
PART 1
Now that we are officially into summer, at least in the northern hemisphere, there is no better time to talk about air conditioning. This week we will cover the A/C system in the 1975 Mercedes 450SL.
To start we will work backwards in our process of restoration and installation. The compressor has already been removed and vacuumed free of refrigerant. The compressor appears to be original GM FridgedAir sticker with R12. Whether or not this unite has been rebuilt I do not know, but having sat unused for 7 or more years, it was recommend that it either be rebuilt or a new remanufactured unit be fitted. The decision was to purchase a remanufactured compressor and the original unit will be kept in storage as a spare.
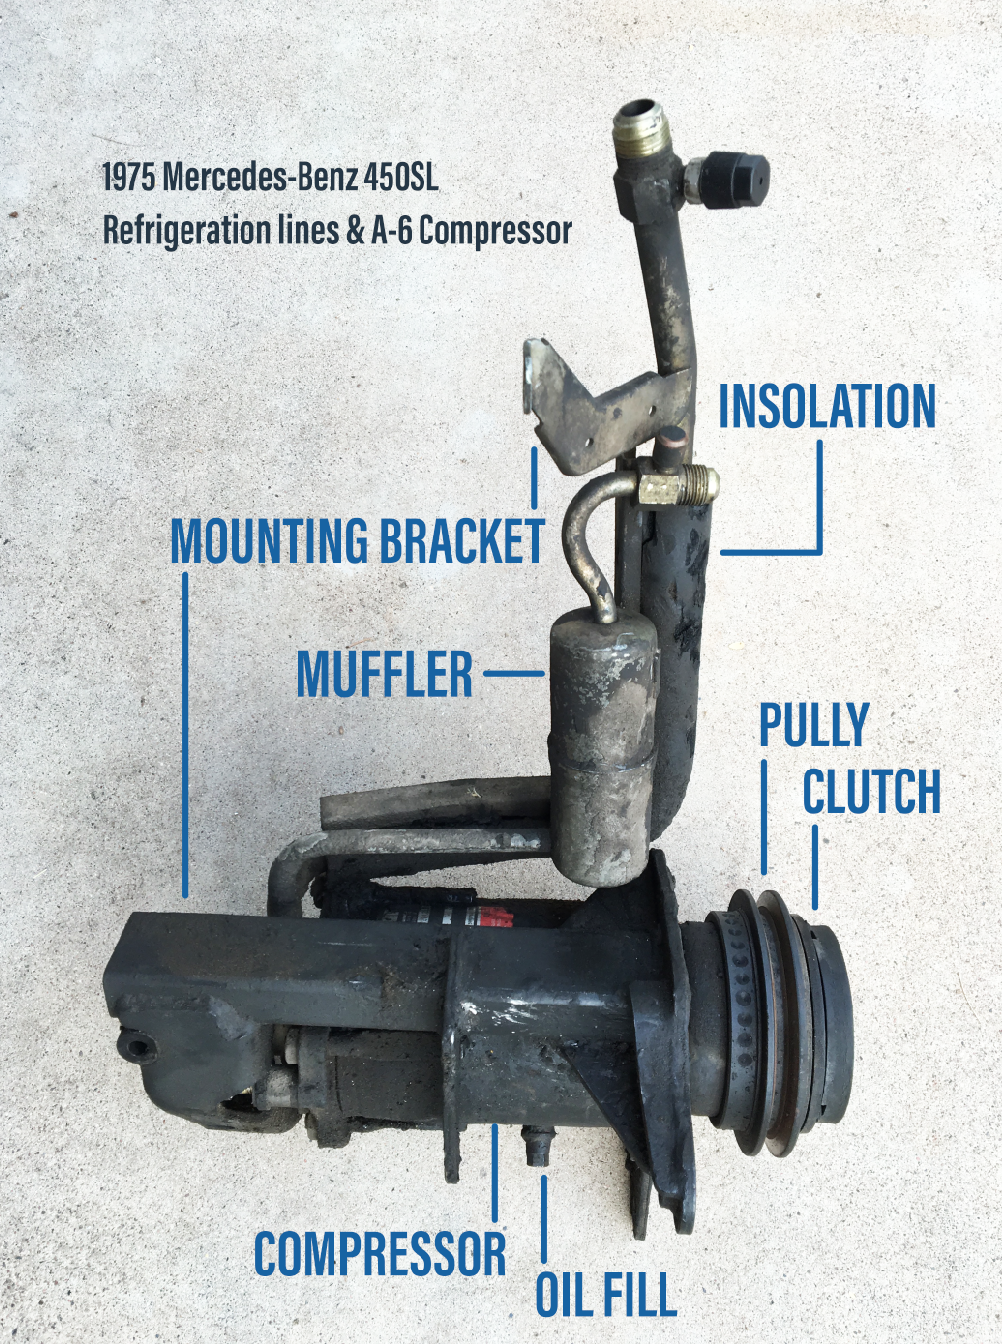
As you can see in the photo, the entire compressor and associated plumbing comes out as a single unit. The compressor its self is bracketed to the engine at the front and side of the engine block, just above the oil sump. More on that however in the subsequent article on reinstallation.
This photo shows the compressor and lines just as it was removed. Plenty of road dirt and fluid from leaks over the years have created a nice thick crust all around.
Mercedes like many European manufactures often used U.S. designed and manufactured A/C systems. For the 1975 450SL, a Fridgedair A-6 compress was fitted as standard equipment on models destined for the U.S. Unlike other parts on our classics that can be a challenge to source, these compressors are a dime-a-dozen. At this point in time, most of these models have been remanufactured by Four Seasons and can be purchased through FCP Euro.

The A-6 compressor is a very robust compressor and should remain in service for decades if properly installed and maintained. Proper installation requires that all fittings be tight with fresh o-rings as required, the compressor has been filled with the correct oil and correct amount and that the entire system is vacuumed down as prescribed for your system prior to recharging. Most remanufactured units come with only 3 oz. of oil, requiring that an additional 7 oz. be added for a total of 10 oz. before operating. Read all of the manufacturers instructions and talk to a qualified automotive A/C tech before you run your system.
On a side note, The A-6 compressor was used from 1962-1985 by General Motors, Ford, Jaguar, Audi, Mercedes, and Volvo.
The image here shows the new compressor (remanufactured) by Four Seasons, bolted up to the cleaned and repainted bracket and “plumbing” ready to reinstall.
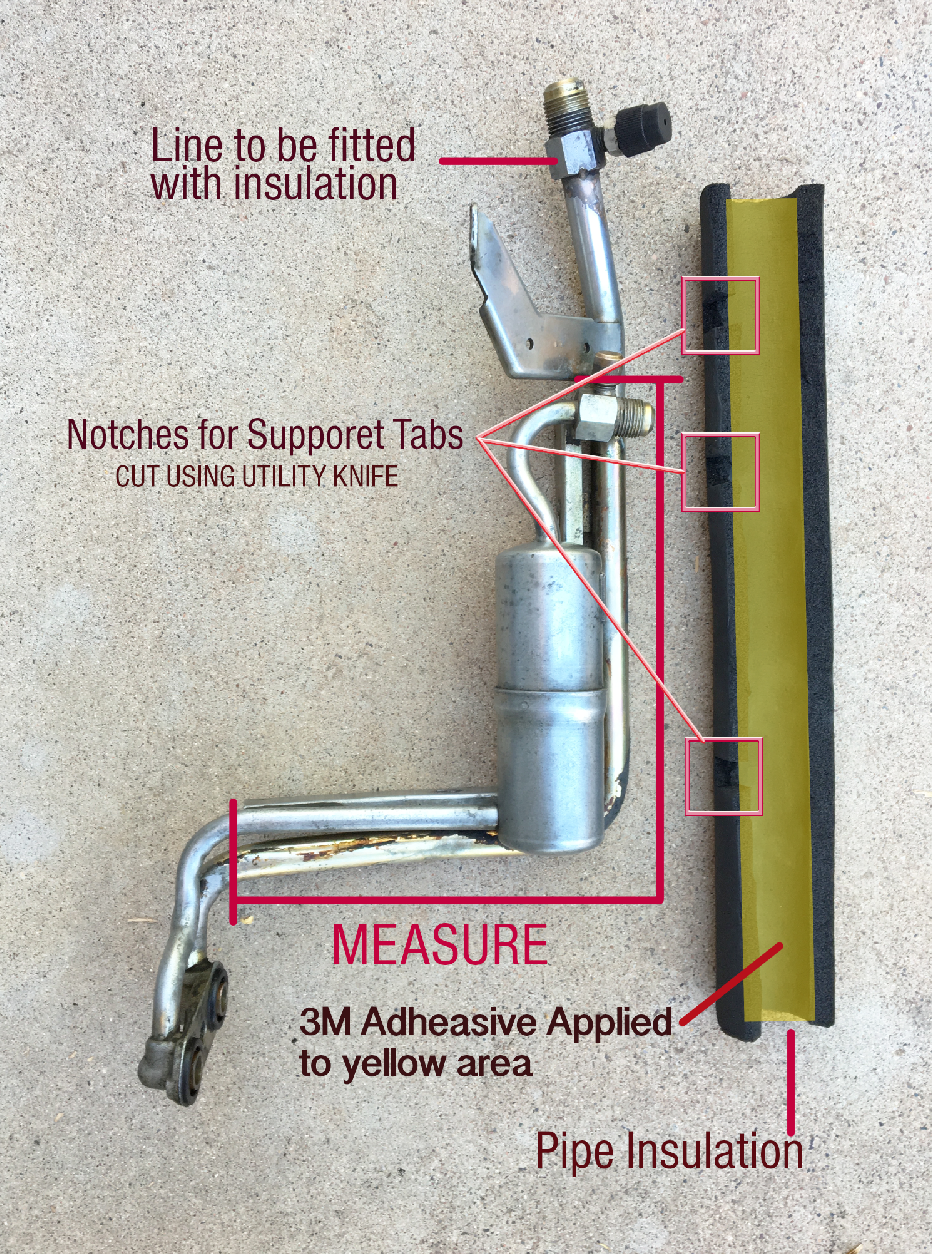
After removing the system however, there were several things that needed to be done before reinstalling. First, the original rubberized insulation had seen the extent of it’s life and needed to be replaced. After attempting to locate the insolation from various sources including Mercedes Classic Center, it was evident the product had to be sourced through a company that produces high heat, chemical resistant commercial pipe insulation. The insulation was sourced from Grainger and while it only comes in a 6 ft. length, at just $13 dollars, it was worth having what appears to be a visually exact reproduction of the OEM part. This Grainger product is good to -80F° to 300°F, which should be more than adequate for where it is located in the engine bay.
The product is preformed and it will be necessary to cut open in order to install. Very useful items to have on hand to make this job much easier are as follows: Brake Cleaner, 3M Yellow Super Trim Adhesive, original formula Simple Green, shop rags, pack of small metal bristle brushes and a utility knife with new blades.
Very fine steel wool is also helpful if you want to add a nice polish to your metal components.

First step in the “restoring” process is to throughly clean the brackets and the A/C lines. If need be, gently scrape the bulk of the dirt off before spraying thoroughly with Simple Green. I use Simple Green because it is safe on Aluminum if it is not allowed to soak too long or dry on the finish. Always Read Instructions! While the parts are still wet with the solution, gently scrub with one of the three brushes. Always use the most gentle to begin. Periodically rinse parts and check for any remaining grease. Spray with Simple Green as needed to remove all grease. Do not allow chemical or water to enter your A/ C lines. If water does enter, blow through with compressed air from a compressor.
Brakleen can help remove any remaining oily film left on the brackets, etc. Immediately wipe down parts well with your shop towel and allow to thoroughly dry. Should you wish to paint or touchup the main bracket with black paint, always properly prep surface with a metal prep before painting with a high quality primer and engine enamel. If painting, allow to dry 72 hours before working with parts to be sure paint has cured and does not scrape off.
If not painting, be sure all parts have been cleaned very well and are free of grease. Prep pipe insolation by cutting open as shown in photo and cut out notches for support brackets using a sharp utility knife. Be sure not to damage inner lining opposite your cut as this will cause a weakening of the insolation. In addition, it will be necessary to cut 3, 1/2 in. by 3/4 in. notches that correspond to the bracket braces. Once pipe insolation is ready, do a “dry” test run then spread open insulation and spray inner portion with 3M Yellow Super Trim Adhesive until evenly coated. DO NOT SPRAY PIPE and watch for overspray mist. Let spray adhesive dry for about 1 minute and proceed to fit insulation to pipe. NOTE: Insulation will want to stick to any surface it touches, so be sure to work it in to the correct position the first time as it is not very forgiving once it is tacked down. Finally, be sure insulation is pressed firmly to pipe all the way around when positioned. Remember to be gentle with the insulation so it is not damaged in the process. Insolation will easily form to the 90° bend in the pipe with gentle manipulation. DO NOT STRETCH the insulation. Wear gloves to avoid irritation to skin from cleaning fluids and adhesive and always work in well ventilated area.
Once the insulation has been adhered, let set overnight before mounting the “plumbing” to the compressor. Be sure to fit two new o-rings between plumbing and compressor and properly tighten. DO NOT LIFT OR CARRY unit by the plumbing. Always carry by holding the compressor.
With the necessary prep, time and patience a like new assembly will be ready to return to the engine bay.