- 11/27/2020
- 4 Min Read
- By: Jose Martinez
How To Replace Windshield Washer Nozzles & Wiper Blades On An Air-Cooled Porsche 911

Chances are your air-cooled Porsche 911 has less-than-optimal windshield washer and wiper functionality simply due to old age. Service both of these and improve your forward visibility in less than an hour.
Improve the view out of your windshield by replacing your windshield washer nozzles and wiper blades with this quick how-to.
Porsche Model Years Applicable:
All Porsche 911 cars from 1974 to 1986. Earlier and later cars use slightly different washer nozzles but follow a very similar installation. This covers the basic washer system and not the heated or intensive wash versions available in later cars. The procedure shown here is on a US-spec 1983 911SC.
Tools Needed To Replace Windshield Washer Nozzles & Wiper Blades On An Air-Cooled Porsche 911:
- Standard length needle-nose pliers
- Mid length needle-nose pliers
- Extended length, angled needle-nose pliers
- Socket set
- 1/4” ratchet
- Screwdriver set
- Flat plastic trim panel removal tool
Parts Needed Replace Windshield Washer Nozzles & Wiper Blades On An Air-Cooled Porsche 911:
- Two windshield washer nozzles
- Two wiper blades
- Service manual for your car’s model year
Right Washer Nozzle Replacement Procedure:
Step 1: Empty Trunk
Empty your trunk and remove the carpet.
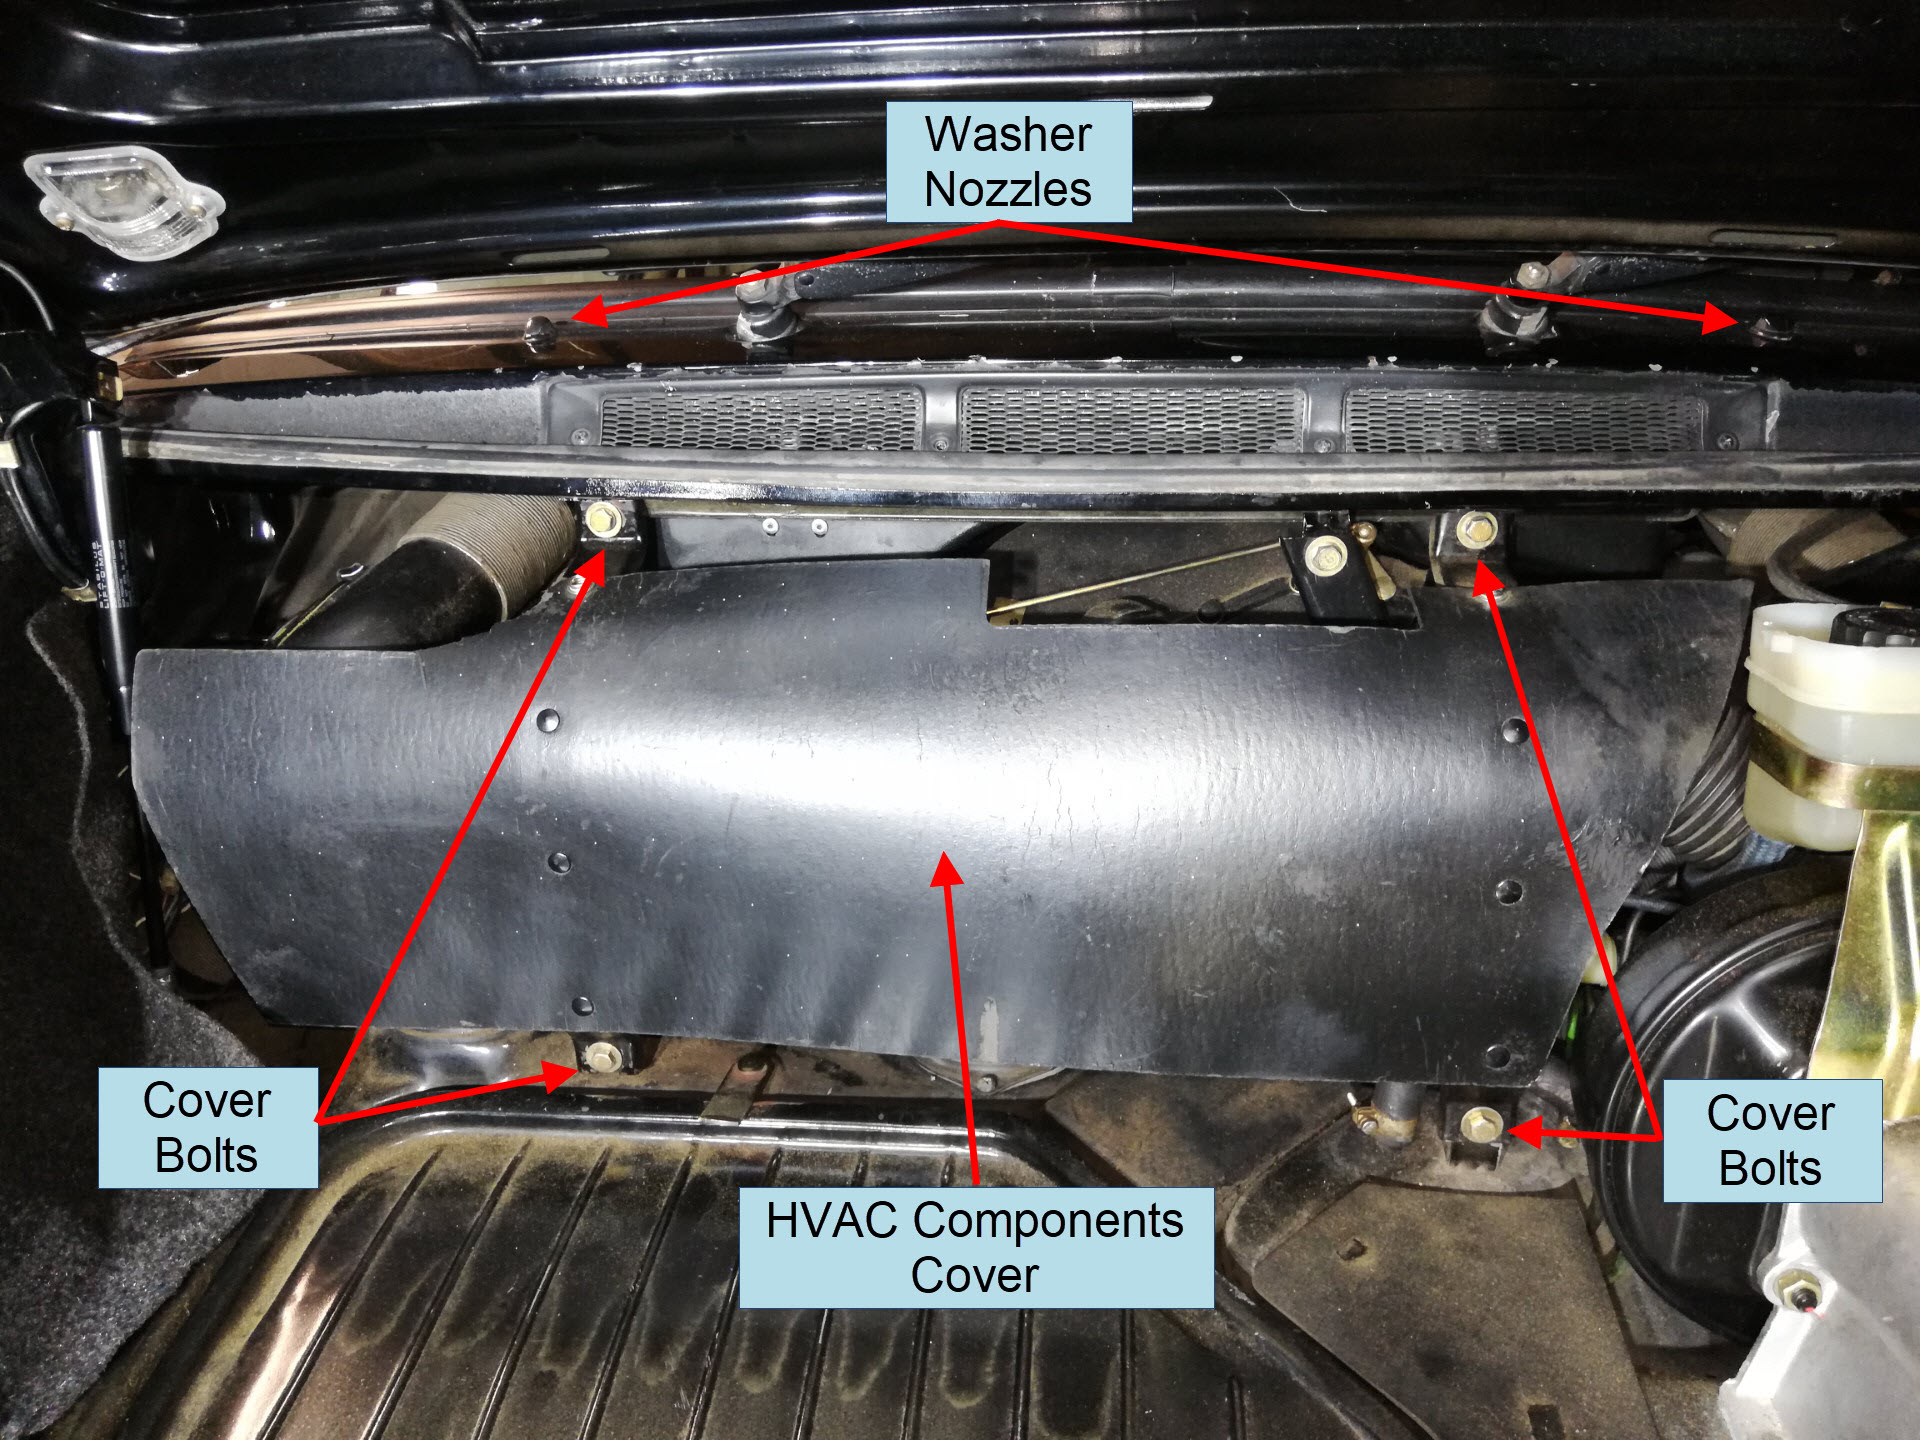
Step 2: Remove HVAC Components Cover
Remove the cover at the base of the trunk covering all the heating and AC components. There are 4 bolts holding it in place.
Step 3: Remove Old Nozzle
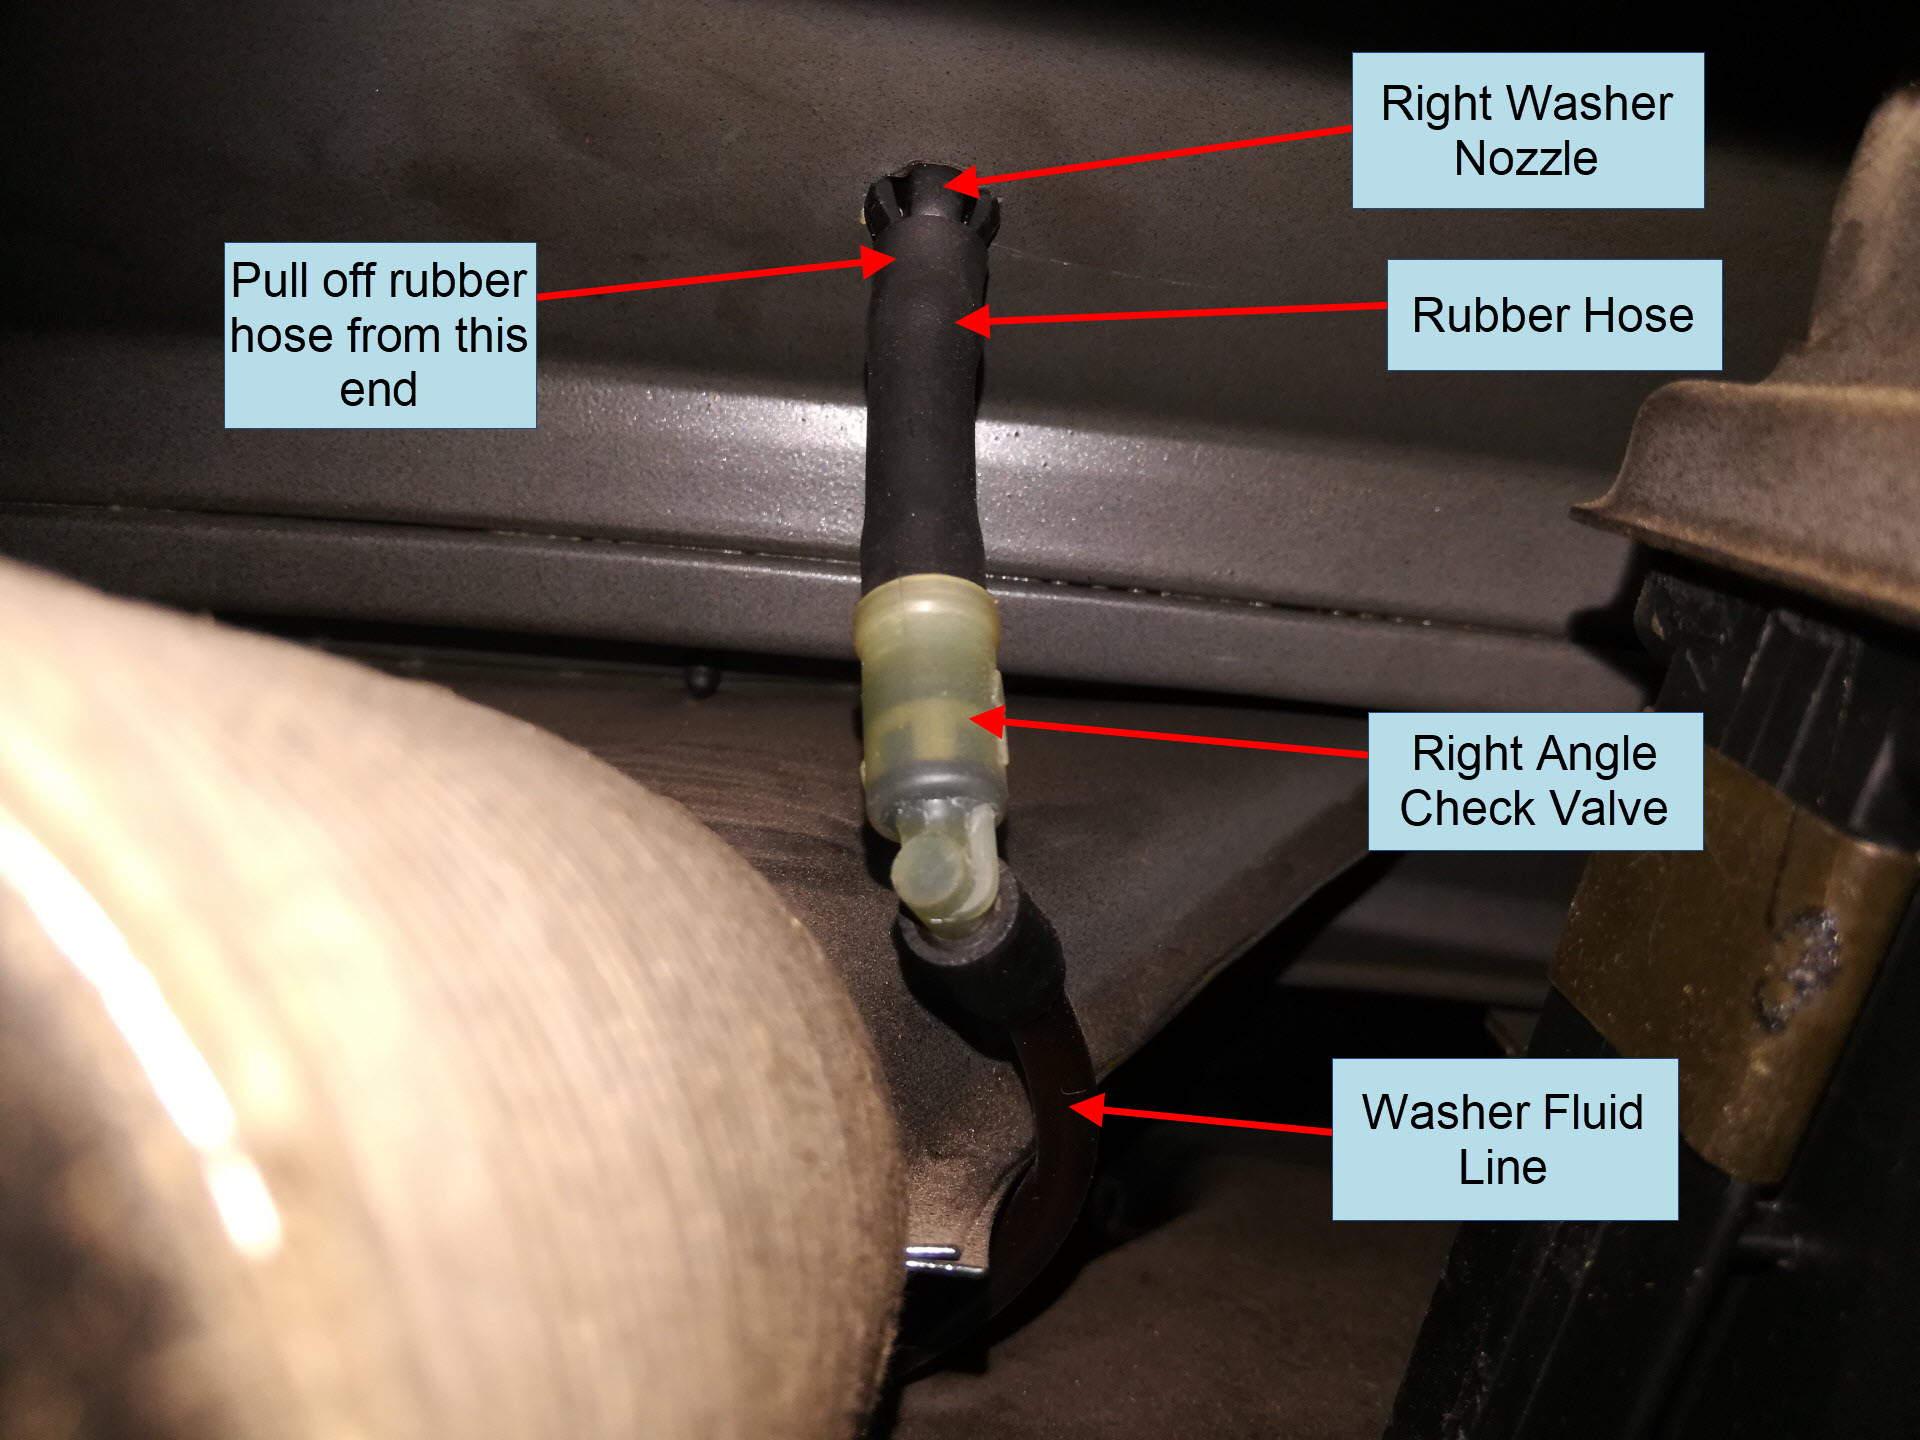
Start with the right (passenger) side of the car and peek under the cowl to spot the windshield washer rubber hose connecting underneath the nozzle. It is quite far back under the edge of the cowl. It is a short rubber tube connected to a right angle check valve, and a long washer fluid line that disappears behind a bunch of HVAC components.
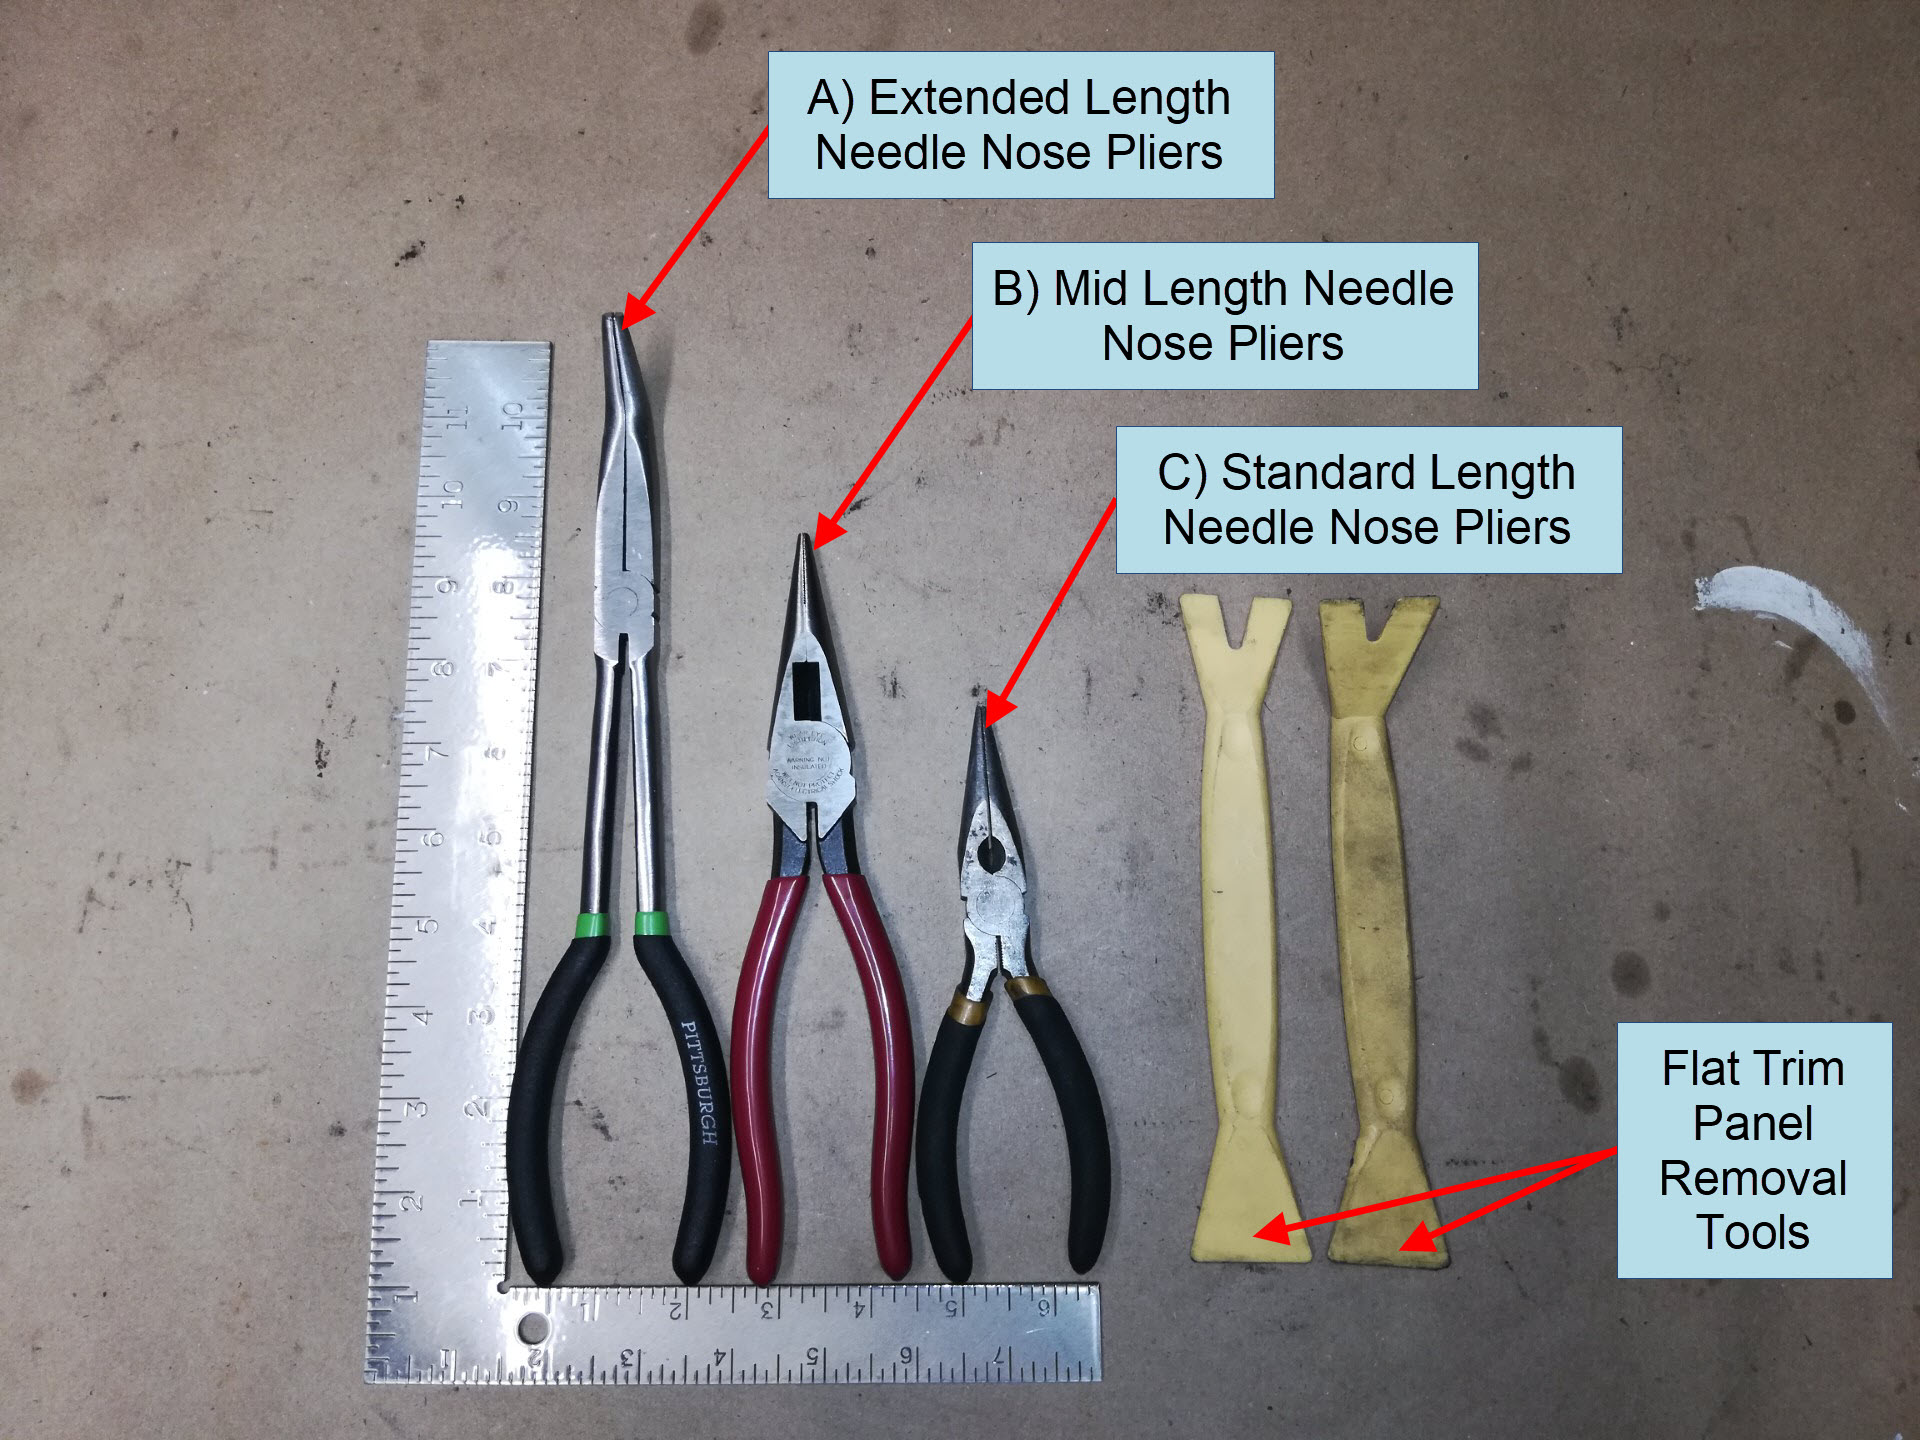
Slip your hand in there, over all the HVAC components and pull off the rubber washer hose at the base of the nozzle. Now you will need to squeeze the two locking tabs holding the washer nozzle in place, however tool access is very limited. If you try to use standard length needle nose pliers (labeled “C” in the image below), you wont be able to reach. You will need to remove any HVAC hoses and components in the way to get in there. This is not recommended as it will make the process needlessly long and complicated plus you risk damaging old brittle hoses and seals. Instead look for some extended length angled needle nose pliers such as these below (labeled “A”).
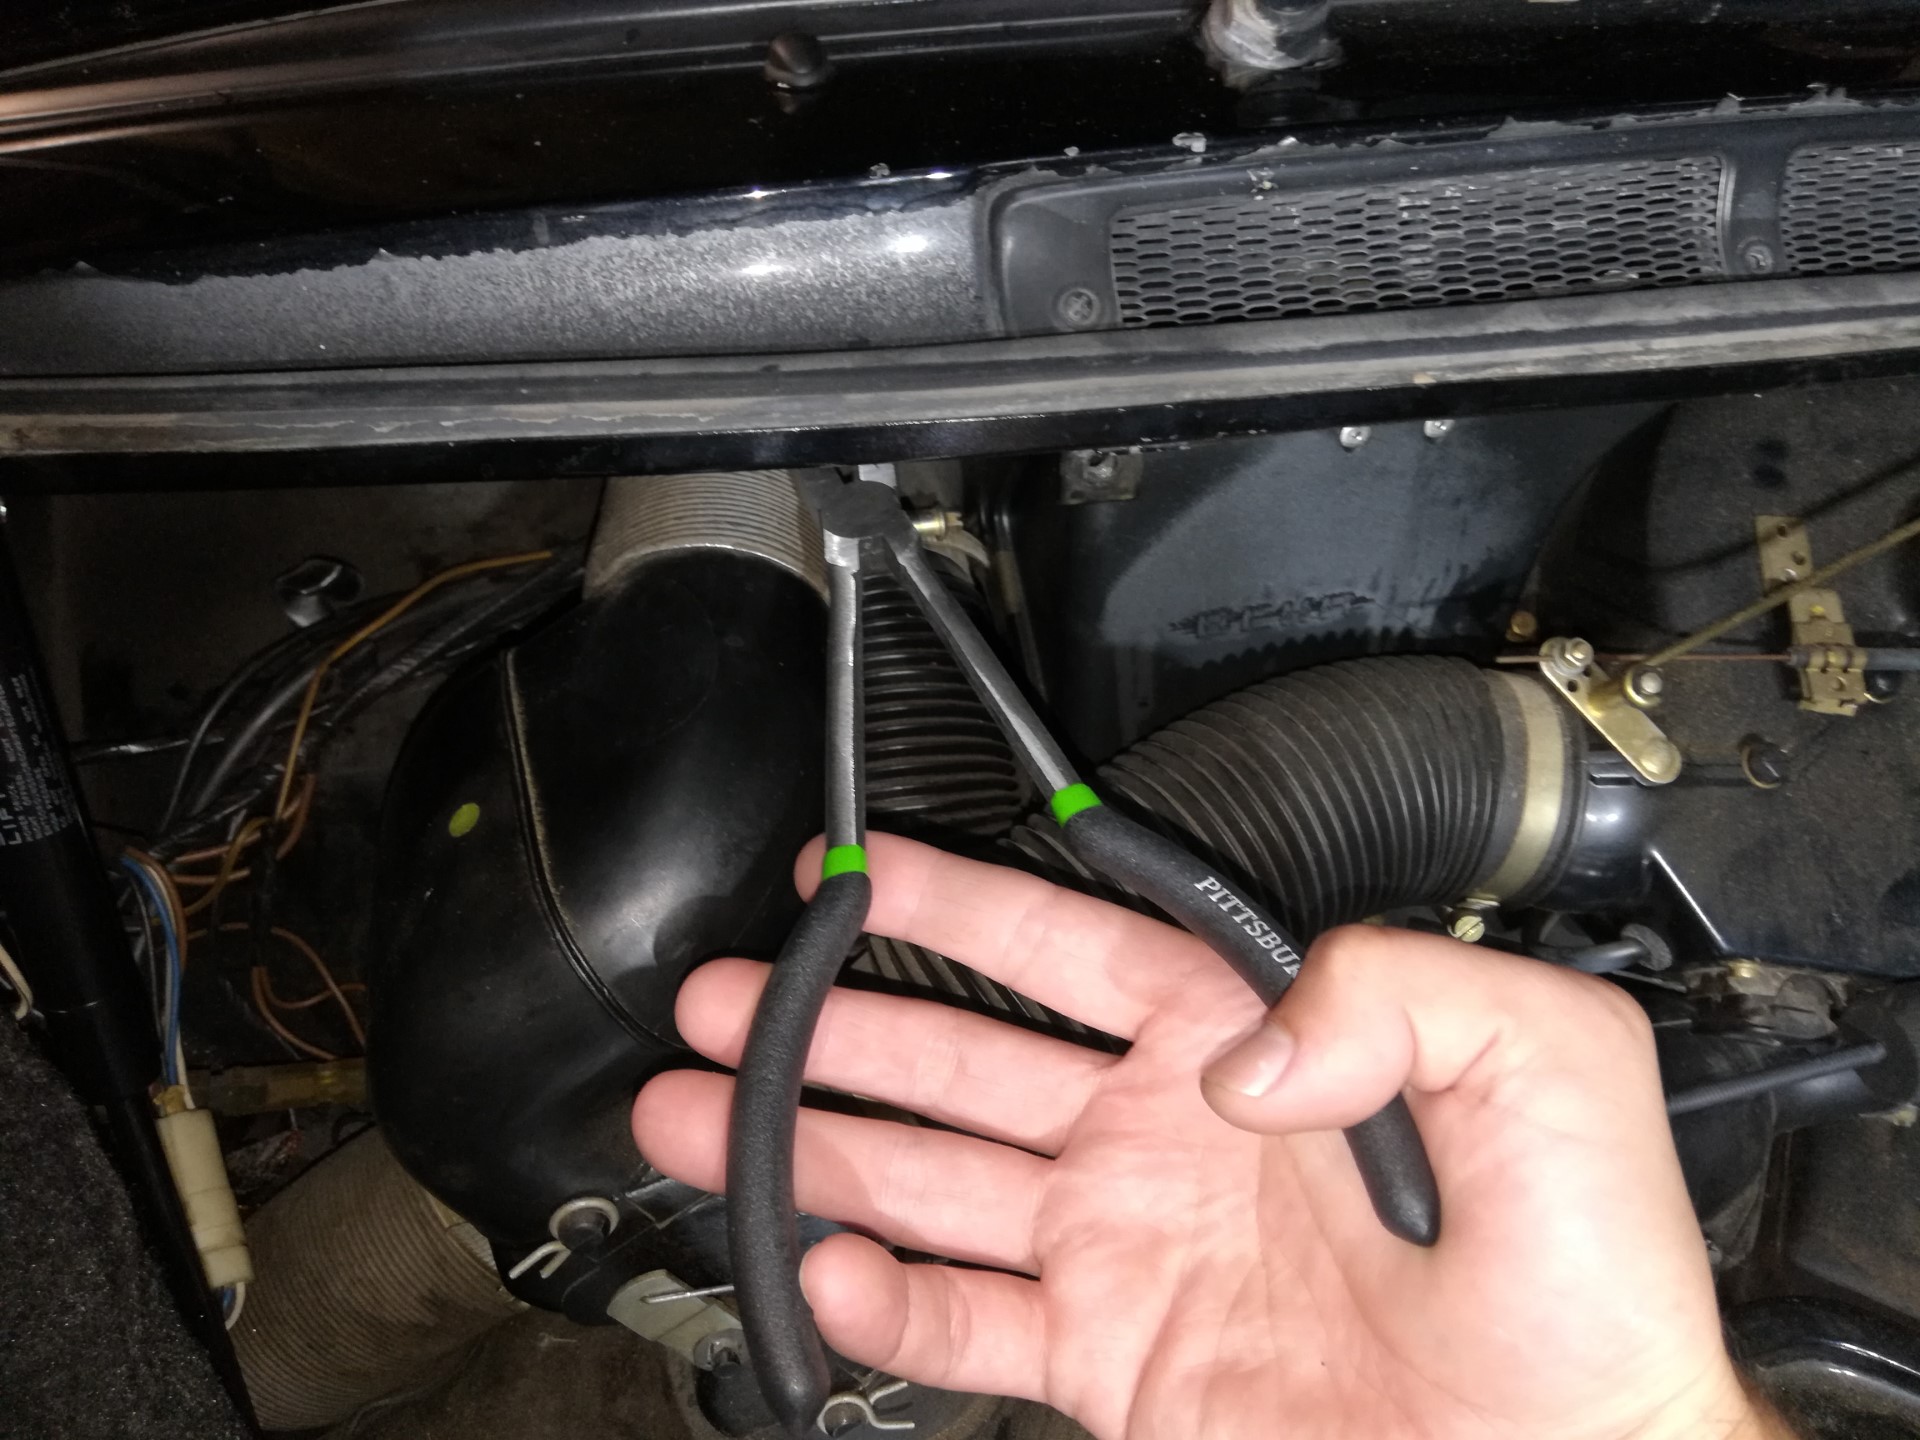
With the extended length angled pliers, you can hold them in one hand, hold a flashlight in the other hand, and carefully get under the nozzle to squeeze the tabs together and release the nozzle.
If the nozzle does not immediately pop up, grab the flat end of a plastic trim removal tool and use it to carefully pry up between the nozzle gasket and the sheet metal.
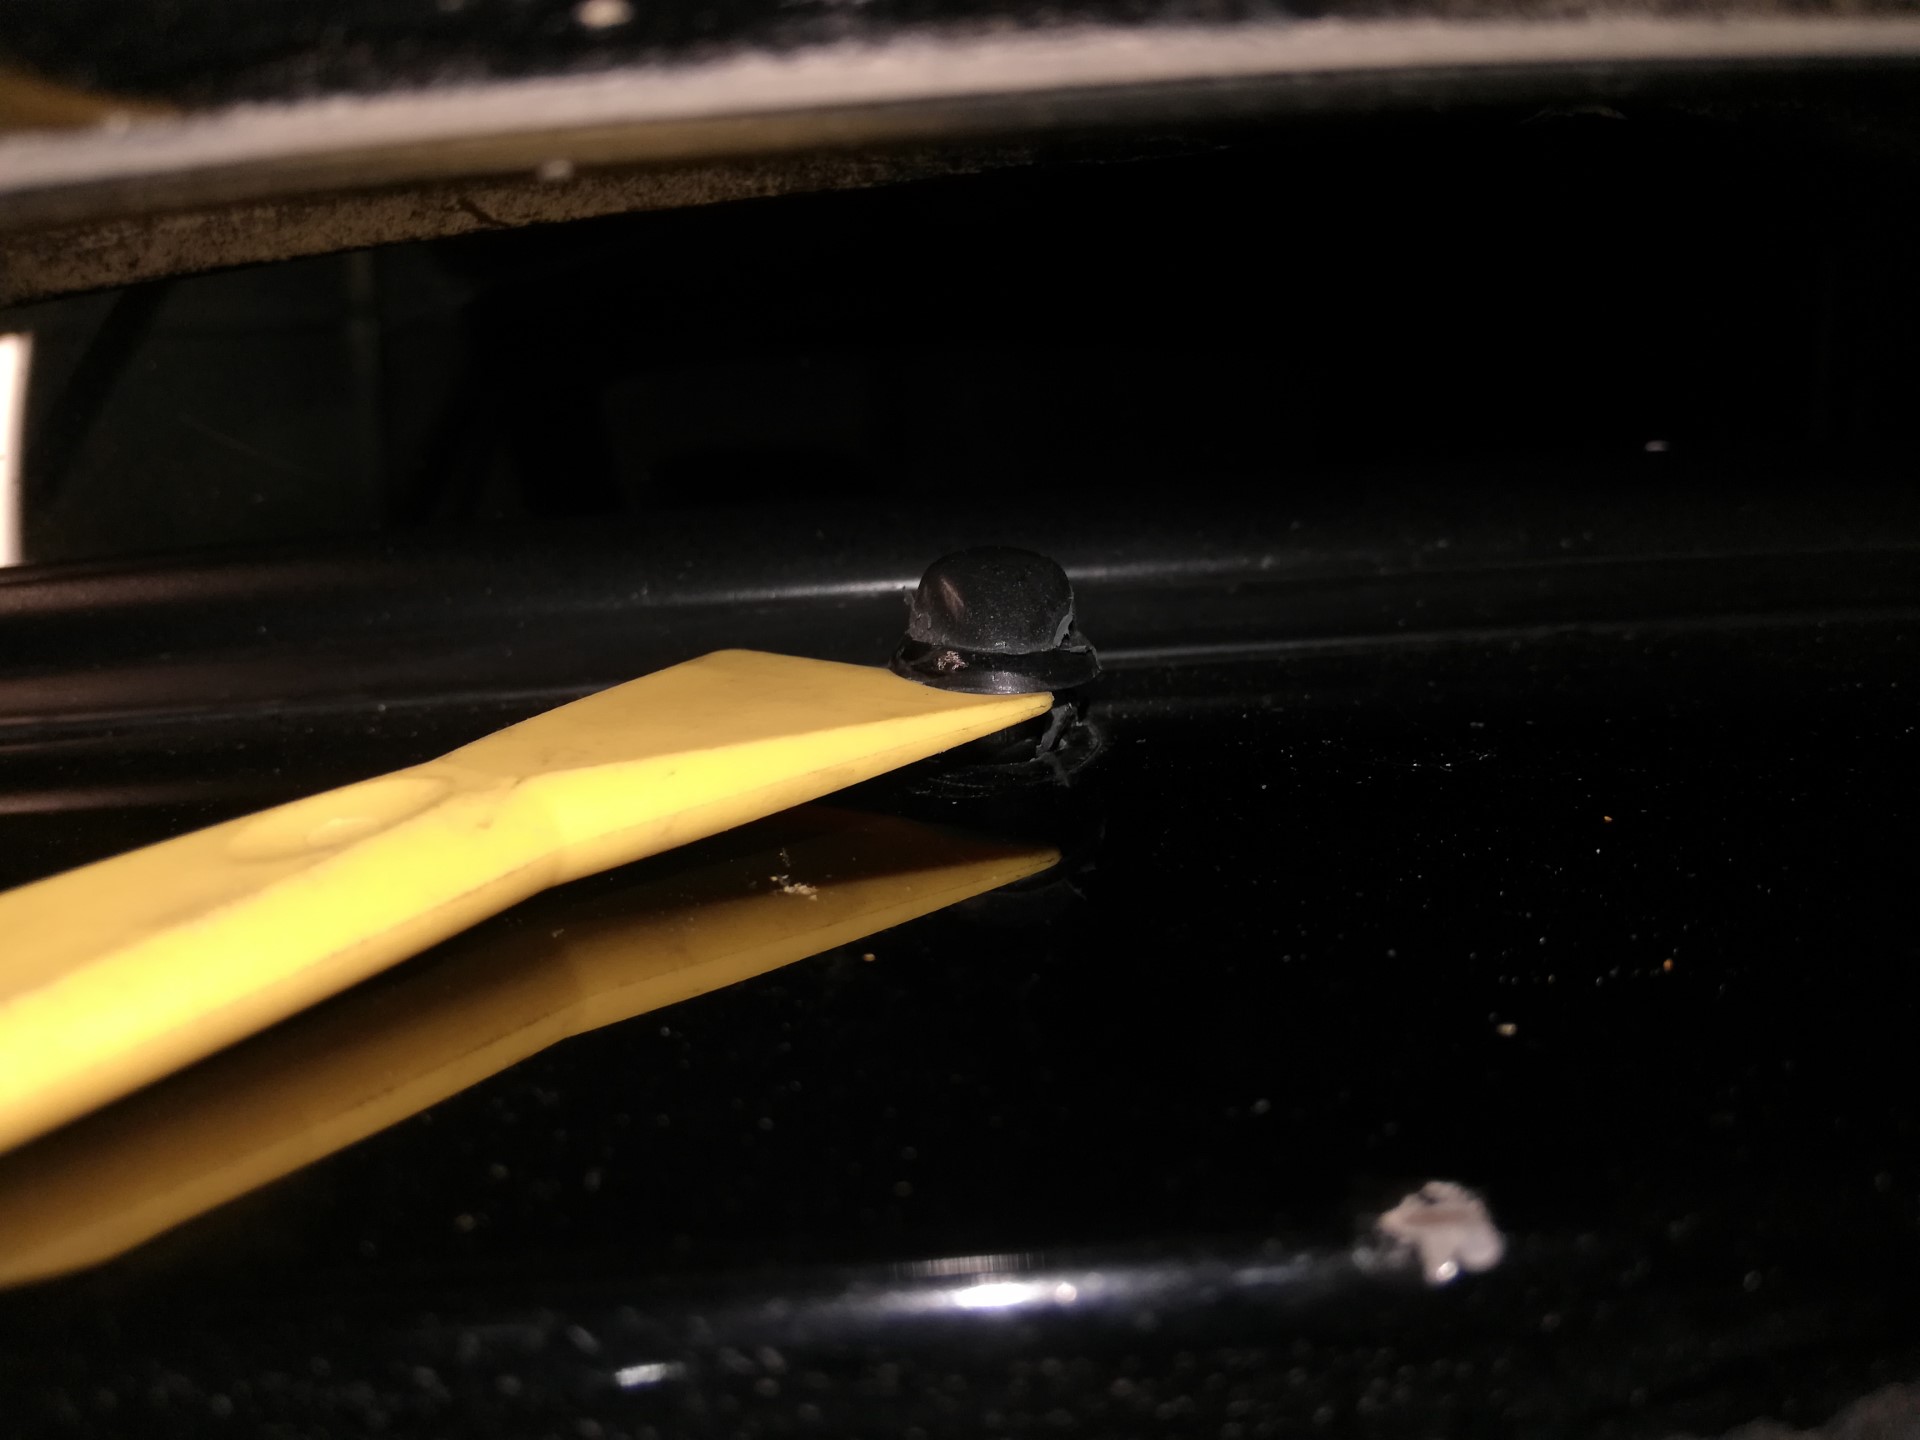
After pulling the nozzle up and exposing the ends of the locking tabs, you should be able to get it out with your fingers.
Step 4: Install New Nozzle
Pop the new one back in, in the same orientation with the nozzle openings facing the windshield.

After seating the new nozzle onto the cowl, press up on the nozzle from below to make sure it is locked in place, then reconnect the rubber washer hose over the nozzle barbed opening.
Left Washer Nozzle Replacement Procedure:
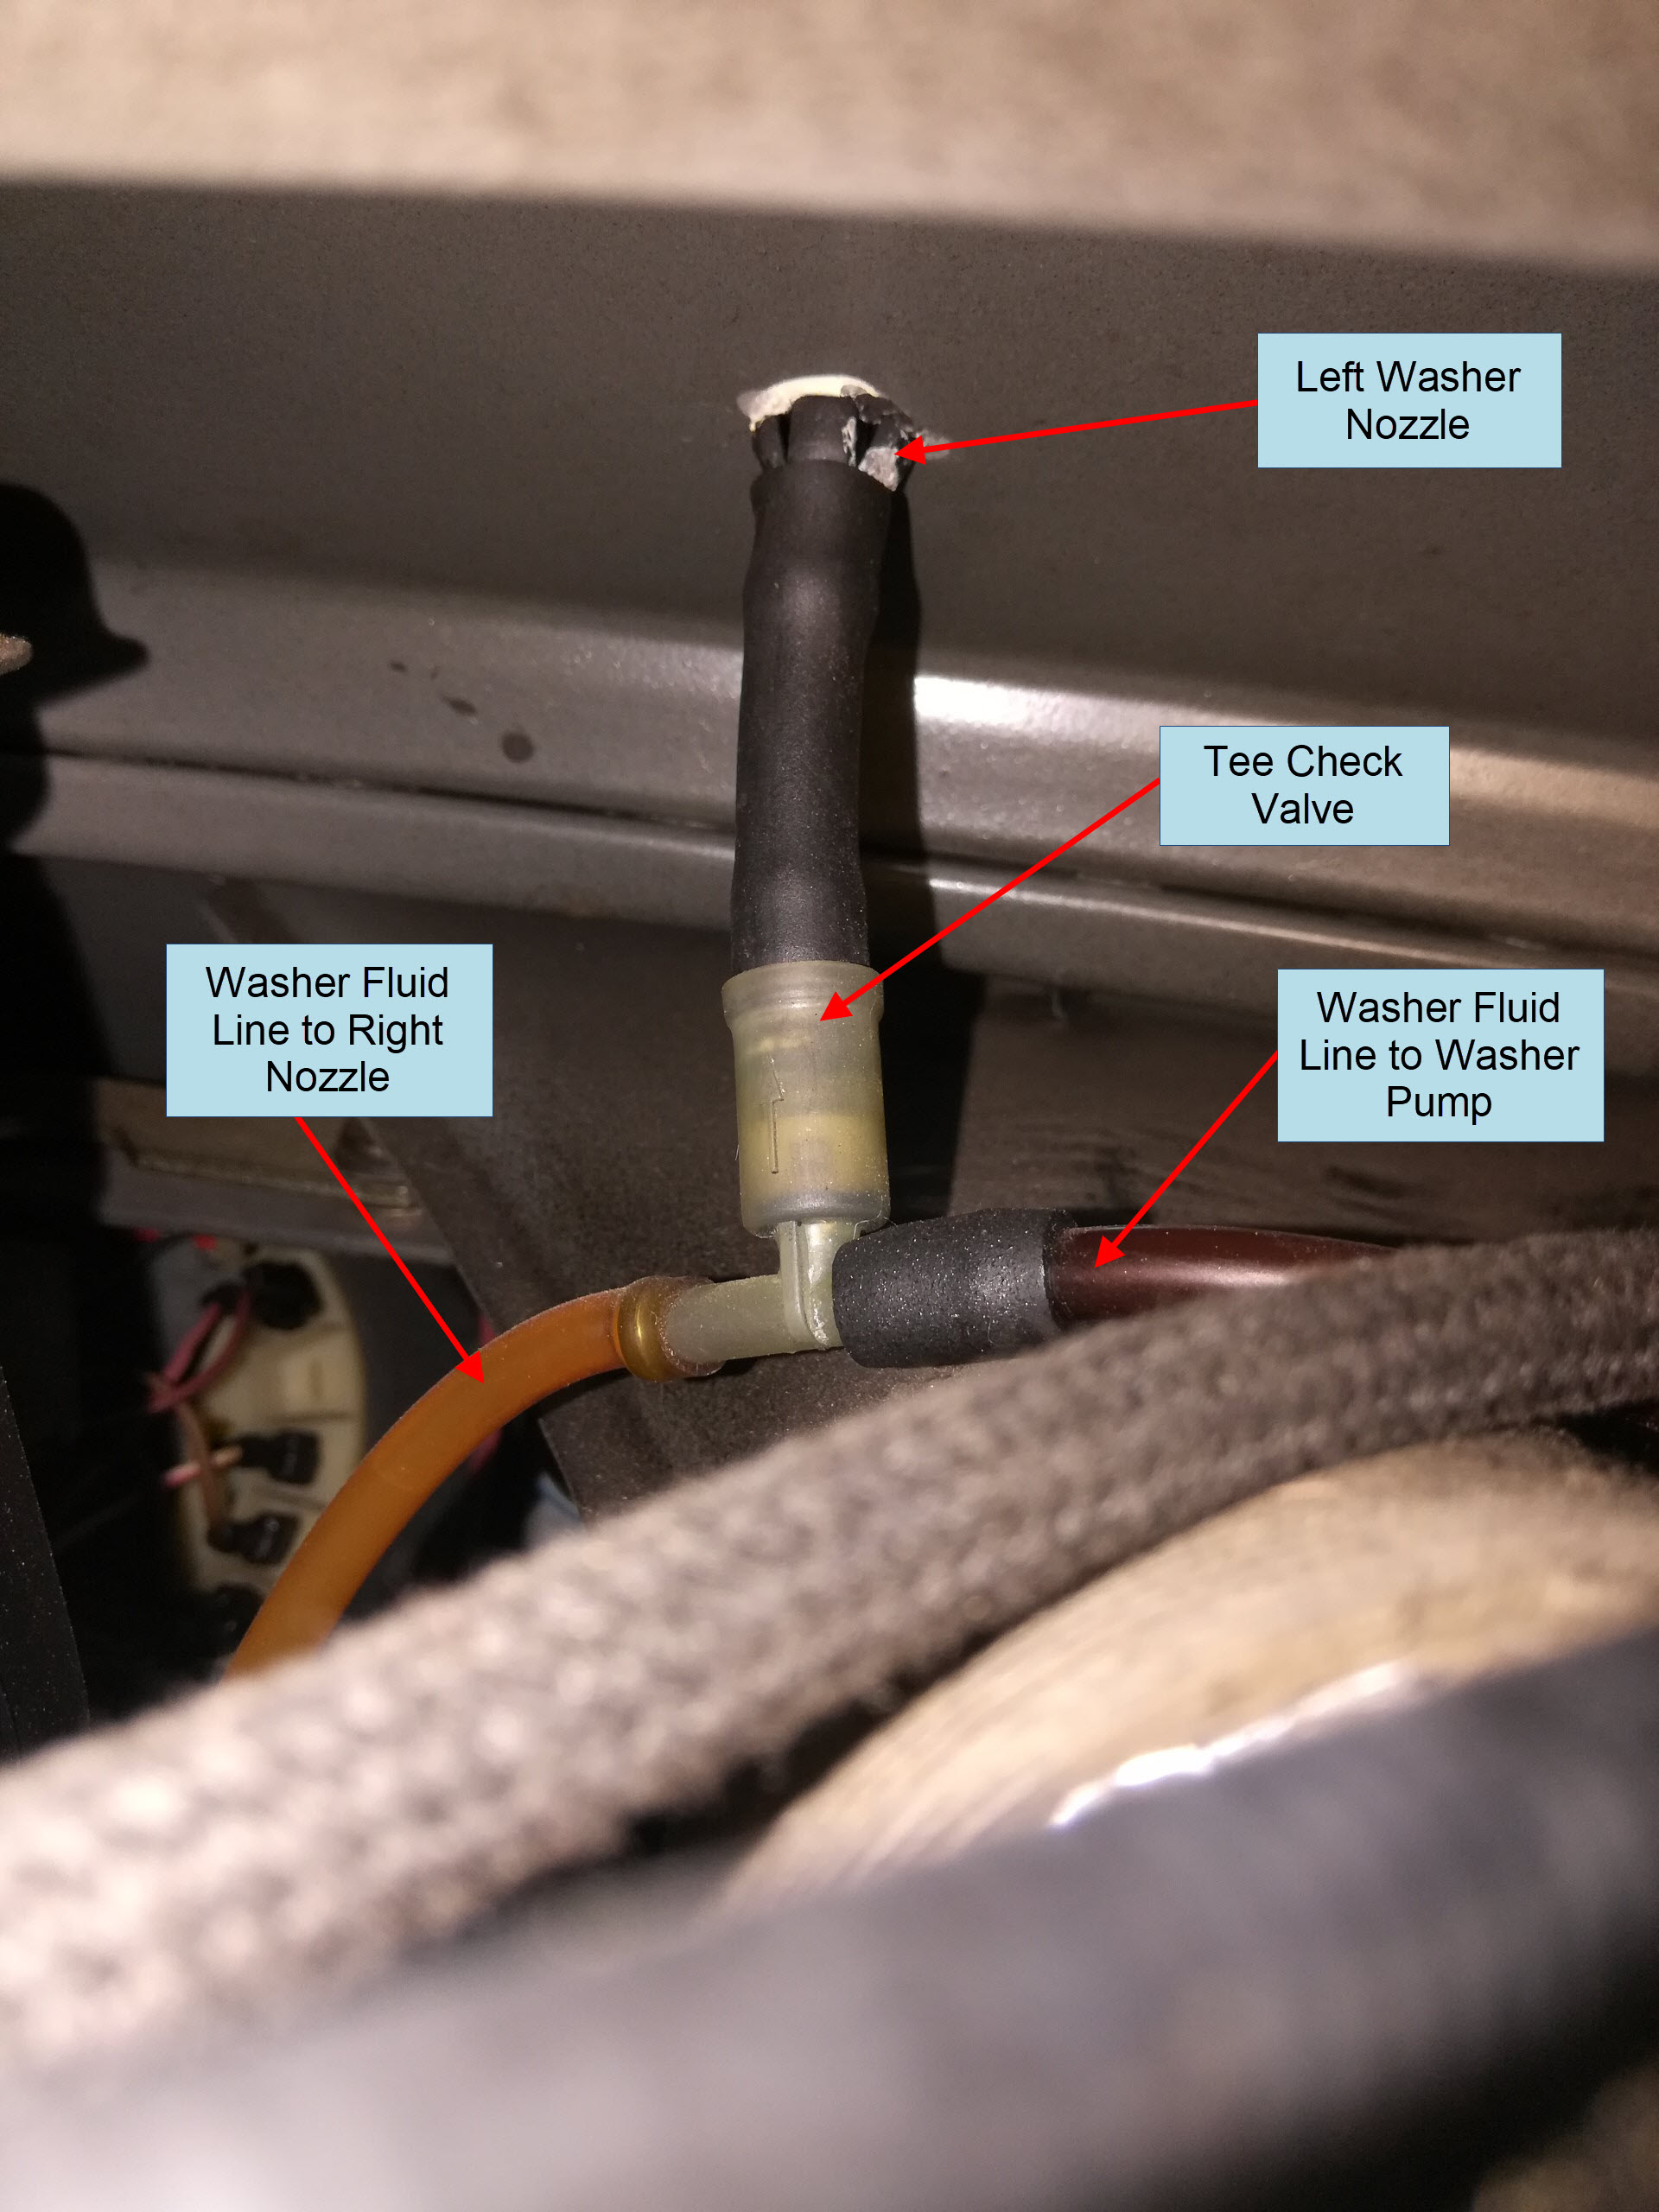
The left side is a bit more tricky due to some components that are in the way. Peek under the cowl and you will see the short rubber hose under the nozzle, connected to a check valve with a T-fitting and two long hoses, one going towards the right side nozzle and one going towards the washer fluid pump.
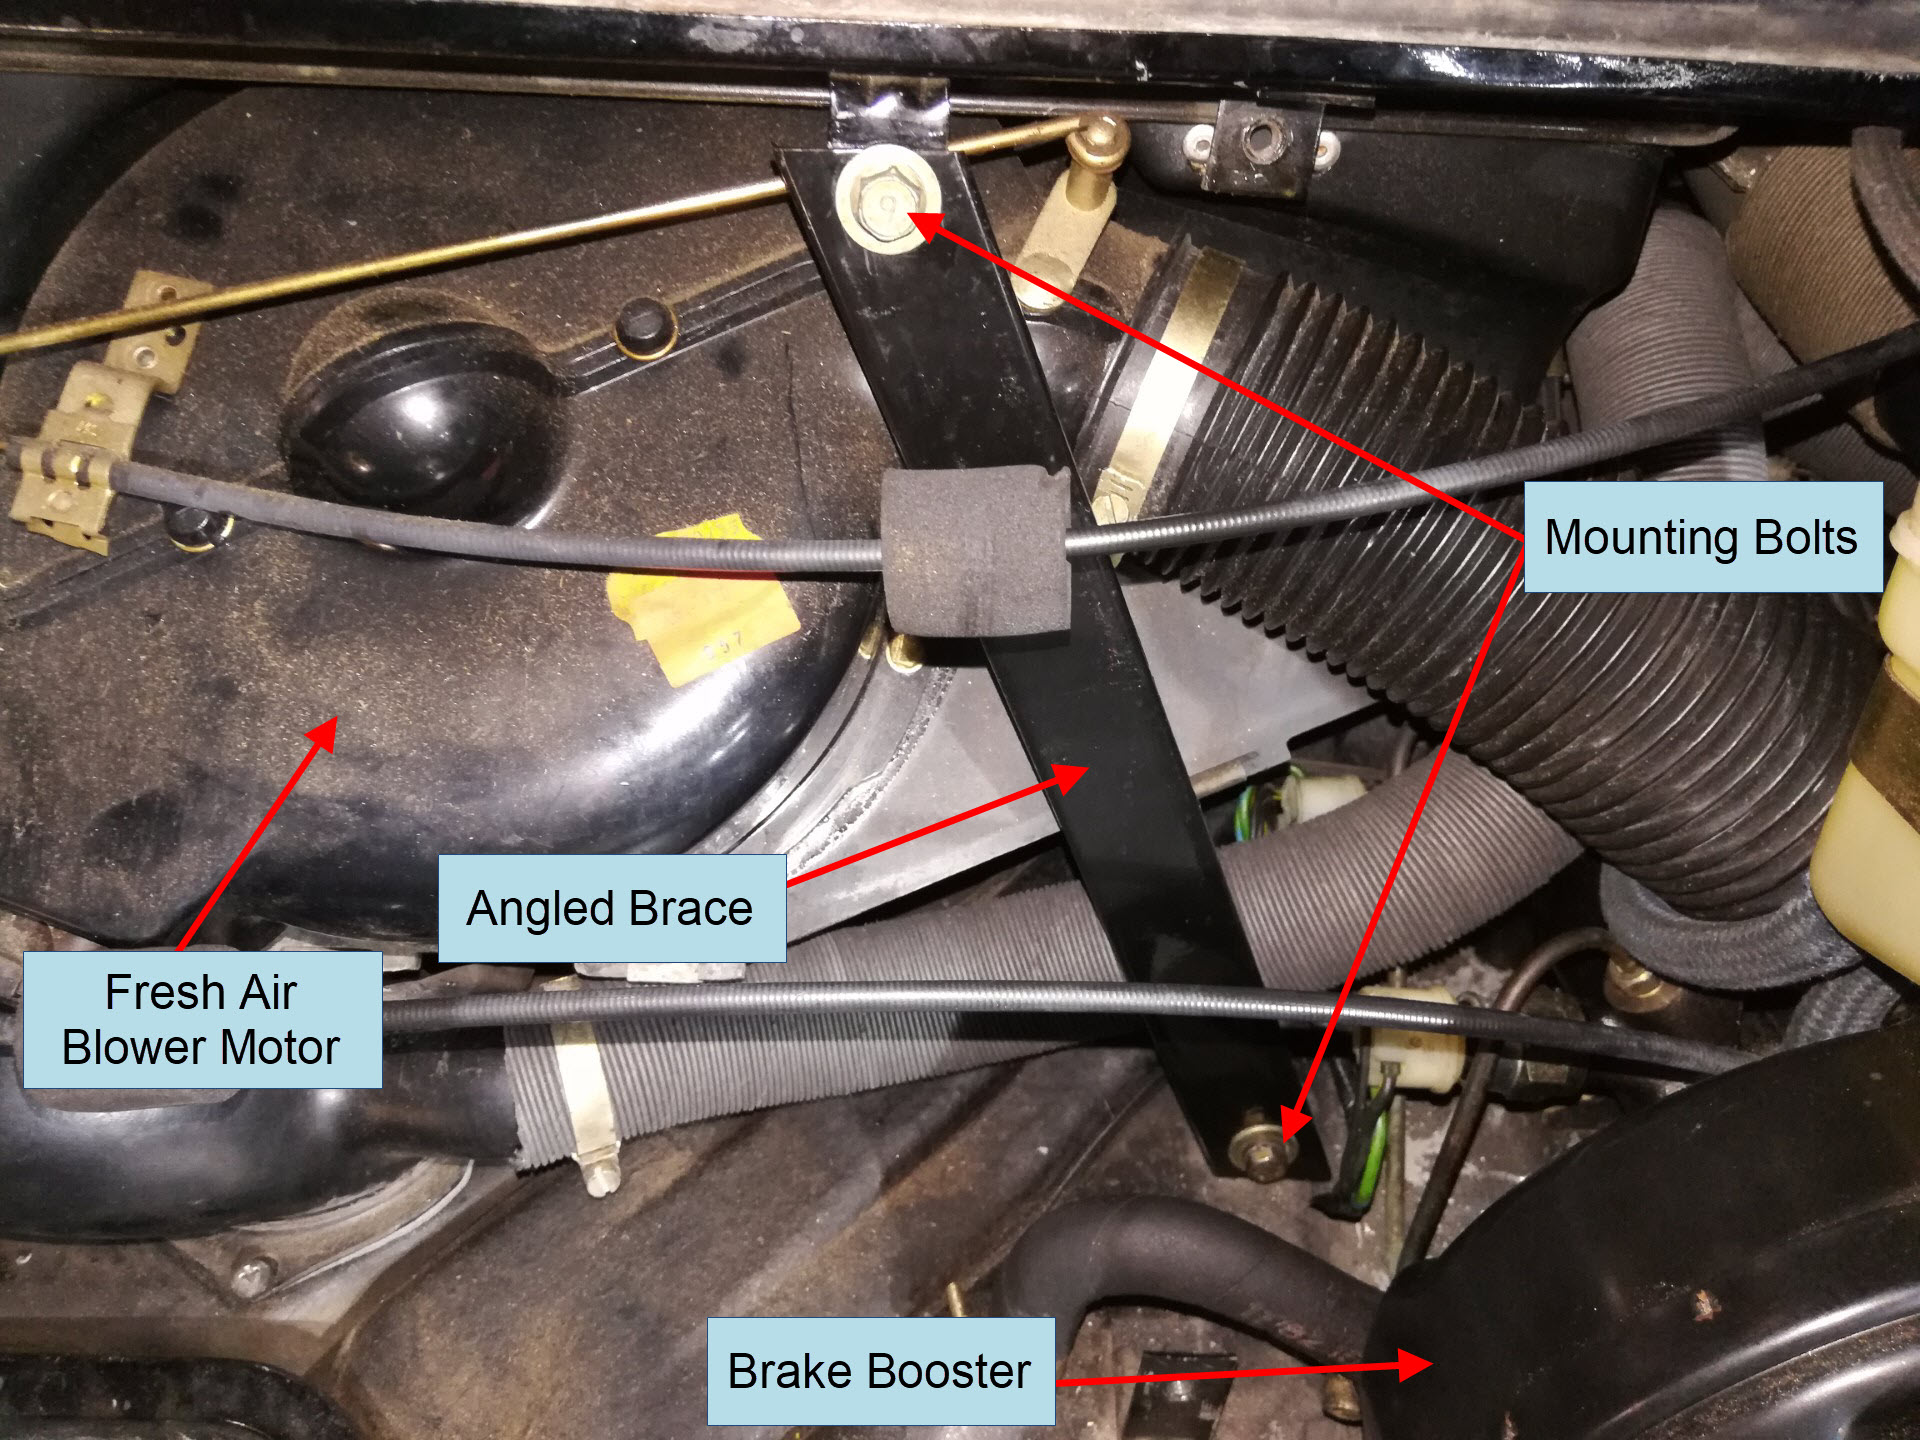
Step 5: Remove Angled Brace
To gain access to this nozzle, remove this angled brace by removing the bolt at each end.
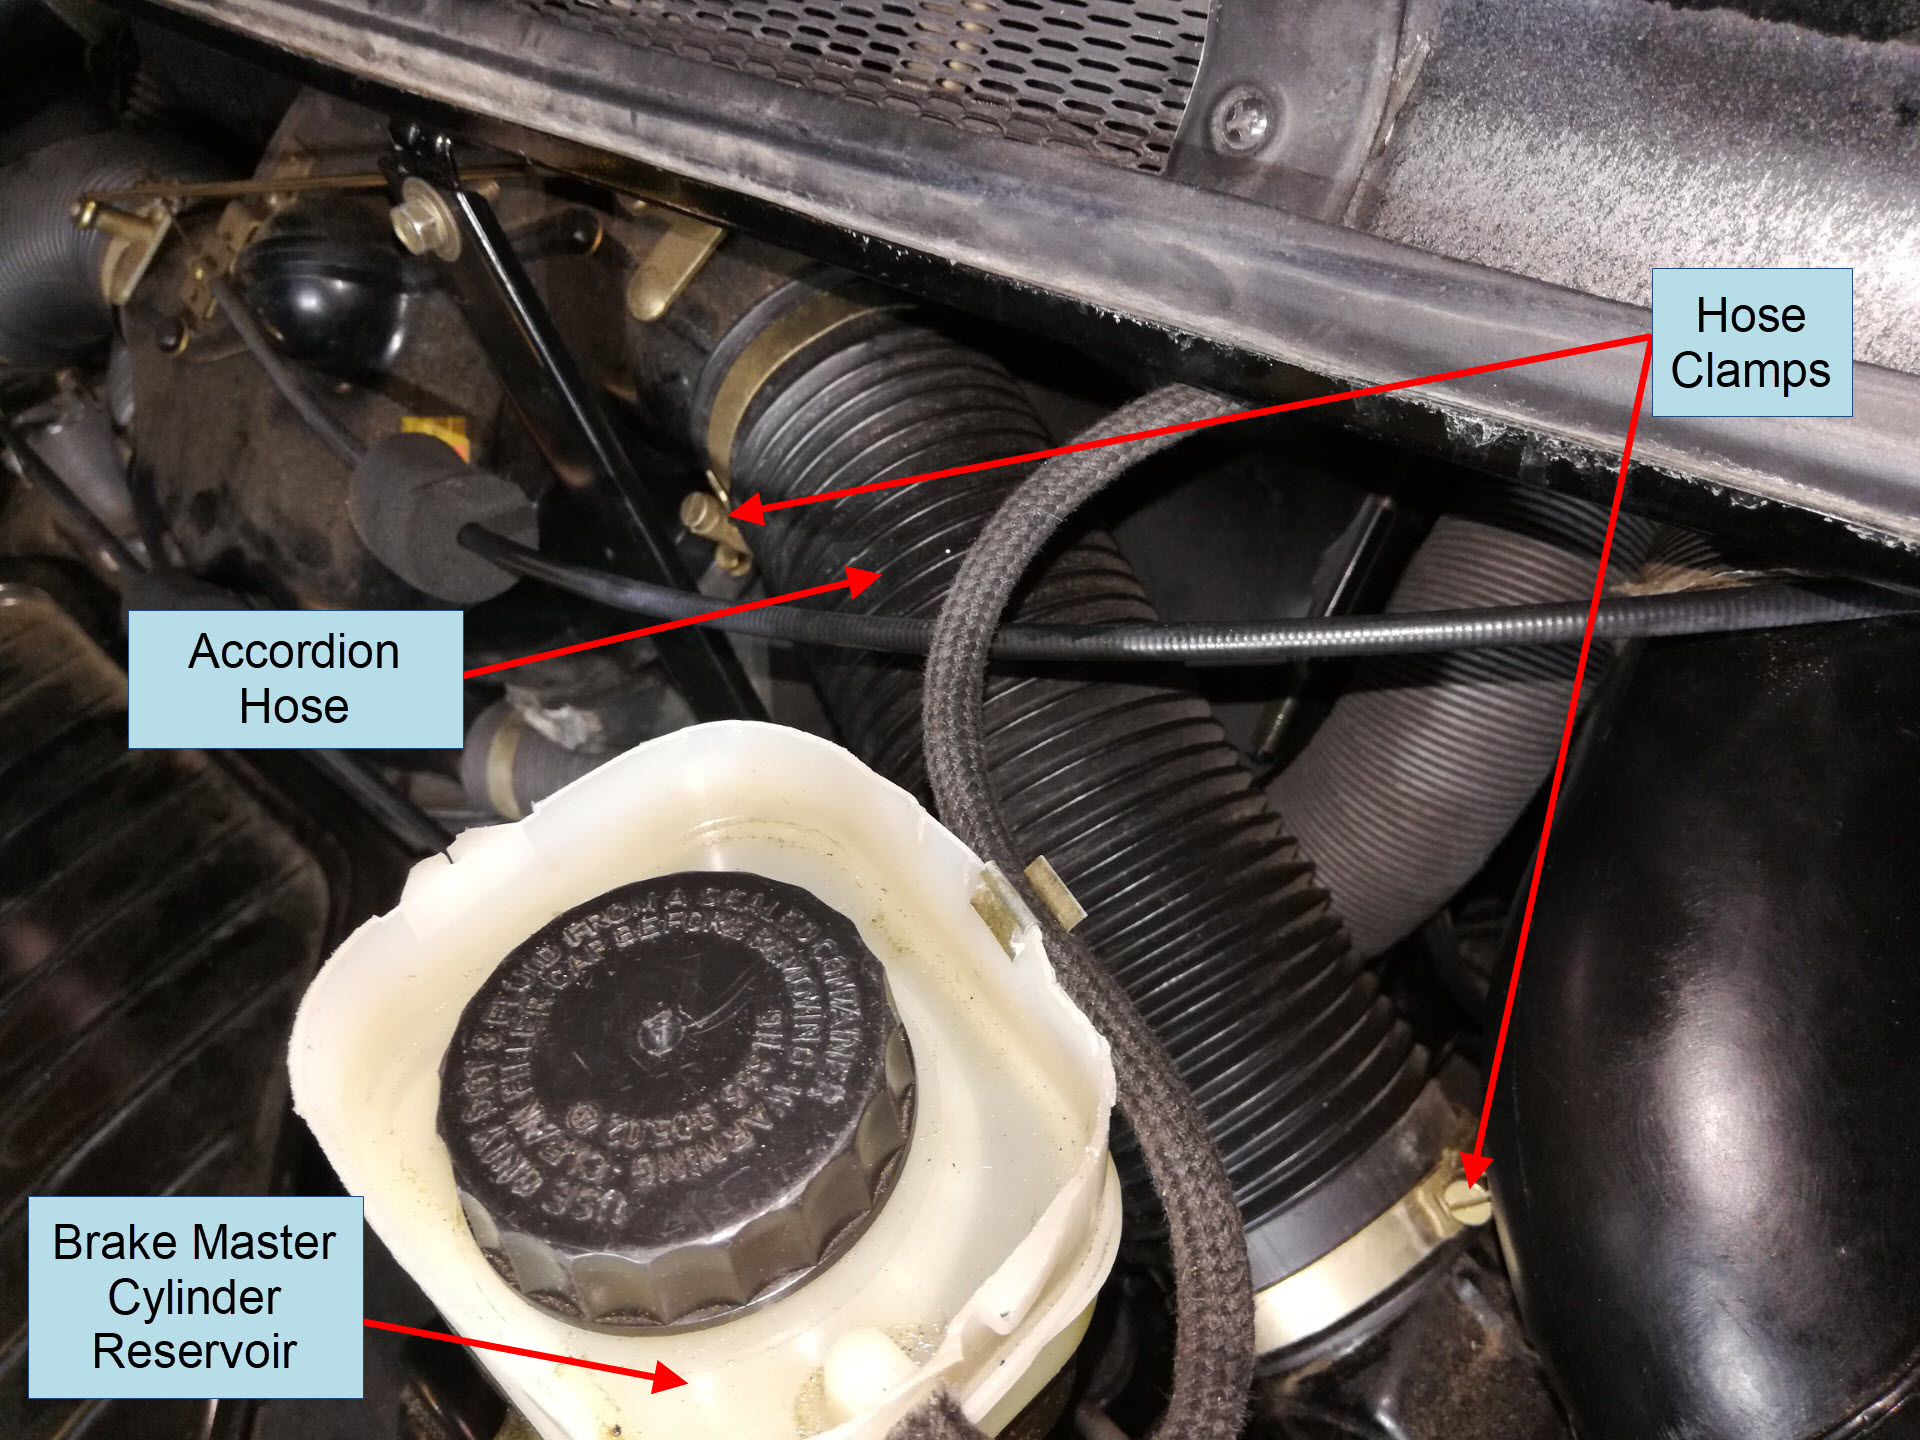
Step 6: Remove Ventilation Hose
Next remove the plastic accordion hose behind it by loosening the hose clamp at each end and carefully pulling it out.
Step 7: Remove Old Nozzle
You will need longer length needle nose pliers here as well, however now the ones you used on the right side nozzle are too long as they end up hitting the hoses of the brake master cylinder. If you have a 1974-1976 911 and don’t have a boosted master cylinder in the trunk you could probably get away with the same extended reach angled needle nose pliers. For 1977-1989 cars you will need an intermediate length of needle nose pliers such as the ones labeled “B” in Step 3 above.
Use the same process as in Step 3 above to remove the old nozzle using the needle nose pliers from below and a flat trim tool from above.
Step 8: Install New Nozzle
Pop the new nozzle back in and reconnect it the same way as in Step 4 above.
Step 9: Test Run Nozzles
Before buttoning everything up, turn on the ignition without starting the car. Pull on the wiper stalk and wait a few seconds for the nozzles to prime and spray washer fluid onto the windshield. Your wipers should also come on at the same time. If everything works ok, peek under each washer nozzle and make sure there are no fluid leaks anywhere.
Step 10: Reinstall Removed Components
Reinstall the accordion hose, angled brace, and HVAC cover in that order. Reinstall the carpet and trunk contents. The washer nozzle installation is now complete.
Windshield Wiper Replacement Procedure:
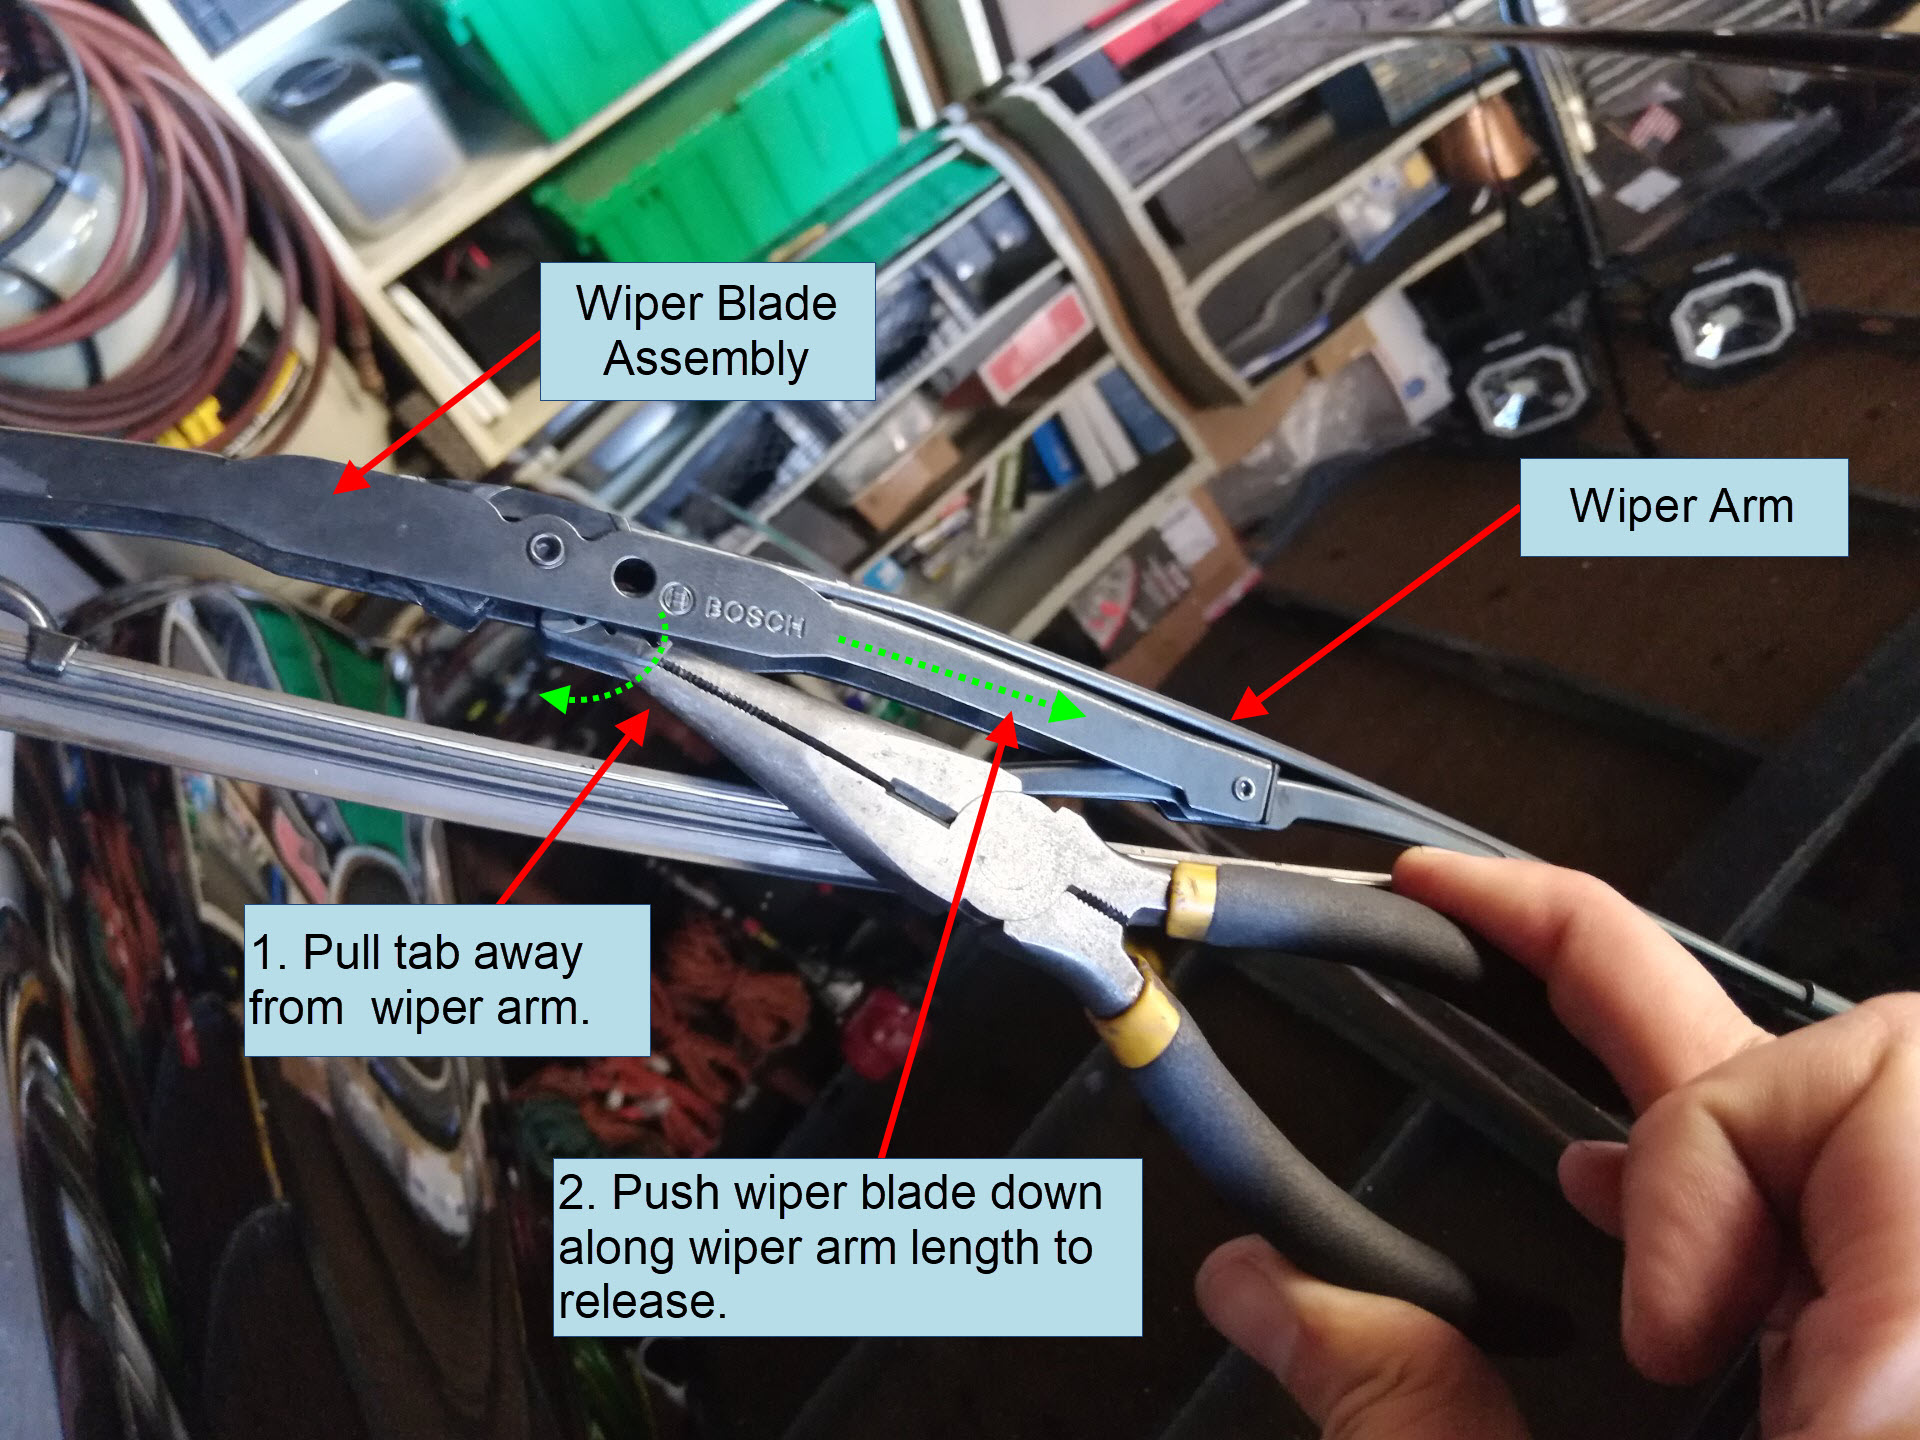
Replacing the wipers is very similar to other European cars using Bosch units, such as VWs and Volvos of the same era. On the US spec 911SC, stand to the left of the windshield and pull one wiper arm up. With any needle nose pliers, grab the tab furthest away from the wiper arm and gently pull away from the arm. Then push down on the wiper blade assembly towards the base of the wiper arm and it should slide off the arm.
To install a new wiper assembly, insert it onto the hook end of the wiper arm and pull away from the wiper arm base until it locks into place. Repeat the same process on the second wiper arm.
Your wiper assembly installation is now complete, your new wipers and washer nozzles will reward you with greater visibility while driving in any weather conditions.
If you have any questions about this DIY leave them in the comments below. And if you'd like to follow along with more of my air-cooled Porsche 911 restoration, you can find all of the articles, here.


