Are you getting a constant slow drip of coolant near the passenger firewall on a Saab 9-3? Is your water pump ~100k miles old? If the answer is yes to both then there’s a good chance your water pump needs to be replaced. Luckily FCP Euro has you covered with all the Saab parts you need.
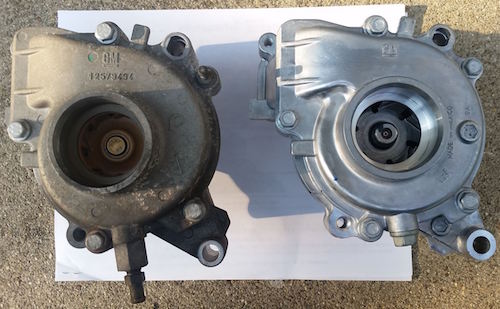
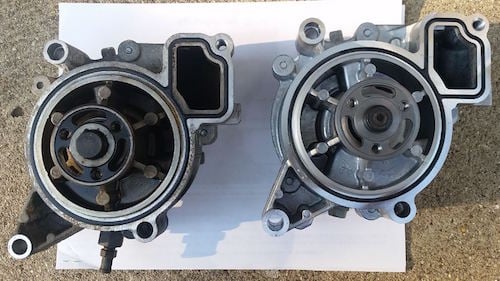
Here’s a pic of the old pump on the left and the new one on the right:
Replacing the water pump is NOT an easy task on this car. It was a challenge of patience and skill. Luckily I had another vehicle to drive as it took me about 15hrs total over the course of about 2 weeks. There were several start+stops to get parts I either didn’t realize I needed as I did the job or ordered the wrong parts and had to re-order. Things like ordering incorrectly-sized banjo bolt crush washers, forgetting to order the exhaust gasket and getting new exhaust lock nuts all took a toll in the time it took to do the job. I also had to take my time to ensure I didn’t miss anything, forget where things go and - more importantly - ensure I didn’t drop any bolts inside the timing chain area when there’s hardly any space to work with!
Decide If You Want to Commit to the Repair
If you get repair quotes it will often be a significant percentage of the residual value of the car and becomes a hard decision to make. The reason is that the water pump is buried deep within the engine bay and runs off the engine’s timing chain as opposed to a typical car’s water pump running off a serpentine belt with easier access to get at it. There are so many parts to take off to get to the 9-3’s water pump with the list including:
- Air intake
- Turbo pressure pipe
- Oxygen sensors
- Catalytic converter
- Thermostat housing
- Exhaust shields
Essentials You’ll Need:
- A spare vehicle to use (this would be ideal)
- Lots of focused time+patience without distractions (else you may swear often)
New parts, including:
- Water pump with seal (you won’t need the timing chain sprocket if it comes with one attached, if it does you can just remove that)
- 2 copper washers (for banjo bolts)
- Gasket for catalytic converter
- 6 Lock nuts for exhaust shields
- 3 Coolant pipe seals (thermostat, engine block + o-ring to water pump)
- Water pump access port cover gasket
- Coolant
- Water pump tool (I used CTA #2757)

NOTE: If you have large hands you may not want to do this job as you’ll see below that there isn’t much room to work with when using this tool and needing to carefully remove sprocket bolts. You could consider having a helper with smaller hands who is experienced around cars.
To give you a sense for how this works, here’s a picture showing the tool attached to the timing chain sprocket of a new water pump. Once secured it allows you to remove the bolts attaching the sprocket to the water pump while holding it in place to install a new water pump. You won’t be using the new sprocket if your new water pump comes with one:
- Magnetic socket inserts (this is a MUST)
- Rust-penetrating oil (I used PB Blaster Penetrating Catalyst)
- 100% petroleum Vaseline (to lubricate seals)
- Anti-seize
- Basic tools such as a wheel chocks, jack, stands, ratchets, sockets, extensions, universal socket joints, angled inspection mirror, pry bars, ¼” and ⅜” torque wrenches, etc.
Above-car replacement steps
Step 1
Raise the vehicle’s hood.
Step 2
Remove the air intake from filter box to the turbocharger input connection, cover the input with a clean rag to ensure nothing gets in.
Step 3
Remove both upper + lower exhaust shields from catalytic converter.
Step 4
Saturate the oxygen sensors’ threads and the 3 nuts on each end of the catalytic converter with PB Blaster, then let it sit+penetrate for a few minutes.
Step 5
Carefully unplug both oxygen sensors connections.
Step 6
Crack open the coolant reservoir cap to allow easier draining in subsequent steps.
Step 7
Remove upper oxygen sensor (I wasn’t able to do this).
Step 8
Remove nuts attaching catalytic converter to turbo.
Step 9
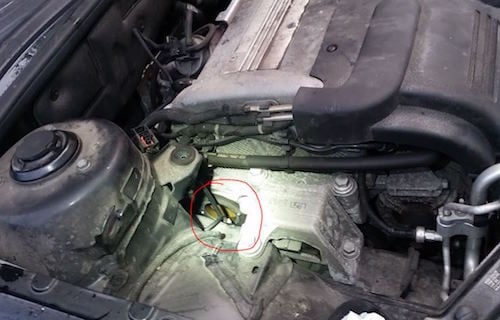
Remove the water pump access port cover circle in red below (ignore the zoom-in as it shows a slightly different water pump tool that basically does the same thing that my tool did):
Step 10
At this point here’s what you should be seeing with the water pump’s access port circled:
Step 11
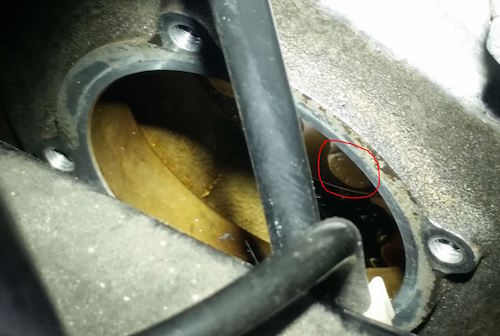
Here’s a zoomed-in picture of the with one of the sprocket bolts visible (circled):
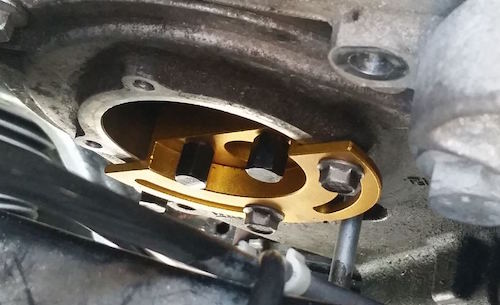
Step 12
Install the water pump tool to secure the sprocket per the tool’s instructions (zoomed-in picture below). You may choose to install the bolts from underneath the car if it’s easier:
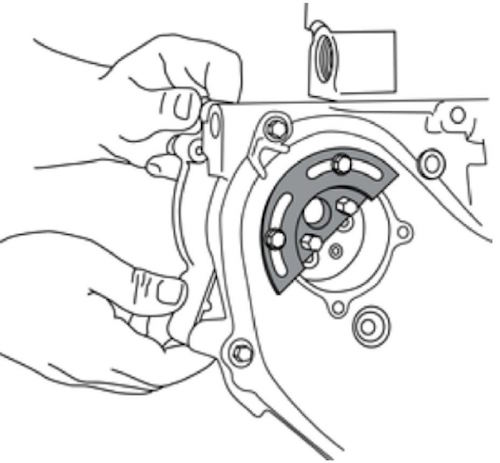
Step 13
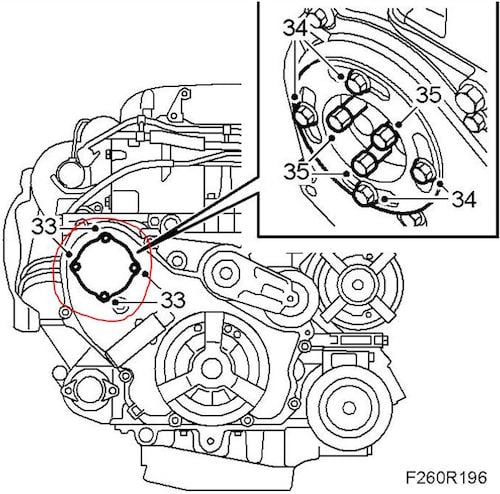
Here’s a diagram showing a different view of how to use the water pump tool. The image is showing a pair of hands removing the water pump on the back side while the shaded water pump tool is installed and holding the water pump’s timing chain sprocket while attached via the water pump access port cover’s bolt holes:
Step 14
CAREFULLY remove the sprocket’s bolts using a socket with a magnetic insert so that they don’t fall inside the timing cover. If it does, you need to remove the entire timing cover to fish that out (that isn’t part of this DIY). This part is tough as there isn’t much room to work with, your work area is recessed and you don’t want to jar the bolt off the magnetic insert as you slowly take each bolt out.
Step 15
Remove the lower-right water pump bolt on the timing cover side
Here are steps to take while under the car:
- Chock the rear wheels.
- Jack up the front of the car and use jack stands.
- Remove the front wheels (the passenger side at a minimum).
- Remove the plastic radiator shield.
- Drain the radiator via the petcock valve .
- Drain the water pump via the drain valve.
- Remove turbo flow pipe.
- Remove lower oxygen sensor (I wasn’t able to do this).
- Remove bracket attaching catalytic converter to engine block.
- Remove nuts attaching catalytic converter to flexible down pipe.
- Tie off the flexible down pipe to one side to help get it out of the way.
- Remove the catalytic converter (I was lucky to fish out the whole thing with both oxygen sensors still attached).
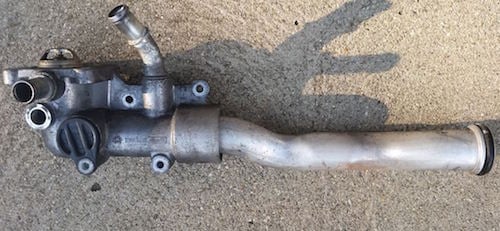
- Unbolt and remove the thermostat housing + coolant pipe. The coolant pipe is just pushed into the openings of both the water pump and the thermostat housing with large o-rings creating a leak-free seal:
- Remove the bolts securing the water pump (use the new pump as a guide to determining which bolts need to come out to detach the old pump).
- “Coerce” the water pump come out (mine was pretty stiff and eventually came out).
- At this point you’ll see where the sprocket attaches to the water pump (old on the left, new on the right):
Tips to consider:
- Look up torque values as you plan out the job. There were way too many I had to keep track of but here are some I was able to capture from my notes:
- Water pump short bolts = 15 ft-lbs
- Water pump long bolts = 18 ft-lbs
- Catalytic converter nuts to turbocharger = 18.5 ft-lbs
- Turbocharger banjo bolts = 15 ft-lbs
- Catalytic converter nuts/bolts = 18.5 ft-lbs
- Oxygen sensor = 30 ft-lbs
- Sprocket bolts to water pump = 6 ft-lbs
- Water pump access port cover bolts = 6 ft-lbs
- Turbocharger heat shield = 15 ft-lbs
- Exhaust clamp = 30 ft-lbs
- Lay out parts in a safe location so you can track where they came from and what needs to go back in. I took a garage spot, laid it all on the ground and kept it off-limits until the job was done.
- Take pictures! There are so many parts and locations that I felt it was necessary to do this else I’d forget.
- Keep track of component orientations before you remove them to help with re-installation, including:
- Water pump (you’ll need to know how the sprocket bolts were oriented so you can more easily install the new pump)
- Oxygen sensor wires near thermostat housing (note how the wires were routed)
- Catalytic converter (for me it was how I was able to fish the thing out)
- Use 100% petroleum Vaseline to lubricate the new seals when you put things back together during reinstallation.
- Consider using anti-seize on threads for exhaust bolts/nuts and oxygen sensors.
Hopefully this summarized approach helps in your decision to tackle the job. I’d love to hear from others who completed this and what you learned from it!