- 12/23/2014
- 2 Min Read
- By: Dan Bullmore
How to Replace a Steering Idler Arm on (Most) Mercedes-Benz Vehicles

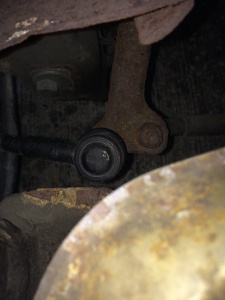 A closeup of the idler arm as installed- passenger tie rod to the left, and drag link to the right.
Before the mid 1990's (including the W123, W124, W126, and W201), Mercedes-Benz generally used a steering set up that is more typical on commercial trucks and tractors than on fine luxury automobiles. Rather than utilizing a standard rack-and-pinion steering setup, these vehicles use a large steering gearbox. Turning the steering wheel turns a large screw that deflects a rod called the pitman arm. Through a series of linkages, the pitman arm connects to the wheel hubs to turn the wheels left and right. One very long link runs across the width of the car to deliver the steering force to the passenger side. This link is known as the drag link and connects to an idler arm which connects to the tie rod for that side. The idler arm thus supports the weight and motion of the entire passenger side of the steering assembly and, as such, is subject to wear throughout its lifetime.
If your steering is clunky or makes grinding or groaning noises, and you don't find the issue to be ball joints or tie rod failure, you may consider replacing the idler arm bushings.
Inspect the idler arm
The procedure for replacing the idler arm bushings is pretty simple, and generally the same for most models. The big differences will involve accessing the bolt and nut that hold the bushings in, as they may be obstructed. Inspect your idler arm before beginning to see if you will need any special tools to accomplish the job. As always, I recommend having ratcheting wrenches and a good set of sockets with wobble or universal joint adapters.
It is possible (and pretty likely) that you will have some difficulty removing the old bolts from the idler arm. I would recommend a liberal application of penetrating lubricant to the bolt surfaces at all three points of the idler arm (body mount, drag link, and tie rod end). Be careful with the lubricant entering the ball joint area of the tie rod or drag link. The use of heat may be necessary to loosen the connections, but do so only if you can protect the ball joints somehow, or if you are going to replace the tie rod and/or drag link.
Thread a nut on halfway
A closeup of the idler arm as installed- passenger tie rod to the left, and drag link to the right.
Begin by removing the nut from the tie rod ball joint. Often, there will be an Allen key opening in the ball joint shaft to counterhold while loosening the nut - be sure to use this so as not to spin the ball in place. Repeat this procedure at the drag link end. If you are lucky, the links will come away with relative ease - otherwise gently use a pry-bar or pickle fork to separate the ball joints from the idler arm. In extreme situations, it may be beneficial to find a nut that is equivalent to the ball joint nut, thread it on about halfway, and give the nut a firm tap with a dead blow hammer. Since the nut isn't threaded on all the way, the shaft of the ball joint will be protected, and it may be just the blunt force needed to knock the bar loose. Watch your head if working from underneath!
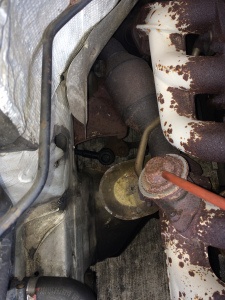 The relative location of the idler arm - the bushing assembly is under a steel heat shield in this W124.
At this point, you can remove the bolt that secures the idler arm to its mount. With the bolt, sleeve and brass covers out of the way, you can use a screw driver to pop the old bushings out. Installing the new bushings is the reverse of removal, and tightening the bolt will draw the bushings into the mount. I like to freeze my bushings for several hours before installation, as this usually shrinks them enough to ease the installation.
Alignment is optional, but encouraged
If you are using the same idler arm you removed, you should not need to re-align the vehicle (unless of course, the vehicle was ever aligned with the old bushings in poor condition, in which case it may be a good idea). Also, if you are replacing the entire idler arm, it is a good idea to go ahead and have the vehicle realigned. Manufacturing variations can cause slight deviation in the locations of the ball joint bores. Usually, the difference is negligible, but if your alignment was already in question because of bad bushings, it would be a good idea to have it adjusted.
The shock absorber will break down
While you are down there, it may be a good time to replace the drag link itself. The drag link resembles a very long tie rod, and with two ball joints, it is a common place to develop slack over the life of the vehicle. Also, on most vehicles, a steering damper is mounted between the body and the drag link to reduce feedback in the steering wheel. Over time, this little shock absorber will break down and cause unwanted vibration in the wheel during normal driving conditions. The two items are generally inexpensive and good to take care of while you have the steering system apart.
In short, the steering systems on older Mercedes parts are so robust, we often don't give them a second thought. A new set of bushings on the idler arm, as well as a few other minor repairs can really breathe new life into the steering and suspension systems of your car while providing more driving pleasure, safety, and reduced operating costs overall.