- 11/11/2018
- 4 Min Read
- By: Gareth Foley
How To Disassemble, Clean, And Rebuild The Inner CV Axle Boot On A W204 Mercedes C300

If your Mercedes has suffered a rear axle CV boot failure and you catch the problem quick enough, you can save the axle without being forced to buy a new one. This DIY is a messy one, but it's rewarding once completed.
CV boot and CV joint repair used to be a common practice, but now that replacement axles can be had for cheap, most shops and vehicle owners choose to slap a new axle on rather than rebuild it. However, rear axles for Mercedes are typically only available as Genuine replacements, meaning they're expensive. If you see a failed CV boot early enough, you can repair the problem before damage occurs to the joint.
On our Mercedes C300 race car, the inner CV boot had a small tear with grease leaking out of it. Since safety and reliability are our biggest concerns on a car that races eight hours a day averaging speeds of 100+mph, we chose to repair the axle instead of letting it go. We'll take you through how we did it, step by step.
Tools needed to complete repair:
- Hammer
- Brass hammer
- Punch/chisel set
- Brass punch set (optional
- Air hammer (optional)
- CV boot clamp pliers
- Side cutters (strong enough to cut band clamps)
- Vice
- Box cutter
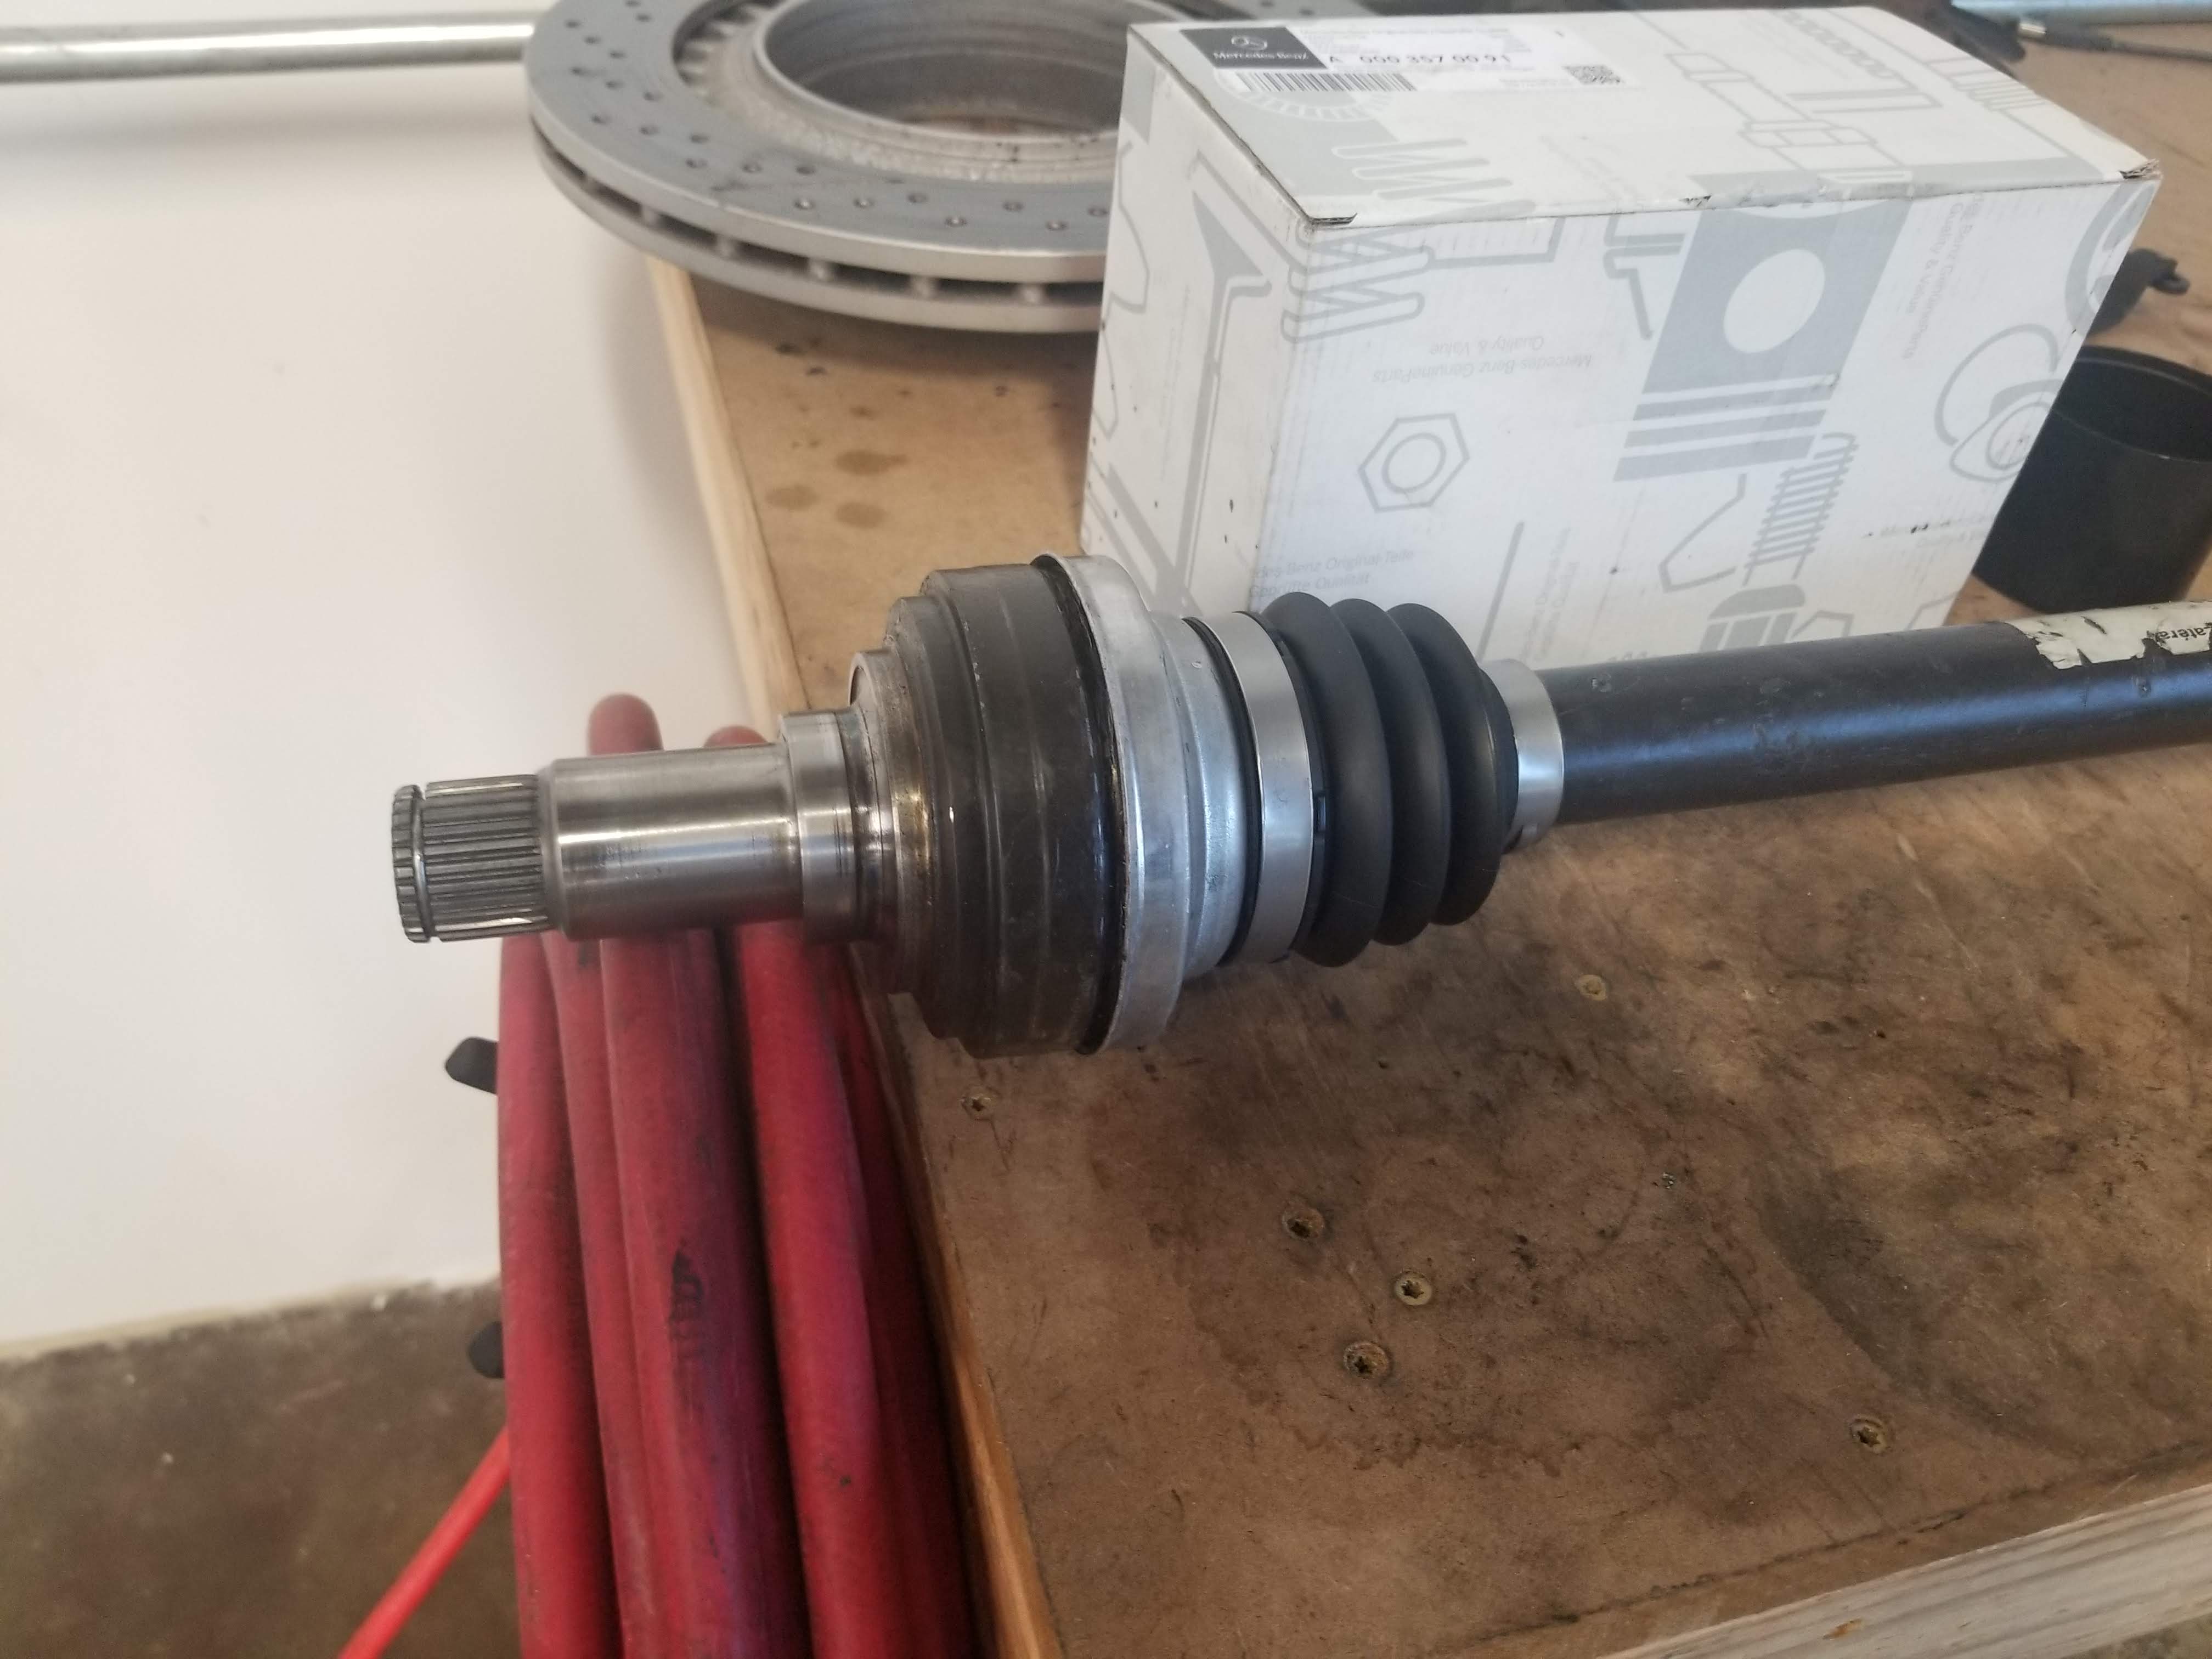
- CV boot kit
- Shop towels
- Brake parts cleaner
- Disposable gloves
Step 1:
If you have ever dealt with repairing a torn axle boot before, you know it's messy. If you haven't dealt with one, take our word of caution and be prepared for dealing with a lot of grease. You will definitely want to use disposable gloves to keep the axle grease off your hands. The first part of this repair is removing the axle. This will vary from vehicle to vehicle and this article is not intended to touch on that. Depending on the vehicle axle removal will be slightly different.
Step 2:
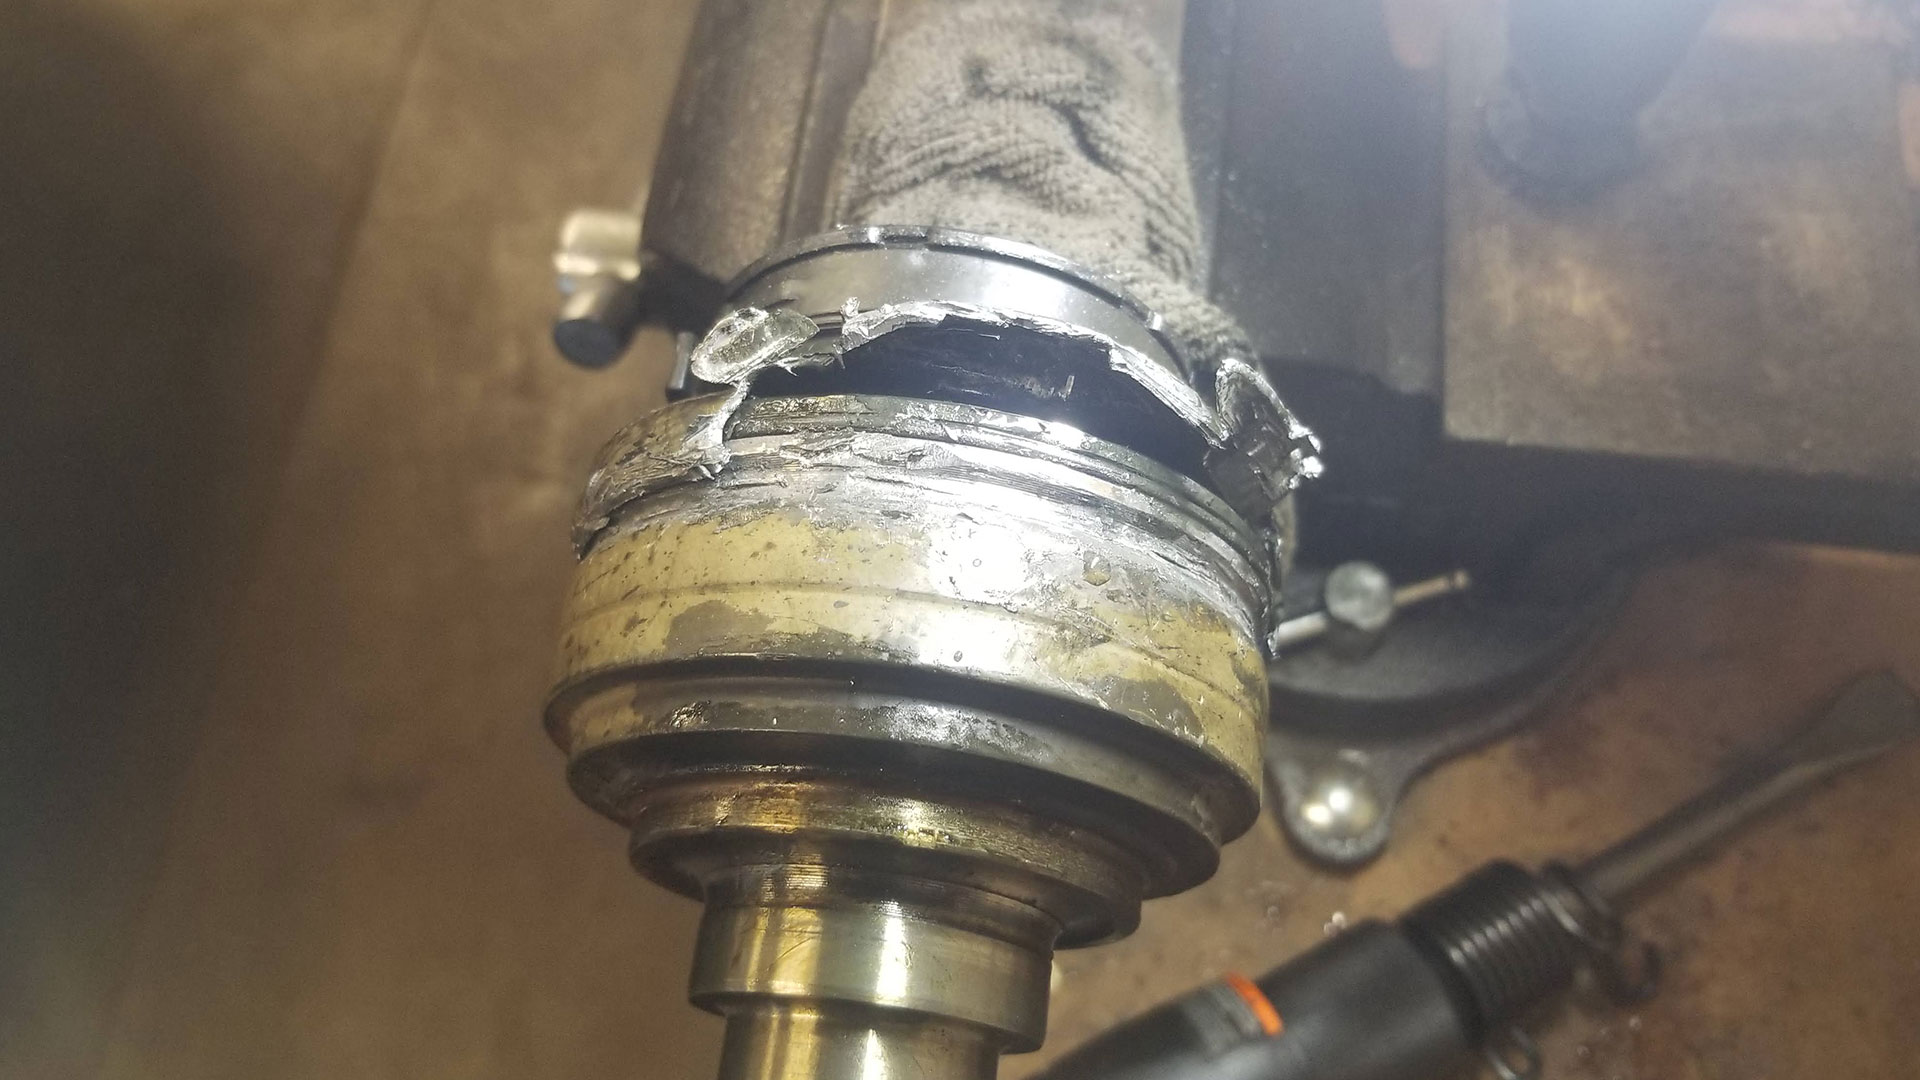
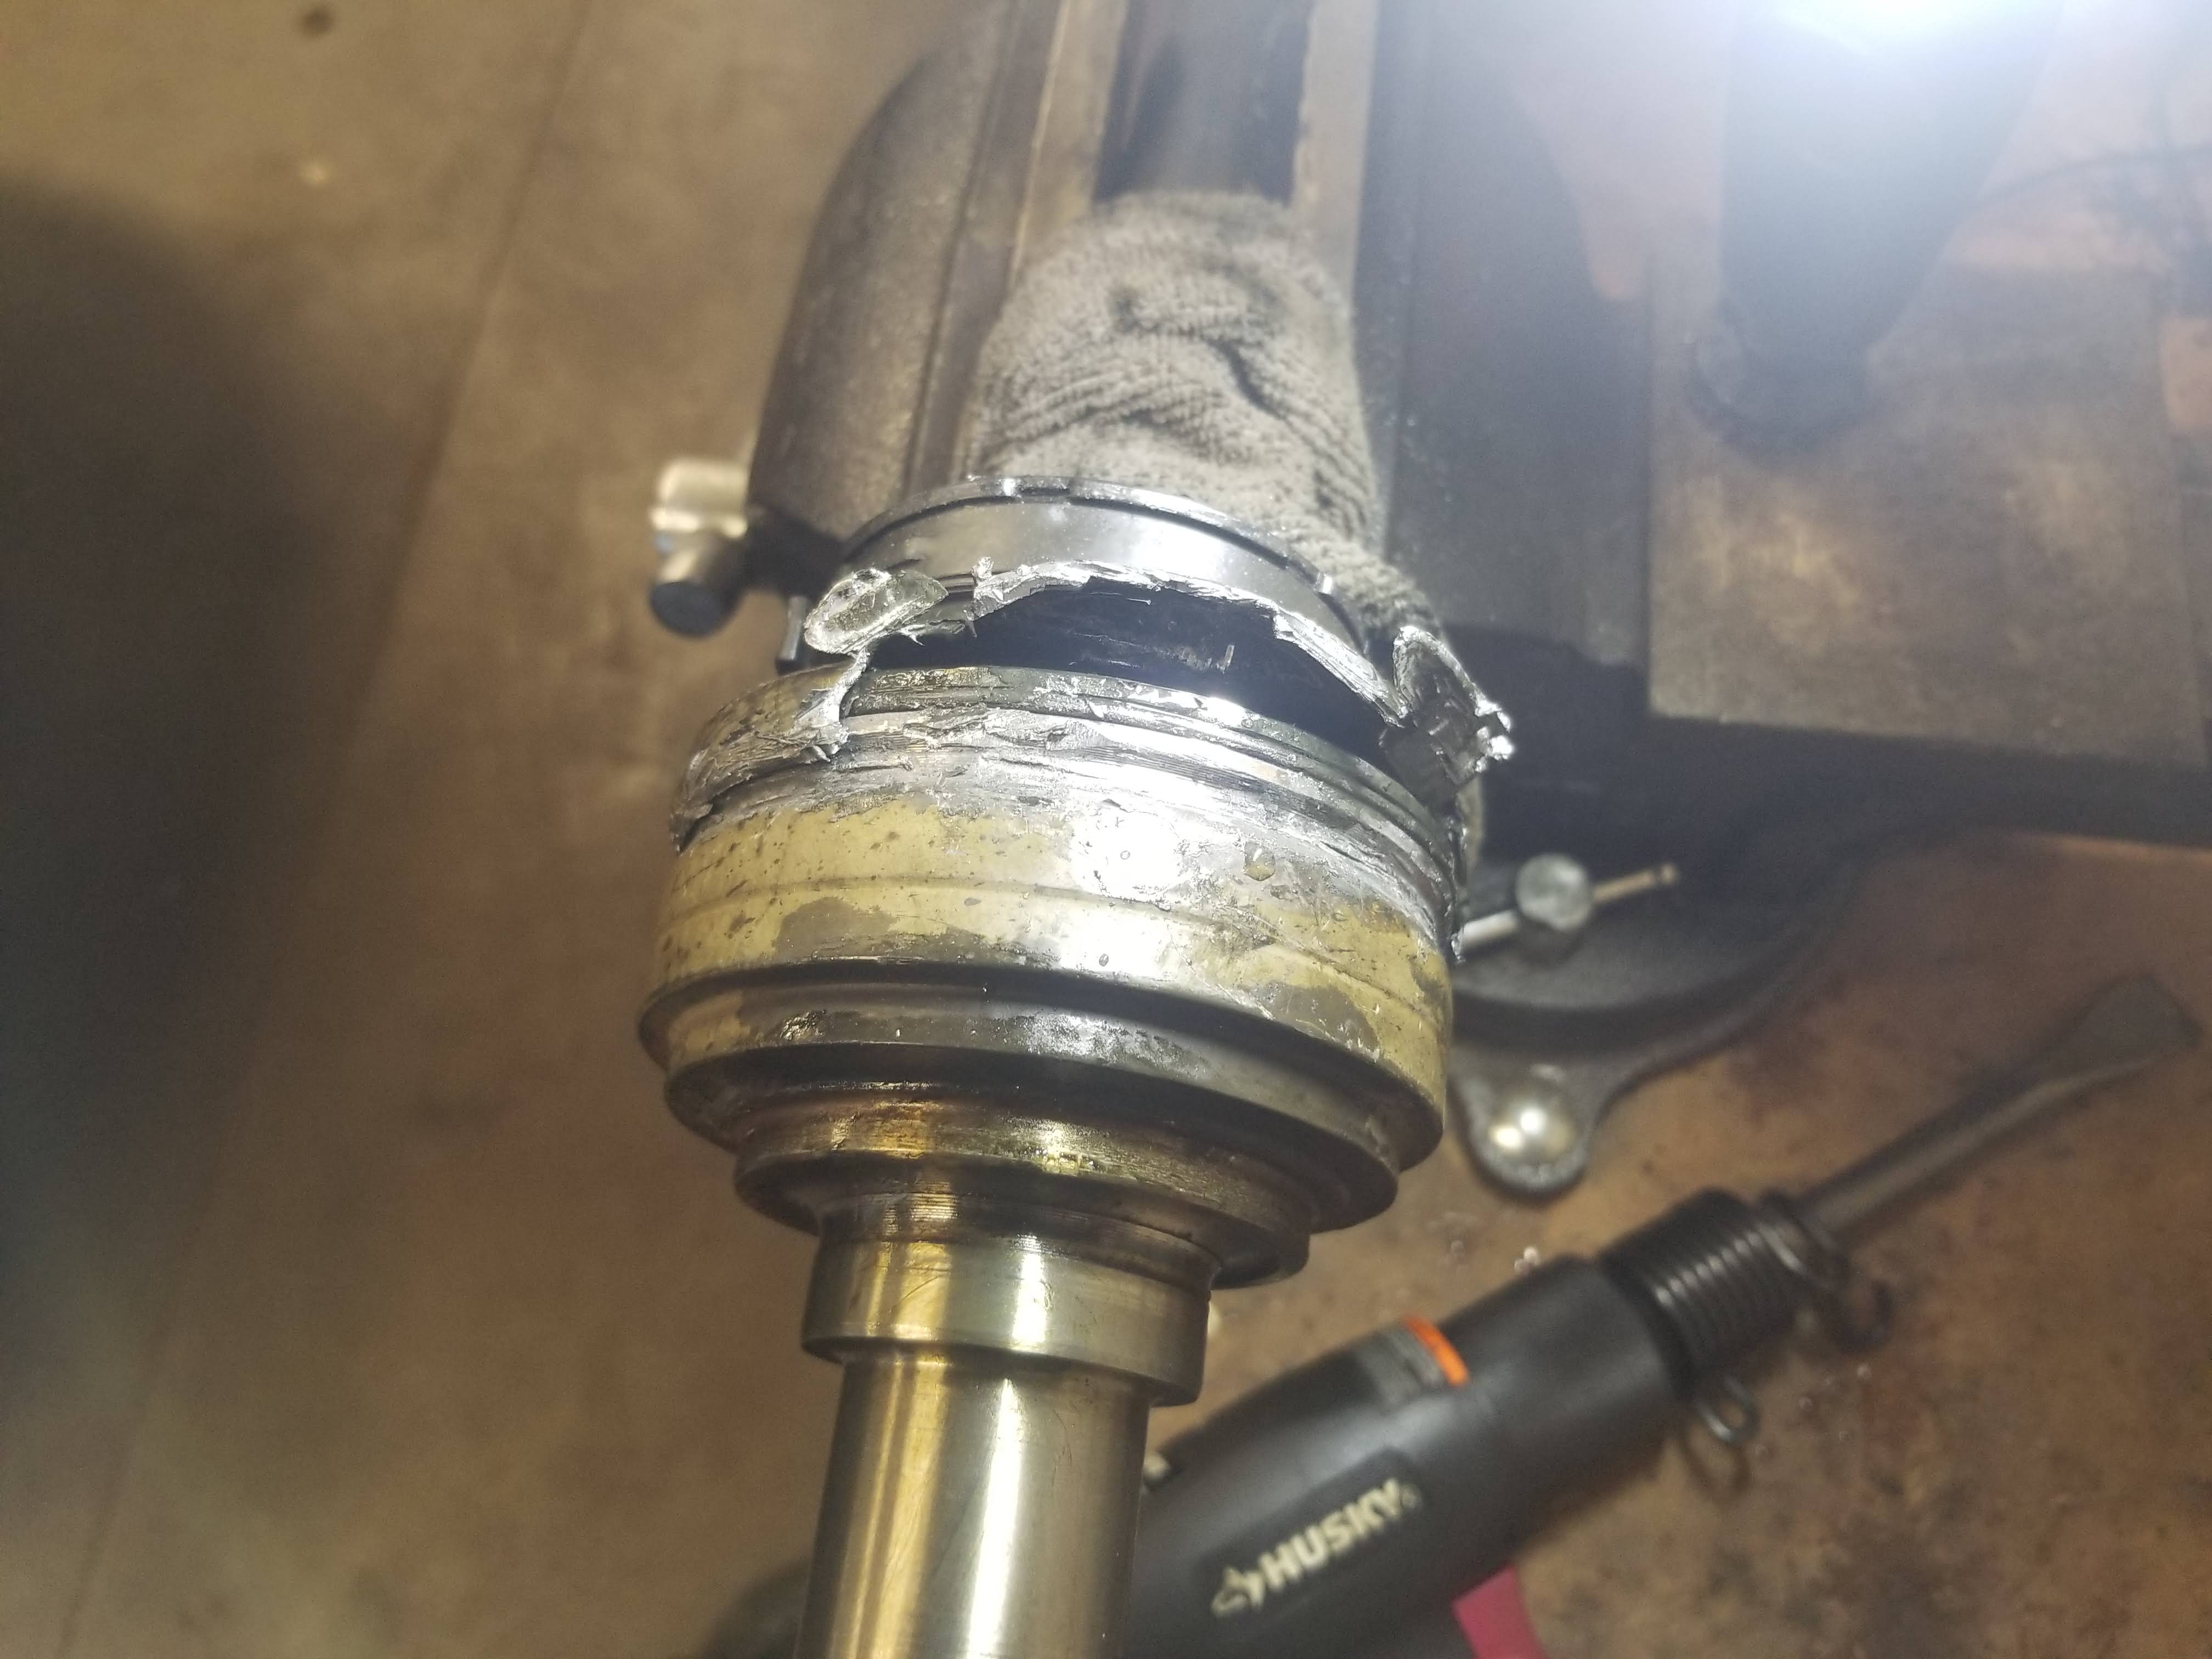
Removal of the CV boot is easy. Use your side cutters to cut the boot clamps. Next use a box cutter to cut a slit down the CV boot and peel it away from axle and CV retainer cap. At this point use some brake parts cleaner to remove some of the grease. This will make removal of the retainer cap a little less messy.
Step 3:
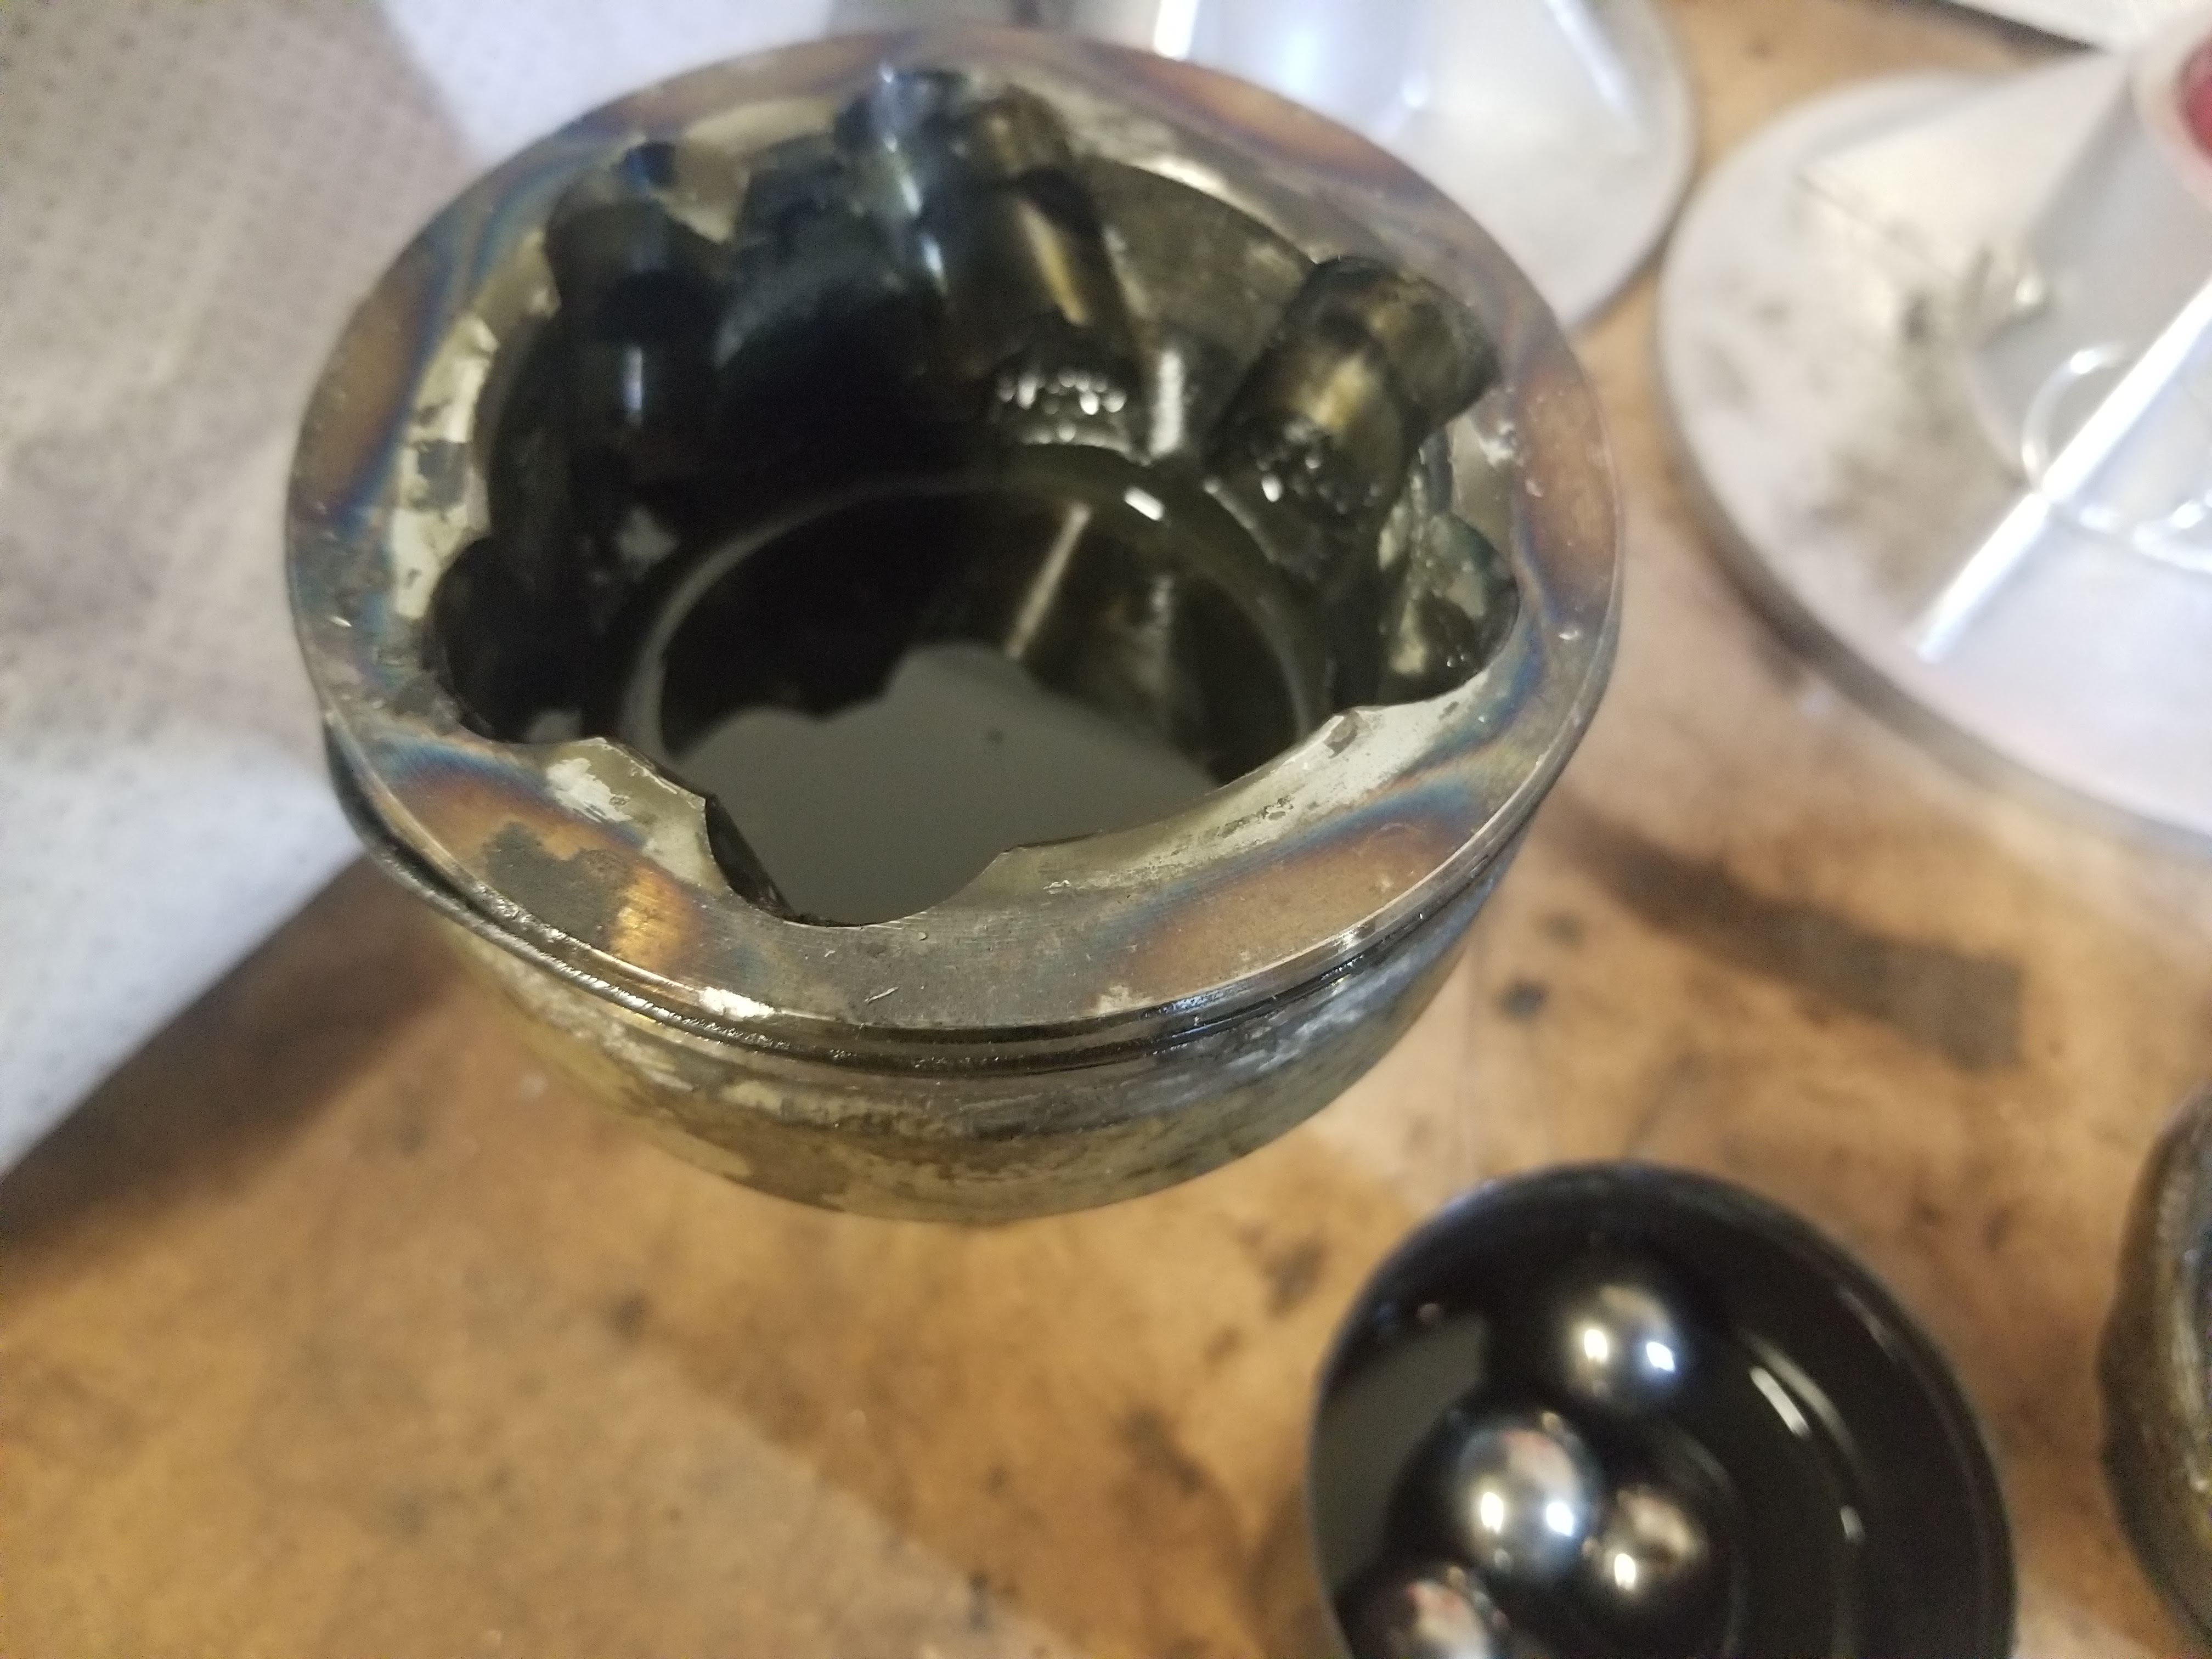
Next step is to begin removal of the inner CV retainer cap. Mercedes uses a different style of inner CV joint where the inner joint is retained by a metal cap. The metal cap is also the retainer for the CV boot. It clips onto the CV joint cup and it pretty difficult to remove. This is where your hammer and chisel will come into play. If you have an air hammer and access to a compressor this will make removal of this cap even easier. Put the axle in a vice and secure it in place. You can use the chisel and hammer to tap the cap back off the CV joint cup. The air hammer will do this quicker. In an extreme circumstance it may be necessary to cut this cap with the air hammer to release tension and make removal easier.
Step 4:
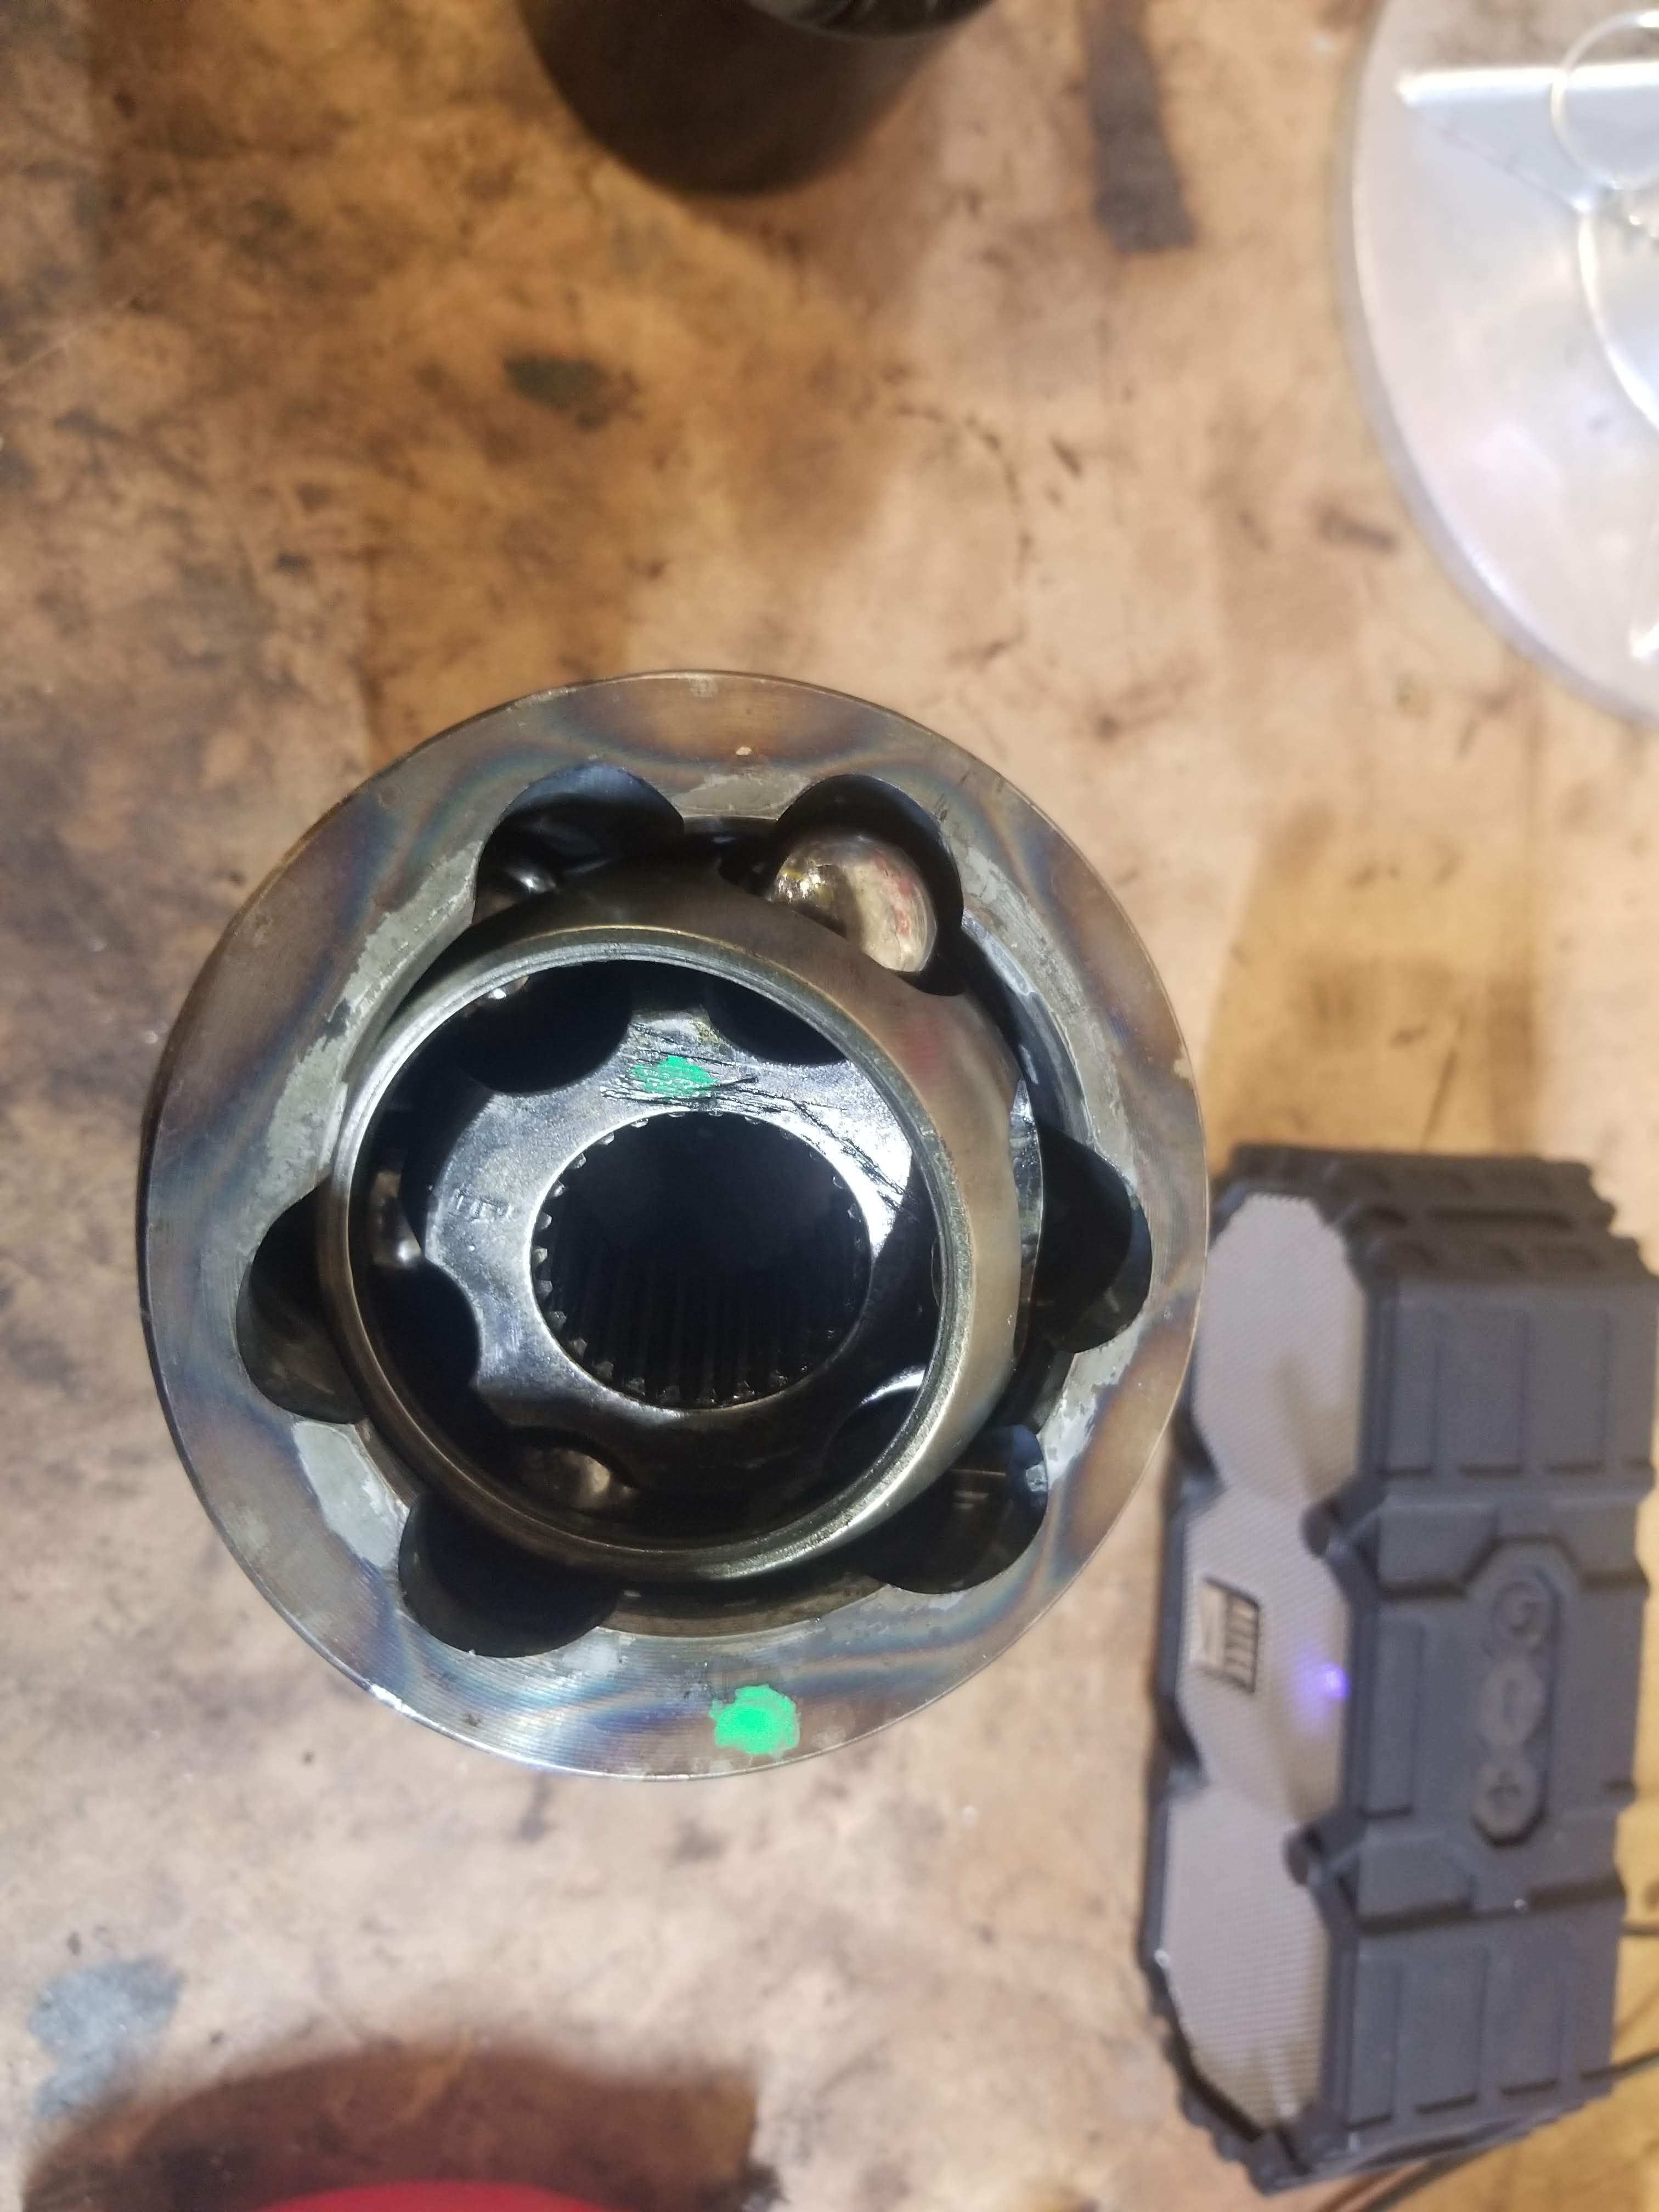
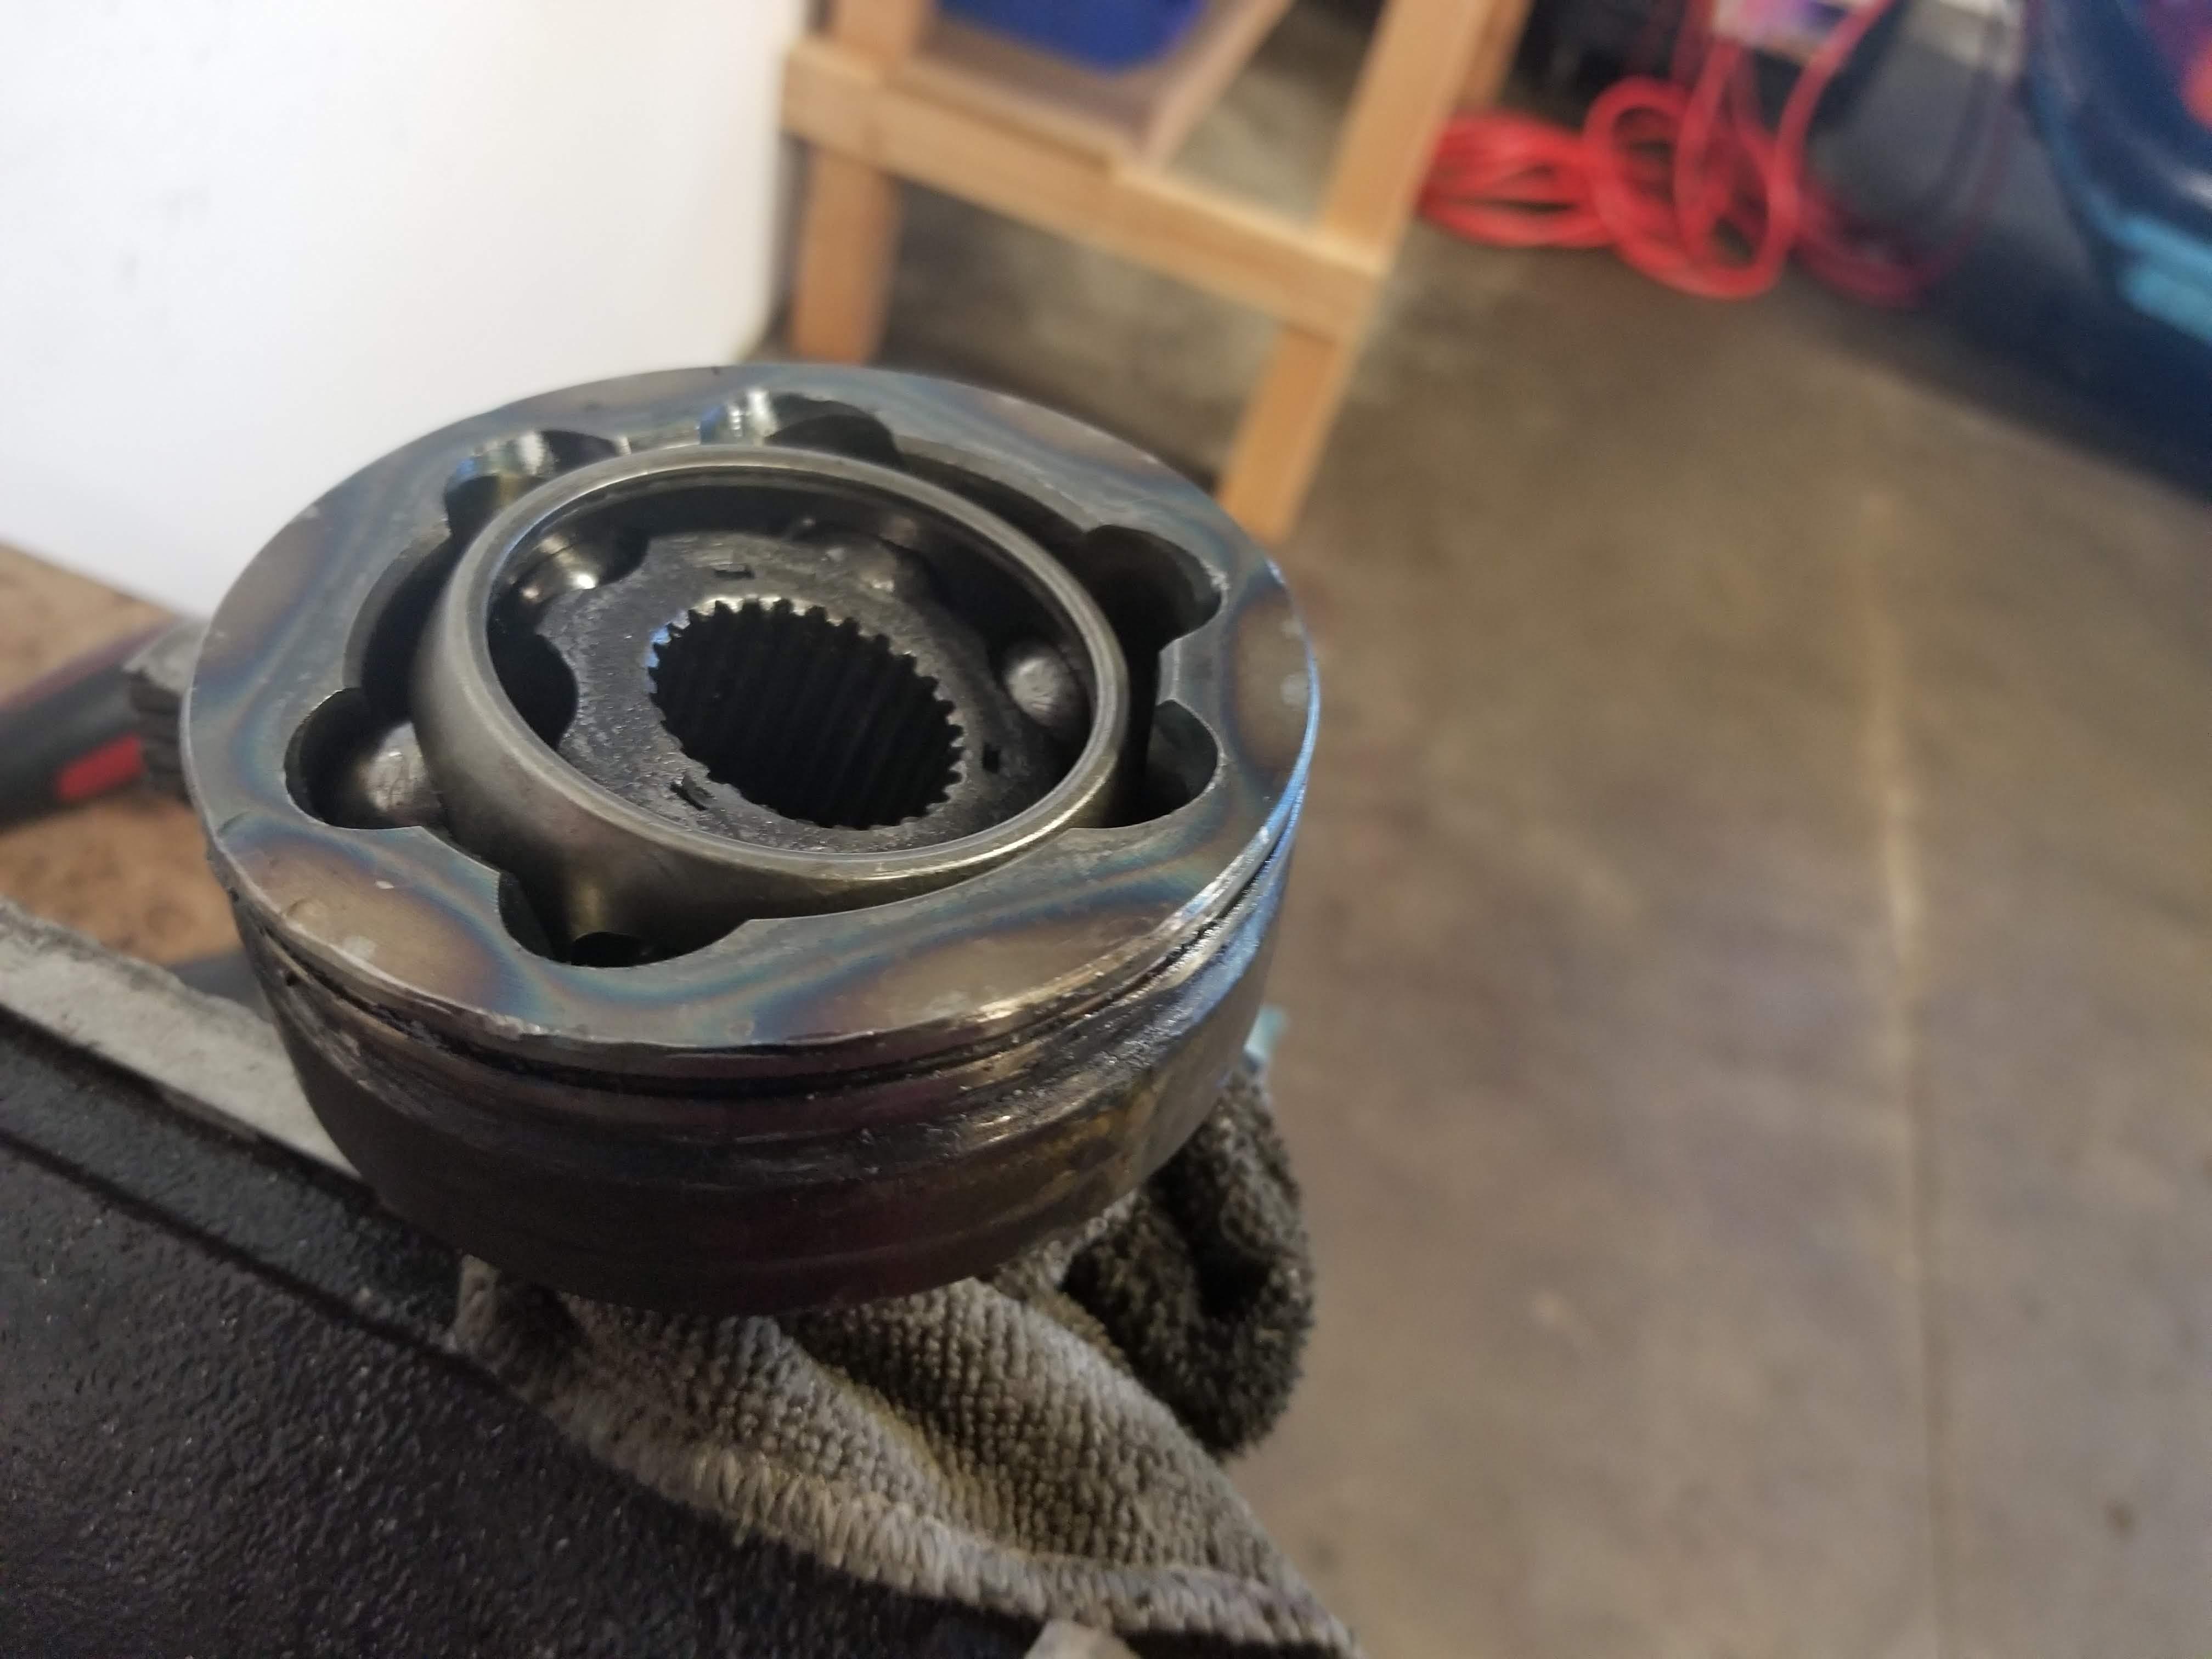
Once the CV joint retainer cap is removed it's now time to remove the CV joint from the axle shaft. There is no snap ring or retention ring used to hold the joint in place. However, it is a pretty tight fit on the splines. You will be hitting directly on the inner bearing race to remove the joint. Make sure the axle is safely secured in the vice and use a brass drift or punch to tap the joint off the axle. If you have an air hammer and brass air hammer bits it will make removal of this joint much easier. I really only recommend using brass to hit on the joint to prevent any marring or accidental damage of the race, bearings, or cup. It may take some effort to get the joint backing off the axle shaft but once it's moving it will come off relatively easily. Make note of the inner and outer bearing race and to which side faces towards the axle shaft. I used a paint pen to mark both and then kept them facing up on the bench to keep them organized.
Step 5:
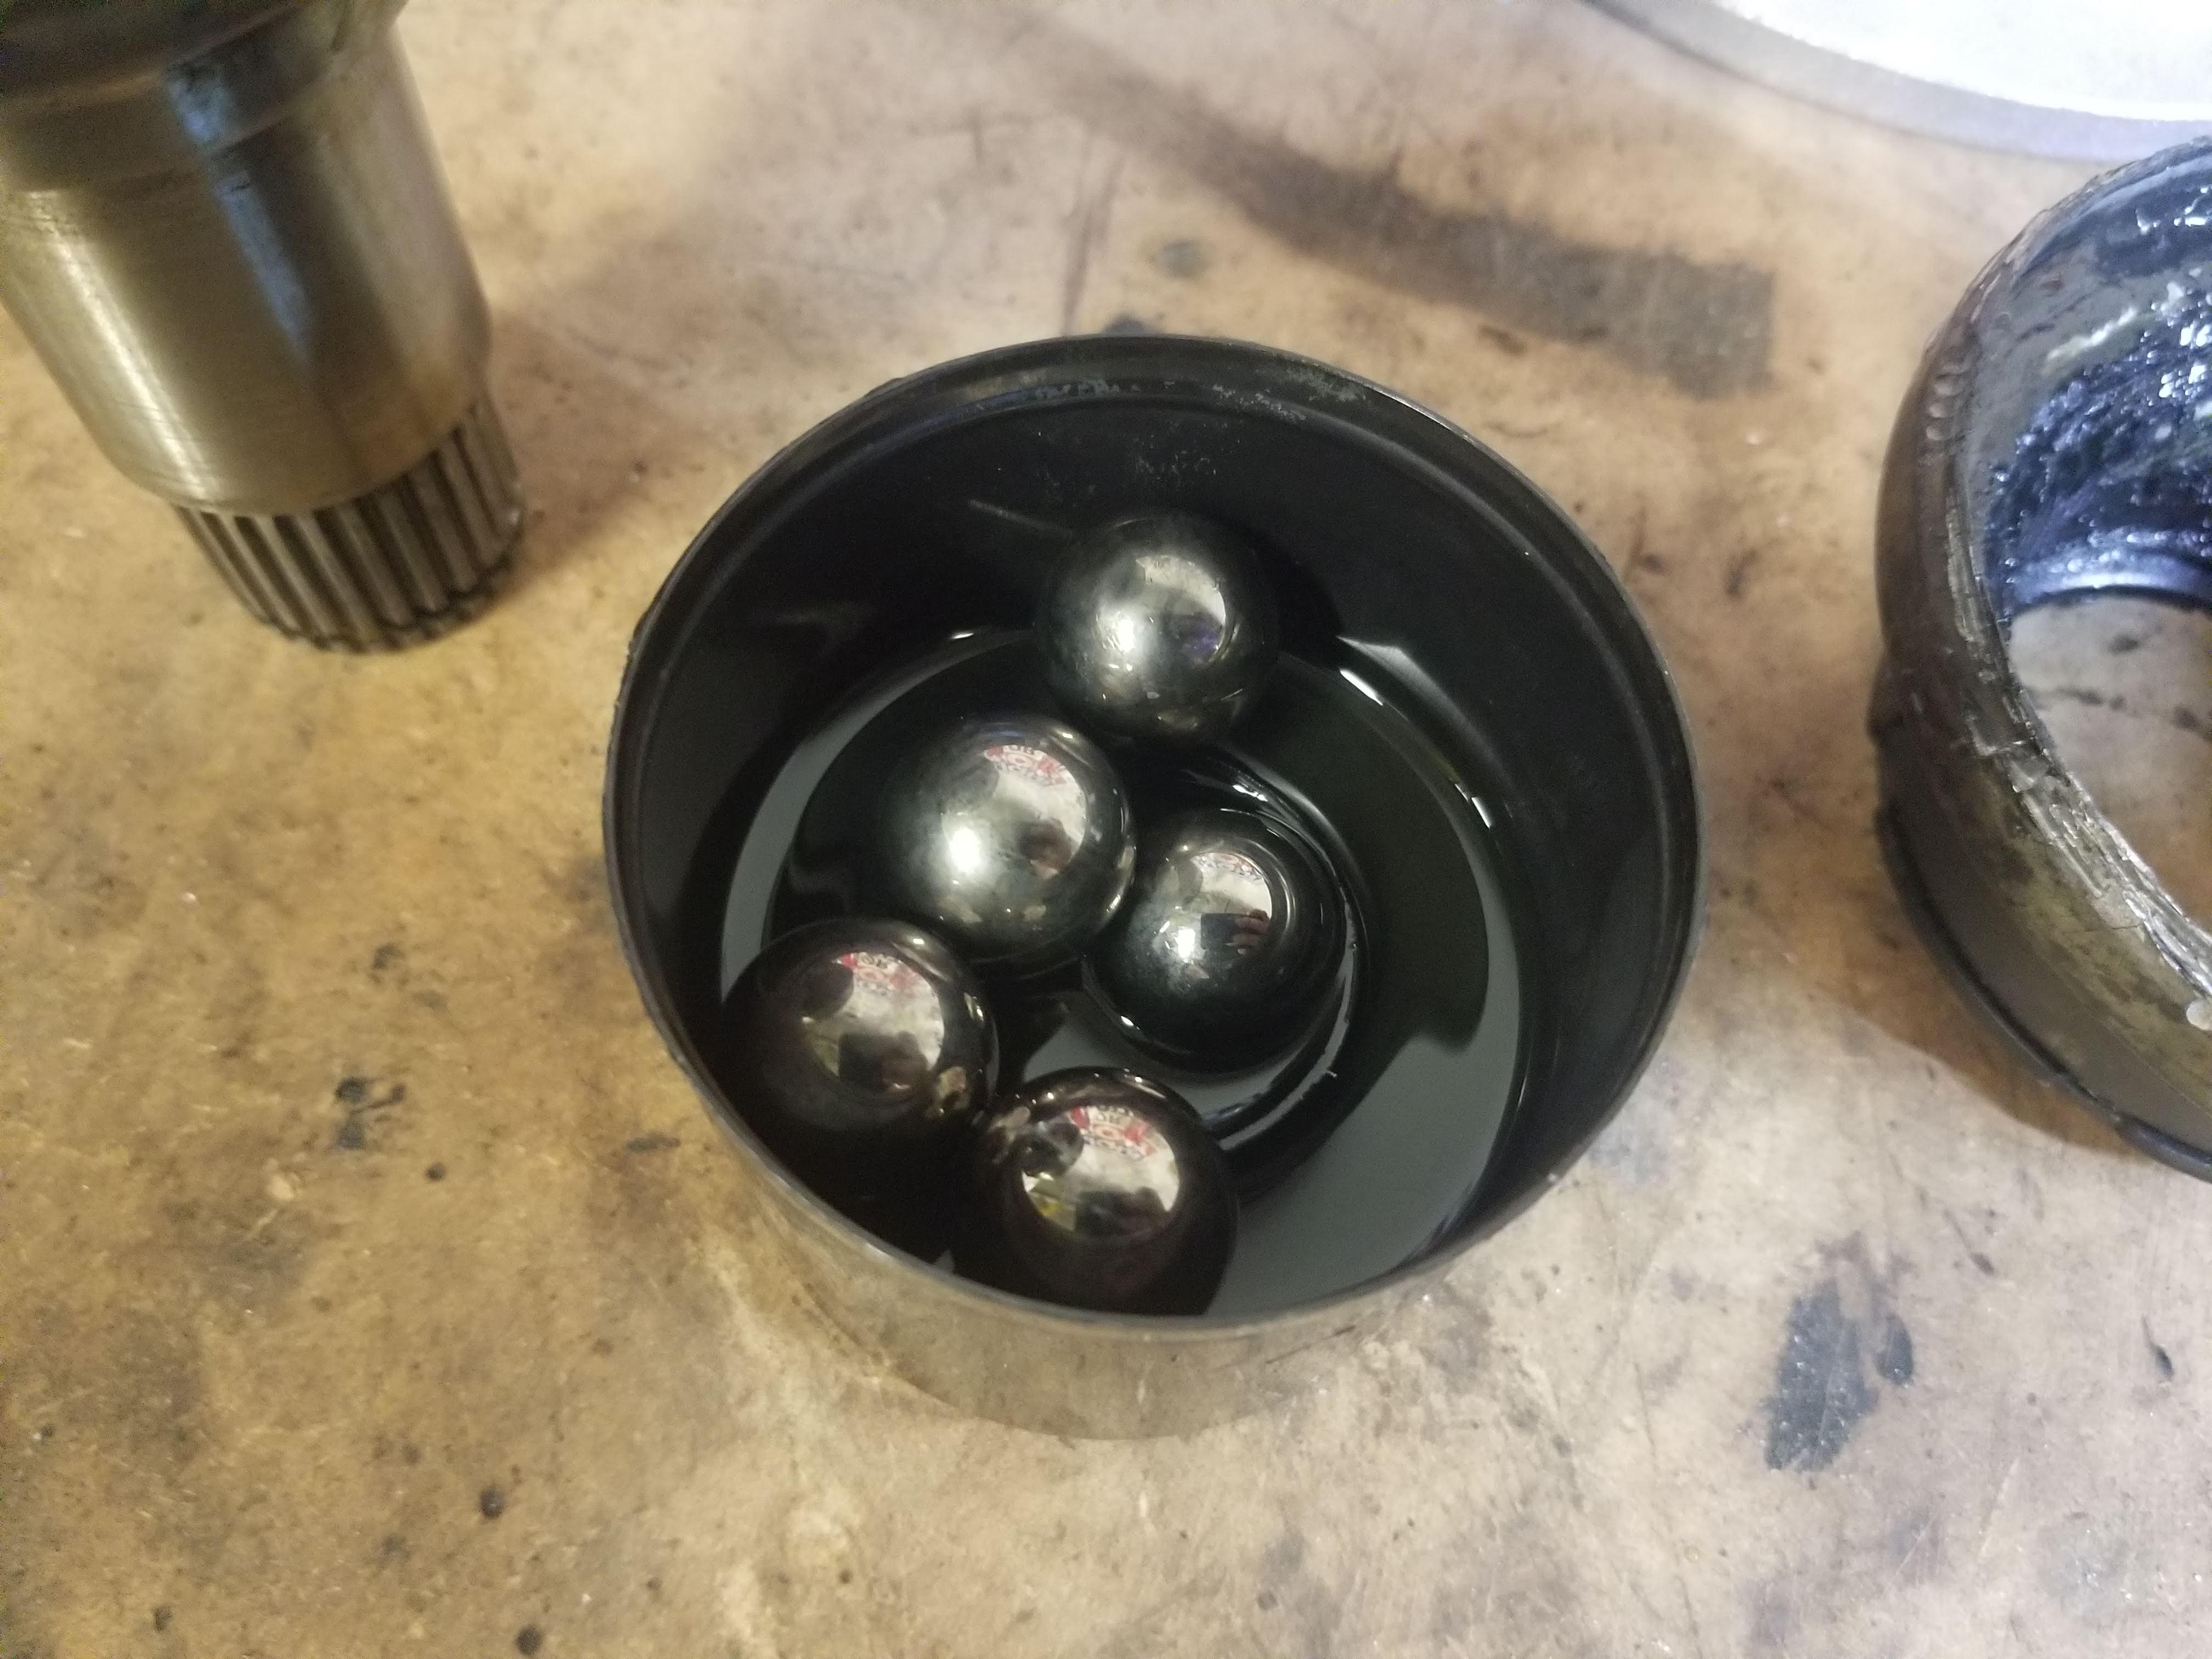
Now that the joint has been removed you can either choose to install the new CV boot and CV retainer cap on the axle and reinstall everything, or you can go a few extra steps and clean/re-lubricate everything. I recommend going further with this because it will give you the opportunity to inspect the ball bearings, bearing races, and CV joint cup for any damage or signs of wear. Removing the ball bearings is a relatively easy process and will require the use of a hammer and punch. We found a good video demonstrating the overall process of this. The bearing grooves on the CV joint cup are angled and will require some effort to get the ball bearings removed. However, once a few of the ball bearings are removed the rest will come out much easier.
Step 6:
Once the ball bearings, inner race, and outer race are removed clean them thoroughly. Also clean the CV joint cup as well. Now is a great time to inspect for wear on the ball bearings, cracks on the outer ball bearing race, and pitting on the inner race or CV joint cup walls. In the case of Mercedes, replacement CV joint parts are not available and if you find any type of wear the joint is essentially junk. In our case everything looked great and we were able to reassemble all the original parts. To reassemble the CV joint I recommend putting the CV joint cup into a vice to keep it steady. Make sure you do not clamp onto a sealing surface. I used a rag to protect the machined surface of the stub shaft. Install the inner and outer bearing race into the CV joint cup first. Make note of the inner bearing race with which side is facing up as the spline portion of the axle shaft can only fit on one side. Install the ball bearings one by one alternating sides as you go. The last few ball bearings can be tricky to install. Also note that the grooves on the CV joint cup and the grooves on the inner race oppose each other. This is what allows for angle articulation of the inner joint as well as limits how much the inner joint can move in and out.
Step 7:
Slide the CV joint boot with clamps and retainer cap onto the axle shaft first before you install the CV joint. Next put the axle shaft into your shop vice and make sure it is secured. You will be tapping the CV joint back onto the axle shaft and in order to get it to do so you will be hitting the CV joint pretty firmly. Line up the grooves of the axle shaft with the splines of the inner race of the CV joint. You can confirm the splines are lined up visually. To drive the joint back on the splines you will need to tap the stub shaft on the CV joint. You do not want to hit this directly for risk of mushrooming the joint. I used a piece of wood to protect it while tapping with a hammer. Drive the joint on until it bottoms out on the splines on the axle shaft.
Step 8:
Now it's time to grease the joint with the included grease in the boot kit. In this case we used a Genuine Mercedes boot kit as that's all that's available. Squeeze the tube of grease into the voids of the joint. Occasionally pivot and move the joint to allow for grease to penetrate deeper into the cup. Once the joint move freely its time to install the new retainer cap. Install the included o-ring onto the CV joint cup and line up the metal retainer cap. I used a dead blow hammer to tap the retainer cap into position over the CV joint cup. It will bottom out and the o-ring will secure it in place. Next install the boot and clamps. I used CTA 4210 to lock the clamps onto the CV boot. Once the boot is installed I pulled the joint in and out as well as pivoted it up and down. You should not feel any type of binding or roughness from the joint. If you do continue to move the joint until it feels smooth. If the joint does not feel smooth there could be an issue with the joint itself. Pending everything feels nice it can be reinstalled onto your Mercedes.