- 06/04/2015
- 1 Min Read
- By: William Yelder
2010 Mercedes Benz E63 AMG Front Pad Replacement Tips (W212)


My friend Binny asked for my assistance in replacing the front brake pads on his 2010 Mercedes E63 AMG. His rear pads and rotors were replaced not too long ago by his indie tech so there was no need to for replacement. However his front pads were squeaking pretty good - it was time for a change.
Most MB dealerships will tell you to change pads and rotors on all four corners at the same time. This is okay under a free maintenance program, but when out of warranty, it can be very expensive. The alternatives are to take your car to an independent mechanic shop or perform the job yourself. Being that I know my way around the Mercs I had no issue in helping my friend.
Brake Pads and Rotors
Now let's talk brakes in general before we dive into this. Pads and rotors are wear items which need replacement after a period of time. This is mainly dependent on two things: The construction of the pads and rotors and driving style. Usually the pads will always wear out first. The rotors have a tendency to outlast several sets of pads before replacement is required. The only time this is not true if the rotors wear unevenly or become warped. Uneven wear can be corrected by cutting the rotors on a brake rotor lathe. However warp rotors are best to be replaced. As for my friend, his rotors are floating rotors. Floating rotors are associated with performance packages and require replacement if uneven or warped. Technically, the minimum rotor thickness for the E63 AMG rotors is 1.299". This gives the owner some wiggle room between normal wear and needing replacements. His rotors weren't anywhere close to this, saving him roughly $1,000.00 for new rotors. Having some wrench time on a few MB cars I suggest using Mercedes-Benz OEM pads and rotors. There are other pad and rotor manufacturers out there whose products are great especially for track usage. But for spec street performance try to stay OEM. Your car will love you for it.
The Job
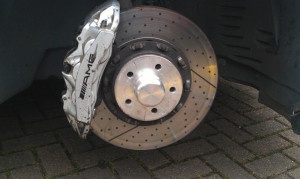
Position the car how you want it prior to jacking it up. Turning the engine on while in mid service can damage your calipers. Lucky for us, I've rebuilt multi piston calipers before and made this mistake. So there was no guess work. The removal and install of the pads is pretty straight forward. However we decided to brake down the caliper components and clean them. You can obviously do this with the calipers still attached to the mounts. However things can get a little cramped when you have sausages for fingers. So for me, it much easier to access everything with the calipers off. There are two 21mm bolts on the back of each caliper which need to be removed to free them. There is also a wire to the right of the top caliper mounting hole. You need to remove it to have clear access to the upper mounting bolt. Same process for the right side, but there are two wires due to the wear sensor. Once removed everything you should be able to wiggle the caliper loose from the bracket and rotor.
We then tied the calipers up with some speaker wire and removed the pads ,brake pad springs and pins. Using some brake clean and degreaser we cleaned up the calipers, the retaining clip and pins. With everything nice and sparkling clean, we reassembled the brake caliper with the new pads.
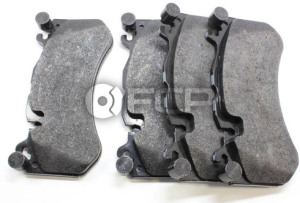 With loctite on the caliper bolts, I hand tighten the calipers back on to the hub. This allows you to install the pads with a small amount of give from the assembly. Being the pad install requires putting pressure on the pistons you need the loose fit. To install the pads, I simply pushed the piston back slowly through the window in the back of the hub using the worn pads and my fingers. First pushing the outside pistons then the inside all while swapping in the new pads. I did have a small issue with making sure the inside pistons didn't push out while installing the new pads. I quickly resolved this by placing the worn pad in between the inside pistons while pushing in the outboard pistons. With the new pads in, we slid the retaining pins and the brake pad springs. Remember how the brake pad springs installed. It can get a little confusing. We ended up doing it twice.
After buttoning up the pads and the retaining parts I torqued the mounting bolts down to 85ft-lbs, reinstalled the wires and we took her for a spin. Then again if you own an E63 AMG, even a spin around the block can be breathtaking.