We learn some hard lessons in the DIY world. Computers, cars, houses; they all have hidden pitfalls that if ignored can cost you big time.
For too long my most overlooked DIY habit was torquing fasteners. Wheels bolts, brakes, strut towers, engine mounts. If it's mechanical and on a Volvo, you can count on it having a torque value.
The Basics
To start, every DIY'er needs a torque wrench. Like most things in life, you get what you pay for. There are certainly some bargain units out there but we all know what happens to cheap tools right? The two main types are clicker and digital, though there are a variety of other types to choose from. I myself use a clicker type wrench like the one below.
[gallery type="square" columns="2" size="medium" ids="8445,8446"]
Torque
...Is a measure of how much a force acting on an object causes that object to rotate. Proper torque is essential to keeping your car on the road and running happily. The right torque can also prevent damage to parts and mechanisms, making future repairs easier and getting you on your way. Oil filters are a common culprit of over-tightening. The proper tools can prevent this like the ever important filter wrench.
[gallery ids="8441,8442,8443"]
The wheel collided with the wheel hub
I can shamefully admit on more than one occasion I thought my breaker bar was enough to tighten down the 15 year old lugs on my S70. I took a wheel off to check on the brakes, re-installed it, and drove off with everything fine until about 50mph. The violent noise of the wheel colliding with the wheel hub is very distinct and thanks to the strength of the parts in question nothing was damaged and no one was hurt.
The proper torque value here is 110Nm... a value that my 18" bar could not easily achieve.
Overtorquing
While refitting a strut tower brace I incorrectly applied 60 ft-lb of torque to the strut mount bearing plate nuts. For anyone already cringing, yes - I snapped it right off with the torque wrench in hand. Much to my dismay I couldn't pound out the bolt so a replacement strut mount was purchased and another mildly expensive lesson was learned.
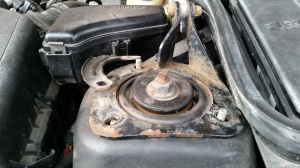 Snapped it off with very little effort.
Quick Reference Guide
Wheel bolts: 110 Nm / 81 ft-lb
Control Arm ball joint clamp: 50 Nm / 37 ft-lb
Control Arm to subframe: 65 Nm / 48 ft-lb + 120º
Tie rod end: 70 Nm / 37 ft-lb
Front Caliper Bracket Bolts: 100 Nm / 74 ft-lb
Front Caliper Guide Pins: 30 Nm / 22 ft-lb
Sway Bar / Endlink to strut bolts: 50 Nm / 37 ft-lb
Suspension Strut to Spindle: 65 Nm / 48 ft-lb + 90º
Suspension Strut upper mounting to body: 25 Nm / 18 ft-lb
Oil Filter: Spin to make contact with the engine, then 1/2-3/4 turn.
About the Author: Anthony Peacock
 Anthony is a small business owner and Volvo DIY enthusiast. He is an experienced videographer and editor, with a long running reputation for owning and promoting the many excellent qualities of Volvo vehicles.