- 04/10/2015
- 1 Min Read
- By: Jay VanGorden
Volvo S60 V70 (P2) Front Control Arm Replacement (Meyle HD)

Steering feeling loose? Feathering tire wear? Car seems to wander all over the road? These are all telltale signs of worn, loose control arm bushings.
Replace the whole control arm
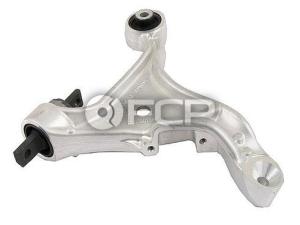
One of the most common failure points on Volvo P2 vehicles are the lower control arms due to faulty or worn out bushings. It's always recommended to carry out a full front end inspection to make sure your ball joints, inner tie rod ends, outer tie rod ends, struts, strut mounts, spring seats, etc. are in good shape as well but chances are that your in need of some new bushings. The bushings can be purchased separately, removed from your existing arms, and the new units pressed back in however the front most bushing can be troublesome to remove and install without Volvo's special tool so my recommendation is to purchase the entire arm with the bushings already installed.
This post will guide you through the procedure on how to install control arms on a 2003 Volvo S60. Even though we offer the Genuine Volvo units, the OEM Lemforder units and the Heavy Duty Meyle aftermarkets I chose to install the Meyle HD units. Why, you ask? Simple, Meyle HD analyzes the factory components to determine their wear point and the root cause for failure. They improve upon the design to make the product more durable to improve service life. On this particular arm they replaced the common failing front hydraulic bushing and changed it out with an optimized full rubber mount with a larger bonding surface area. More information on this particular arm can be found in Meyle's helpful PDF graphic.
Parts needed:
- Volvo Control Arm Left (S60 V70) - Meyle HD 30635229
- Volvo Control Arm Right (S60 V70) - Meyle HD 30635230
Installation
- Jack the car up and safely support the vehicle. Remove the front wheels
- Remove the 10mm bolt for the ABS wheel speed sensor.
- Remove the ABS harness from the bracket attached to the strut and store away to the side.
- Remove the axle bolt with a 14mm socket.
- Remove the upper sway bar link nut; remove the upper portion of the link from the strut.
- Remove the caliper hold down bracket bolts.
- Tie the caliper off to the side - I used a large cable tie and strapped it to the coil spring.
- Remove the lower ball joint nut
- Remove the lower strut mount bolts ( strut to knuckle )
- Slide the axle out of the knuckle.
- Use another cable tie and tie the knuckle to the coil spring so it's out of the way and supported
- Use a third cable tie to secure the axle to the strut. This will prevent the tripod joint from accidentally overextending and separating.
- At this point the control should be fully disconnected from all other components.
- Remove the rear bolt - 18mm head / 21 mm nut on top
- Remove the two 17mm bolts from the side of the control arm
- Tap out the control arm with a rubber mallet
- Remove the steering stops from the original arms and transfer to the new Meyle arms
- Install in reverse order.
After installation is complete I would recommend having an alignment performed on the vehicle. Also, while the control arms are out this would be a great time to replace the lower ball joints since 95% of the work is already completed.