- 12/03/2014
- 3 Min Read
- By: Dan Bullmore
Mercedes E-Class Multi-Link Supension Rebuild (W201 W124)

Shortly after purchasing my W124 E-class, I went to work replacing the entire front suspension. Rust damage had gotten the better of most of the iron bits on the underbody. Also, the front, due to the stressed ball-joint design, was of special importance for me to address. After taking care of the front, I took the car to be aligned. The alignment shop attempted a four-wheel alignment, but was unable to align the rear because of severe rust on the fasteners and suspension links. Worse so, the rear suspension was badly out of alignment - I never noticed because it didn't manifest itself with any driveability issues besides loud tire noise. I set about collecting all of the pieces to rebuild the rear suspension as I did the front.
The multi-link rear is a complicated beast
Through the magic of the internet, I was able to source two very nice hubs, complete with bearing and parking brake hardware off of a parts car. I also sourced the links for the multi-link suspension, replacement springs, shocks, bushings, and fasteners. The multi-link rear suspension of the W201 and W124 Mercedes is a complicated beast, and has many parts that should be replaced whenever the opportunity presents itself.
A few items should be considered absolutely essential for this job, chief among them a Klann type spring compressor. This is a must-have tool for doing suspension work on older Mercedes, both for safety and practicality. They can be had for relatively little online and are a great investment, as they make the job much simpler. The Klann type is one of 3 coil spring compressor and removal tools that are popular. I would also strongly suggest an air or electric impact gun, and several impact extensions. A wobble adapter is an excellent item to have as well. I purchased a 1/2” electric impact gun from Harbor Freight to help with the front suspension rebuild, and it has turned out to be an incredible value. My particular vehicle required a 30mm 12 point socket to remove the axle nut (this appears to be pretty standard for Mercedes). Another incredibly important tool is a propane can with torch attachment. Effective application of heat is a fantastic way to get old parts to budge after years of being stuck. A three-jaw puller also helps to push the nose of the drive axle out from the hub. Depending on your replacement parts, and on the model-year of your vehicle, you may need one of two triple-square drivers, 10mm or 12mm. 12mm appears to be more common, and was what I needed to do the job on my vehicle.
[gallery type="square" columns="2" ids="7020,7019"]
Decompress the spring out of the vehicle
 Generally speaking, the first step involves loosening all of the bolts on the control arm (the spring link). You will first have to remove the plastic cover from the control arm - it is clipped on and held with two 10mm screws. Once the cover is off, you can access the nuts and bolts. It is of critical importance that you not push the bolts out until the spring is totally compressed. Use the impact and sockets to remove the nuts. Compress the spring to remove the load from the control arm. I placed the lower compressor plate under the control arm so the arm and spring would come away as one. Once the arm is unloaded, you can push the bolts through and remove the control arm and spring. It is good practice to decompress the spring once it is out of the vehicle.
Remove the caliper and rotor, making sure to secure the caliper in a safe place without kinking the hose. At this point, use your 12 point 30mm socket and impact gun to loosen the axle nut. This nut uses a sheet metal tab rather than a cotter pin, so you will have to punch the tab out before loosening. With the nut loose, apply the three jaw puller to the hub and press the axle through. With the rotor out of the way, you can now loosen the bolts holding the heat shield onto the hub. With the heat shield loose, you can turn it as necessary to reach and loosen the link fasteners on the hub.
Installation is reverse of removal
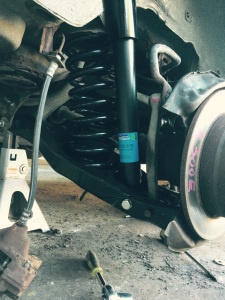 This photo shows all of the arms bolted up along with the new spring and shock.
If you don't have serious rust issues, your bolts should be easy enough to remove. The impact will help tremendously here. Be sure to mark the orientation of the eccentric alignment washers on the tie rod before attempting to loosen. Also, be sure to remove and keep the plastic cover that goes on the thrust arm (lowest suspension link that points to the front of the car). This cover is for reduction of wind noise and it does make a difference. With all arms and the hub removed, you will be ready to stage the replacement parts. Installation of the arms is opposite of removal except for a few very important points:
1. It is critically important that the bolts on the suspension links be torqued with the drive axle in a horizontal position. You can accomplish this by placing a jack under the hub and carefully lifting until the drive axle is parallel with the ground. This ensures that the bushings are relaxed when the wheels are on the ground. Failure to do so can cause premature failure of the bushings.
2. Be sure to use proper torque as specified for your car- this will vary from model to model. It will be a tight squeeze in most cases, but proper tightening is very important.
3. Make sure that the tie rod adjustment is as close as possible to how it was previously. This will allow you to drive to the alignment shop and have a proper alignment done without damaging your tires too much. Earlier model W201 and W124 chassis may have eccentric alignment bolts on the control arms as well. This design was phased out by the 1990's.
4. The control arm and spring may prove difficult because the spring has to curve back towards the car in order to fit inside of it's upper mount. This will take some trial and error in tightening the spring with the compressor.
5. The control arm only has a bushing on the inboard side. On the hub side, the bushing is actually a part of the hub assembly. You will need to press this bushing out, and press the new bushing in. This is much easier with the hub off of the vehicle. This bushing is a primary cause for many of the creaks and groans in the multi-link suspension, and should be replaced whenever the opportunity arises. Now is the perfect time!
New shocks alleviate drivability issues
After re-assembling and torquing all of the fasteners for the links, be sure to return all plastic covers to their correct locations, and to keep an eye out for anything you may have overlooked. Even if you placed the eccentric washers for the tie rod in exactly the same place as before, you should take the vehicle to be aligned. This is partly because eye-balling the installation is not very effective, and also because variations in tie rods, bushings, etc. can cause the alignment to be slightly out compared to your old tie rods. An alignment is good for your tires and for the suspension you just rebuilt. Also, it isn't necessary to have the suspension taken apart in order to replace the shock absorbers, but it is certainly easier if done at the same time. New shock absorbers can alleviate all kinds of driveability issues as well as protecting your tires and increasing the life span of other suspension components- luckily for us, they are pretty affordable, too!
The multi-link rear suspension was the crown jewel of Mercedes chassis innovation in the mid 80's and early 90's. In good repair, it makes for an unbelievably comfortable and sporty ride. I am often astounded at how much better my car becomes with each repair. I realize how fantastic these cars must have been when they were brand new, and refreshing the rear suspension has brought a major improvement in every aspect of owning my W124.
Shop Mercedes-Benz at FCP Euro
 Dan Bullmore is a physicist and engineer from Houston, TX. Preferring the old to the new, Dan has owned many examples of Mercedes and Volvo vehicles and has devoted much of his time to maintaining and understanding them.