- 02/02/2015
- 1 Min Read
- By: Bryan McPhail
Mercedes-Benz Heated Washer Fluid Troubleshooting & Repair (W220, E210)

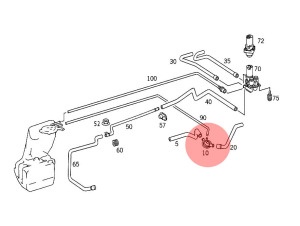
Some Mercedes models like the W220 S-Class and E210 E-Class include a heated washer fluid reservoir in addition to heated spray nozzles. From the parts diagram below you can see it works by recirculating engine coolant throughout a pipe loop within the reservoir. This is great for keeping the system ice-free and ensuring a better quality clean! Of course, with this added complexity comes the potential for more problems.
 Coolant falls on to the exhaust
The hoses (#65 and #5) connect to the engine block, and #20 leads to the cabin heater core. I've circled part #10 - a plastic t-shaped piece that connects heater core, washer system and engine block as it's arguably the weakest link in the setup. I wouldn't say this is a common failure part, but when it does fail you'll know about it fast, because it's directly above the exhaust manifold - coolant falling onto the exhaust can make a lot of smoke! Because part #10 is directly behind the engine (next to cylinder 8), and goes through a firewall it's a little awkward to replace, so let's go through some pictures to help.

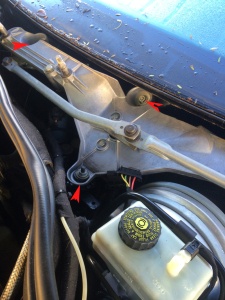 Wiper Assembly Removal
You need to get access to the rear of this firewall partition, so that means the windshield wiper mechanism needs to be removed. The wipers themselves just unbolt and can be removed. Other car models often need a wiper puller to remove the arm from the spline, but Mercedes use a clever little self tensioning system here - when the bolt tension is released, the arm just pops itself off - nice! The plastic scuttle guard is held on with plastic rivets which you can pop out and this reveals the motor assembly. This is nice self-contained unit - just remove 4 bolts and the electrical connector and this can lift out as one large unit to give you access to the rear of the firewall partition.
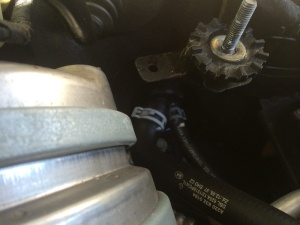
It's not immediately obvious how to separate the t-piece
Mercedes do not use regular screw hose clamps, instead a spring type clamp is used. This is a strong spring and certainly holds the hose on tight - but the drawback in this application is the limited access (especially on the front) makes it very hard to pliers in to release the tension and remove the hose. Needle-nose (long) pliers will help, but a right-angled version will also come in handy. With the hoses removed it's not immediately obvious how to separate the t-piece from the firewall, but from the front of the car looking to the rear, rotate the piece clockwise with some force if required, and it should pop out. Reassembly is reverse of disassembly.
 Access to rear of T-piece
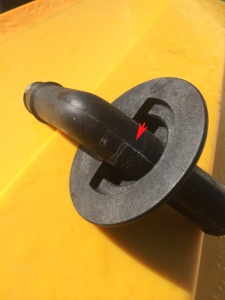
The old piece pictured here shows the problem waiting to happen - the seam in the molded plastic part has failed with age and heat cycles and started to leak under pressure.
Shop Mercedes-Benz Parts at FCP Euro
About the Author: Bryan McPhail
 Bryan is a longtime BMW enthusiast in Florida.