- 08/12/2014
- 3 Min Read
- By: Dan Bullmore
Mercedes 6-Cylinder M103/M104 Belt Tensioner Replacement

The M103 and M104 Mercedes-Benz engines are as common as they are solid. These straight-6 engines carried the line for Mercedes from the mid 80's into the late 90's. In this post, we will tackle the much debated accessory belt tensioner replacement. The job is simple if you have the right tools, or are willing to be creative! I suggest reading this guide entirely before attempting the job, and then using it as a reference during the repair.
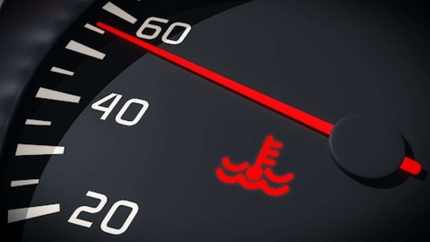
Like most cars, a loose belt on the Mercedes might squeak, but on these cars, they may also cause your air conditioning to cut out unexpectedly. This is because the A/C system employs a compressor speed sensor. If the compressor and engine speed are not in agreement, such as might happen when the compressor seizes (or the belt is loose), the clutch is released so that the belt is not damaged (thanks Mercedes, for looking out for us)!
I have written this document such that you do not need to remove the radiator or any hoses. This saves a tremendous amount of time, but you must be very careful not to damage any of the cooling system hardware.
Necessary items:
- 8mm Allen key
- 10, 11, 12, 13, and 14mm sockets and wrenches, as well as suitable extensions and a socket wrench
- 19mm socket (this should be a 6 point socket, as a 12 point may damage the bolt)
- 3/16” smooth rod, and a means of bending it (pliers, vice, etc.)
- Sealant (I used oil-safe RTV)
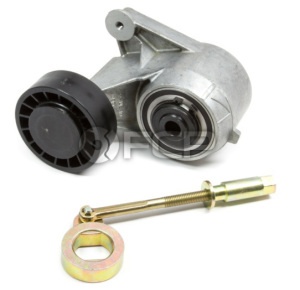
- Mercedes Accessory Belt Tensioner Kit (W140) - Febi 1032000870KIT3
- Optionally, a new belt and tensioner shock absorber
 Typical M103 Pulley Diagram. Pulleys in red must be removed. 19mm tensioner bolt shown.
Make a diagram of your auxiliary belt routing before proceeding. This can save you a lot of frustration.
Remove the fan shroud: this procedure differs between models but is fairly straight forward.
Now remove the cooling fan. This requires a special tool from Mercedes, but we will be making our own. Collect a 3/16” smooth rod from your local hardware store, and bend it into an L shape with about 3/4 of an inch of length on the stubby end.
This will fit in between two bosses on the fan bearing assembly and pass through a hole in the fan pulley to keep it locked. At this point, you can remove the fan center bolt with an 8mm Allen wrench. Remove the fan and viscous clutch and set it in a safe place. If your tensioner has failed, it should be somewhat easy to remove the belt at this point. If not, locate the 19mm bolt and gently loosen it. Once it is loose, turn the tensioner nut counterclockwise until the belt is loose.
At this point, we must remove the pulleys for the fan, the water pump, and the power steering pump. Continue to counter-hold the fan pulley with your special tool as you remove the bolts on it's face.
NOTE: The fan pulley is made of an extremely soft alloy and will be damaged if it falls. Grasp it carefully and set it in a safe place. Also, be sure to note the orientation of your pulleys (hub inside or outside) for reinstallation.
A special counter-hold tool also exists for the water pump, but I didn't have it, so at this point it is up to you how you would like to proceed in removing the pulleys. Just be careful not to damage your radiator or interfere with the coolant hoses- these radiators are famous for snapping off at the neck.
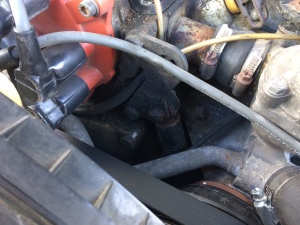
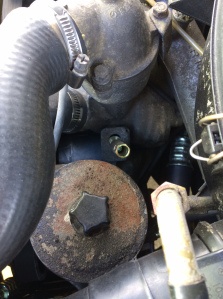 Pictured here (brass colored) is the tensioning nut that loosens or tightens the belt tension once the 19mm bolt is loosened.
Once the pulleys are off, you are greeted with a clear image of the tensioner. It is situated behind a bracket that resembles the letter Y. The first thing you will do here is loosen the center (19mm) bolt on the tensioner. Do this slowly and gently, as the bolt has probably been in there for years and may not be ready to come out. Next, remove the bolt and nut that hold the top of the shock absorber to the engine. Now remove the bolt on the upper driver side next to the power steering pump, and the bolt on the lower driver's side- note that this bolt may be held in behind the pump with a nut that you will have to counter-hold. After these bolts are all loosened, you can remove the bolt on the passenger side of the bracket.
NOTE: This bolt goes through the timing cover, and as such will be oily. Be careful to not allow foreign items to fall into the bolt hole, as this is where your timing chain resides.
Now locate the tensioning rod assembly and turn it counterclockwise to loosen. Once the rod is free from it's bracket, the tensioner can be wiggled out of it's place. Take note of the orientation of the tensioner, as it is critical in reassembly. Reassembly is the exact reverse of removal, with two important notes:
1. Be sure to put sealant on both sides of the bracket where the bolt enters the timing cover. This will keep oil from leaking out and debris from falling in.
2. Behind the 19mm bolt, there is a plastic arrow pointer with splines that slips on the center of the tensioner. Put this on your new tensioner with the pointer pointing at the farthest right point on the “scale” cast into the tensioner. This will guide you as you tension the belt by giving you a gauge of the tensioner's travel.
The procedure for tensioning the belt is critically important, as incorrectly tensioning the belt is almost assured to destroy the tensioner or tensioning rod. To apply tension, the 19mm center bolt must be loosened, and then the tensioning rod turned clockwise. Once satisfactory tension is applied, the 19mm center bolt is re-tightened. Attempting to tension the belt without loosening the center bolt will destroy the tensioning rod, resulting in necessary replacement.
 Here we see the upper shock mount for the accessory belt tensioner.
Wrap-up
Once you have all of the pulleys replaced and the belt tensioned, but before replacing the fan and shroud, I would run the engine for a few seconds to be sure that the belt has settled. At that point, I would loosen the 19mm bolt, adjust the tension if necessary, and re-tighten the 19mm bolt. You can now reassemble your fan and shroud assembly.
This is also a great time to replace your viscous fan clutch, as they are a common failure item as these cars get on in years.
Because torque specs vary from model to model, it is important to check with your local dealer, or do an internet search to be sure you are using the correct torque in tightening your fasteners.
In short, the replacement of the tensioner may be a bit time consuming, but barring anything unusual (broken bolts, rust, etc.), it is by no means difficult, and is absolutely critical to ensuring years of further enjoyment from your car.
Shop Mercedes Parts at FCP Euro
 Dan Bullmore is a physicist and engineer from Houston, TX. Preferring the old to the new, Dan has owned many examples of Mercedes and Volvos and has devoted much of his time to maintaining and understanding them.