I picked up a set of wheels for my brick a couple of months back. I had been keeping an eye out for this exact set of Volvo wheels, 16” Meteors. If you know about the abstract naming scheme of Volvo wheels, then you’ll know these are essentially baby 17” Comet wheels, in my opinion, some of the nicest looking wheels Volvo has made. I didn’t want 17” wheels due to potential comfort issues, and 16” wheels look great on my Volvo 940. I would have to take care of any offset issues later, but that’s a small issue.
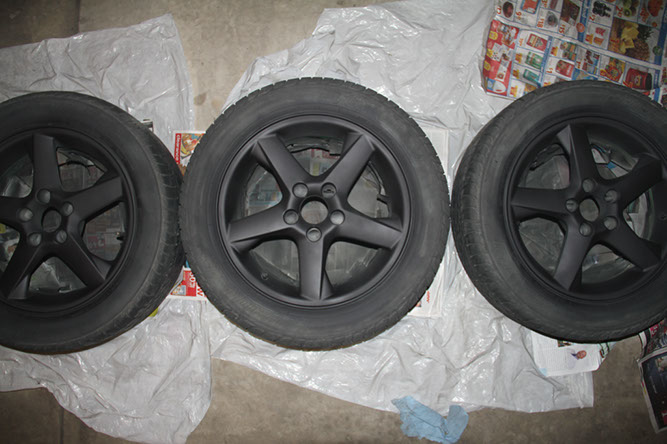
Though the tires were bald, and the paint was flaking off they looked alright. After taking into account the rough shape they were in, I traded cash for wheels and stuffed them into my car and made my way home. I can’t say I was entirely planning on going all out and refinishing them, but once they arrived in my garage and I took a much closer inspection, it was clear they needed a full refinish. The paint was flaking off everywhere, and they were stained by, I’m guessing, leftover brake fluid or some much-too-aggressive wheel cleaner. All I needed was to paint these wheels in Hyper Silver to bring these wheels back to life, of course, without spending an arm and a leg.
[Disclaimer: If you are looking for an absolute perfect finish, note that there are a few steps I skipped in the interest of time and money. I don’t believe that the steps I skipped would have contributed greatly to a better finish. These steps are stated below, but I think you will agree that the end result is close to what you would get if you spent twice as much time on them]
 Condition of the wheels before refinishing. Note the dark streaks and bubbling and flaking of paint.
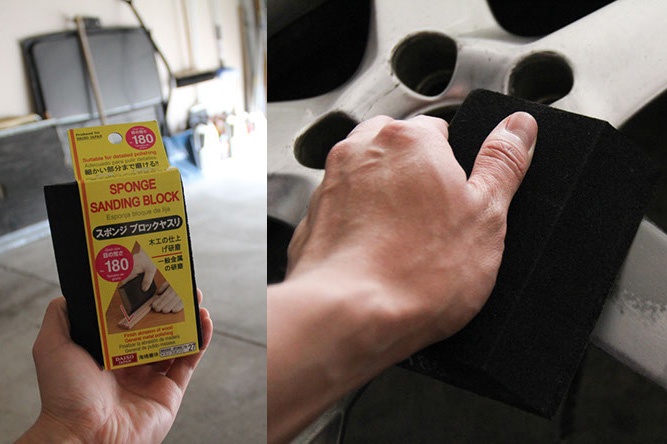
To start sanding, I intially used a 180 grit sanding sponge. This grit was very appropriate for taking off the old finish, removing it quickly. Unfortunately, the sponge was starting to fall apart after one wheel, so I ended up buying some 150 grit sandpaper and wrapping that over the existing sanding sponge. I personally found that continuing to sand with the 150 grit produced very good results. By using old pieces of sandpaper, you’re essentially sanding with a progressively finer paper. However, you can always buy a finer sandpaper, say 320 grit, but you probably won’t see a large difference after 320. A rule of thumb is to double the grit when moving to a finer paper.
Along with sanding, I also had the unenviable task of chipping away all the pieces that were flaking off. From what I can gather, it looks like the oem finish consisted of a primer, followed by an epoxy sealer, then finally the metallic paint. This is an example of the epoxy coating coming off in one piece. I would say the worst areas were the point where the spokes met the outer rim.
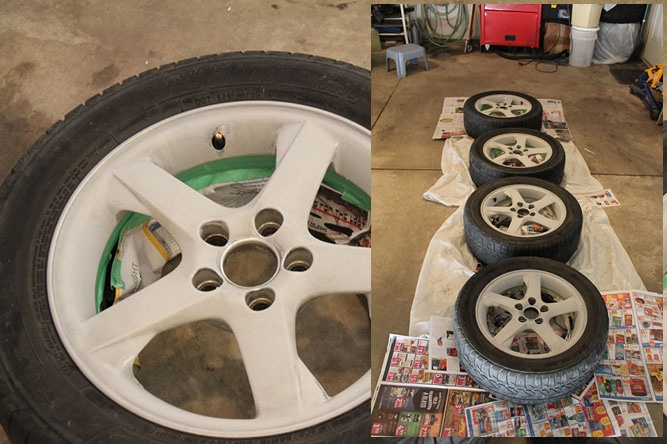
This is what I ended up with after two full afternoons of sanding. In order to get the surface smooth, you’ll notice that I had to sand right through the primer in some areas. The darker gray is the epoxy sealer primer and the light gray is the regular primer.
 Finished sanding the wheel
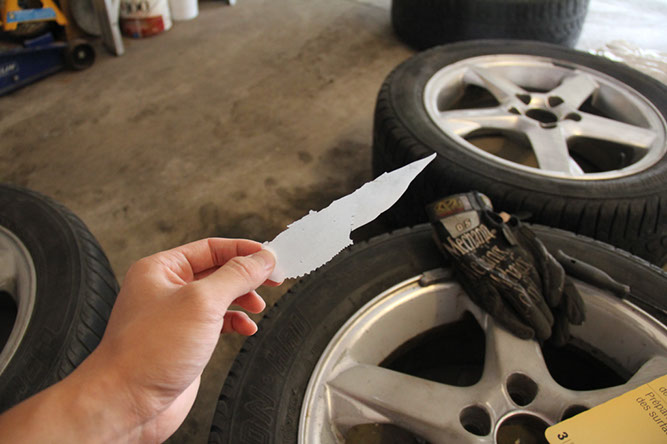
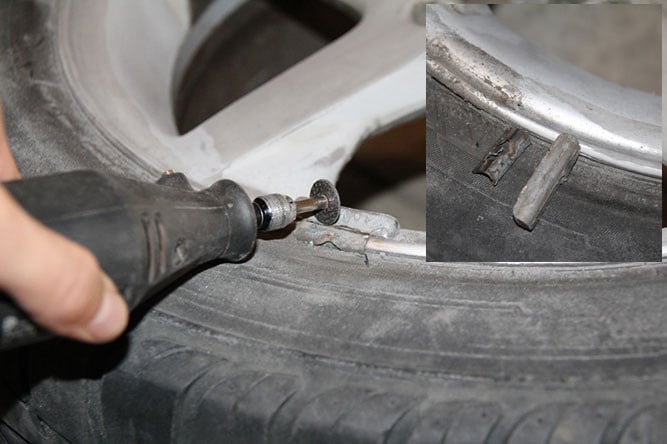
I also needed to take off the wheel weights. If you have a special tool to remove them, by all means, that’s the best way to do it, especially if you want to reuse your wheel weights. But if you’re like me, you won’t have that tool and using a screwdriver will only end up chipping your rim. I used a dremel to cut the wheel weight off. What makes this method safe is that you don’t need to cut all the way through the band, just enough so that you can bend it back. It should snap off with little force, using a pair of pliers to pull it off.
 Cutting off wheel weights
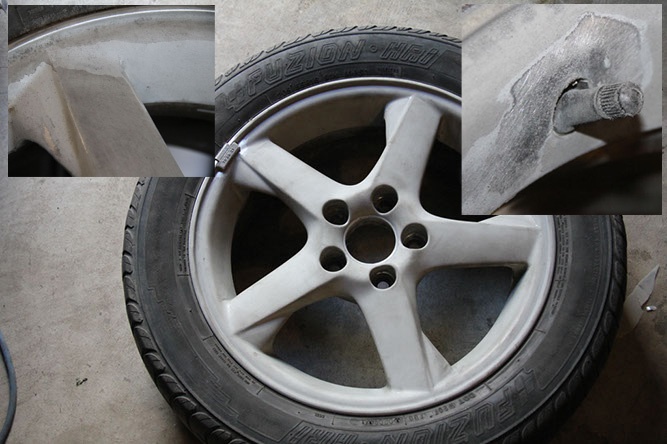
After all your sanding is done, you’ll hopefully end up with a smooth finish that even a detailer would be proud of. Lucky for me, there was very minimal curb rash. There were only two spots that may have needed some work, but I was happy to not worry about it. If your wheels did have bad curb rash, you would need to get some bondo and proceed to fill and sand it smooth. Give your wheels a good scrubbing. I used dishwashing detergent and a microfiber mitt to remove as much grease as possible. Because I didn’t have any finish I needed to take care of, I didn’t worry about damaging them. Keep in mind that regular use of dishwashing detergent will strip your clearcoat!
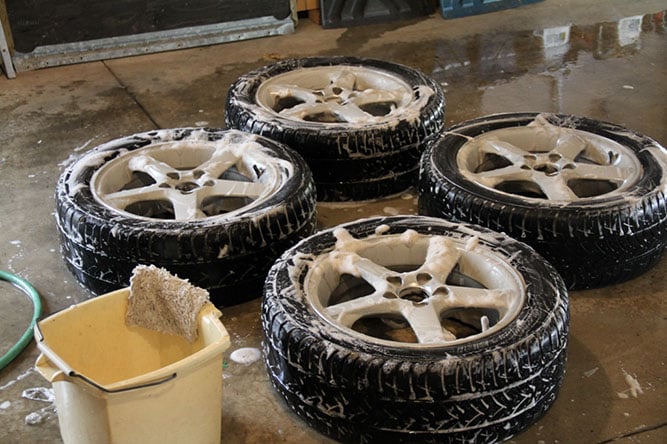 Cleaning the wheels
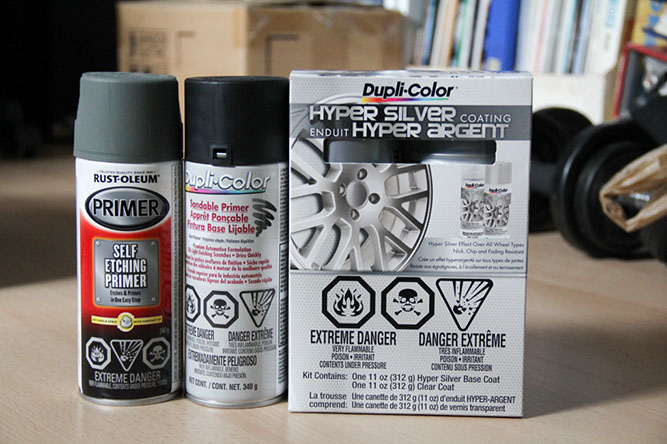
Here comes the fun part, painting. There are of course many different types of paint you can use. Any paint specific for wheels will work. Wheel paint is designed for the higher amount of abuse that wheels go through including high heat, and chip resistance. I decided on the Hypersilver kit, by Duplicolour. It is a two-step paint, with the first colour coat being a translucent silver layer followed by a slightly matte cleat coat. Due to this, depending on the colour of your primer, you will have a lighter or darker finish. I wanted a darker finish, so I picked up a can of black sandable primer. I was hoping that with this paint kit, I wouldn't have to pay a professional to get the Hyper Silver colour that I wanted.
Painting
This is what I did, and there are many different opinions in the paint industry. I can’t vouch for durability, but logically speaking, this process should work well. I can tell you that the finish turned out better than I was expecting.
The steps of painting are as follows:
- Etch Primer - Bonds the paint to exposed metal. If you don’t use etch primer, parts of your wheel that have metal exposed will have a greater tendency to allow paint to flake off. Sanding is optional. I decided to sand down this layer.
- Filler primer - Fills imperfections from the previous primer layer. Sanding is optinal. I opted not to sand this layer.
- Sealer primer (optional) - This seals the primer and prepares a smooth surface for the paint. I opted to not use a sealer primer as I figured the final colour coats of paint would be enough to seal it. and smooth it out
- Colour coat - Most important layer. Any imperfections from your previous work will be visible at this point!
- Clear coat - Important for the longevity of your finish. Your wheels may not look substantially different with or without a clearcoat, but it will improve the durability and resist chipping.
 Wheel Paint. Etch Primer, Filler Primer, Paint.
Before I started, its important to note you should wear a proper respirator and filter cartridge for painting. In addition to a respirator, I donned a pair of safety glasses, as well as an LED headlamp to highlight my painting to ensure as few missed spots as possible. I used a 3M respirator with a NIOSH P95 organc vapor cartridge. I opted to paint inside a closed garage to prevent dust from being kicked up onto the wheels. You may or may not look like a fighter pilot.

Using the etch primer, I sprayed the wheels, light coats about an arms-length away, lifting my finger off the nozzle and reapplying every time I changed direction from left to right. Note, I didn’t mask the tires as you normally would as I am planning to replace the tires before I mount them on my car. If you don't mask them, don't expect to be able to get the paint off the tires. I also didn’t bother masking the valve stem, although you probably should if you’re reusing it. The parts I did mask were the inner rim, which I decided not to paint, as well as the mounting surface for the lugnuts. It is very important to mask the lug mounting surface to ensure your wheel can be securely tightened. Tightening a lugnut on top of a painted surface can potentially cause you to undertighten a lug, or allow the lug to loosen over time. If you wanted a quick way of masking your tires, you can use cue cards and stuff it between the rim and the tire. One disadvantage to this method is, you will have a visible unpainted area on the outer lip of your rim. The best way is to simply mask it with tape.
 Masking the wheels and the floor
Once the primer has dried (follow the directions on the can to proper drying time) I sanded the surface smooth, used a vacuum to suck up the dust, and followed it up by a quick wipe with a microfiber cloth.
 In the process of painting the etch primer
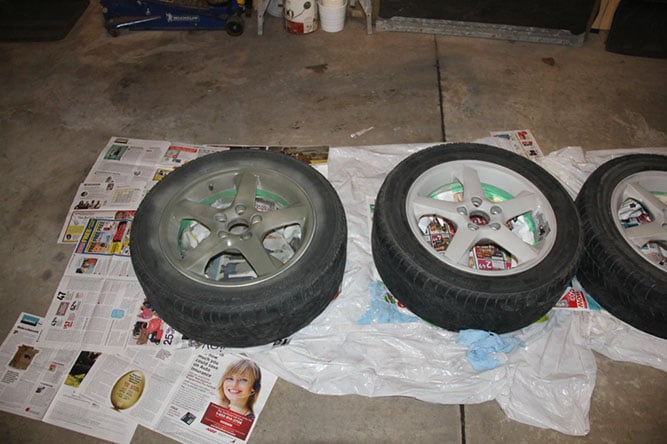
Next was applying the filler primer. Using the same technique, sprayed the wheels with the primer. After the primer dried, I opted not to sand this layer in the interests of time, and figuring it was not needed. If you’re looking for a perfectly smooth gloss finish, I would recommend sanding this primer layer. Sanding primer is fortunately, a very quick affair.
 Finished filler primer. It almost makes you want to keep it black. Almost.
Once your primer has dried (again, read the instructions on the can) the colour coat will go on and all your hard work will finally be paying off, or in worst cases, you’ll see exactly where corners were cut. The colour coat is a little tricky. It will go on much thicker than primer, so you need to be careful in order to prevent drips. Following the instructions on the can, I did 3 coats of paint, waiting 10 minutes between them, using the same technique as the primer. Remember to angle your spray can to get the hard to reach spots. Wipe off the nozzle every couple minutes to prevent droplets of paint coming off and creating pimples on your wheels.
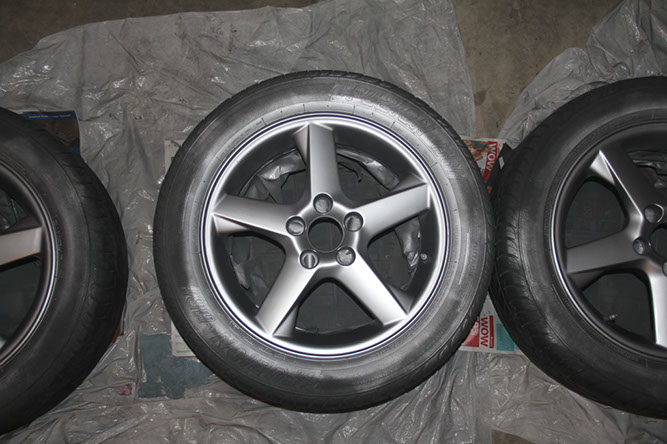 Nearly finished wheels. Awaiting the clearcoat.
The final step was the clearcoat. The most important part of the clearcoat is ensuring you cover every part of the wheel. Remember, this is your last layer, and you want to make sure all your paint is protected. I did three coats, waiting 10 minutes between the first two, but 20 for the last, heavier coat.
After everything is painted, let it dry for a couple hours at least, before handling, or removing the masking. If you look closely, you will notice imperfections with the wheel. The finish is not perfectly smooth, and unfortunately, there are dust particles in the paint to varying degrees. On the other hand, only a perfectionist would have issue with the finish and I think the paint should be pretty durable in the long term.
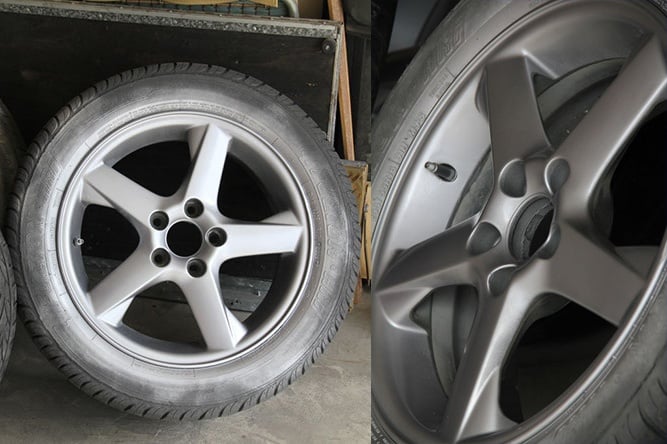 Finished wheel. Bonus points for identifying what the wheel is resting on. Looks different than the previous picture due to lighting.
All in all, I'm happy with how these wheel turned out. The Hyper Silver finish really enhanced the edges of the spokes. From my experience, here’s some tips for a better finish:
- Sand all primer layers.
- Paint your wheels in an elevated position, such as on a table, to reduce dust in the paint
- Use multiple light sources during painting to reduce missed areas.
- Have extra paint on hand. I managed to finish all my wheels with my paint I had, but only just.
- For a lighter Hyper Silver Finish, use a gray filler primer. I personally like the deep silver finish, in my opinion, exactly what Hyper Silver should be.
- If you're painting wheels with the tires still on them, take a blade lightly go between the rim and tire, ensuring there are no parts of the paint stuck to both the rim and the tire. Additionally, put a bit of oil on the rim lip to reduce the chance of chipping during the tire changing process. *Hat-tip to Bob*
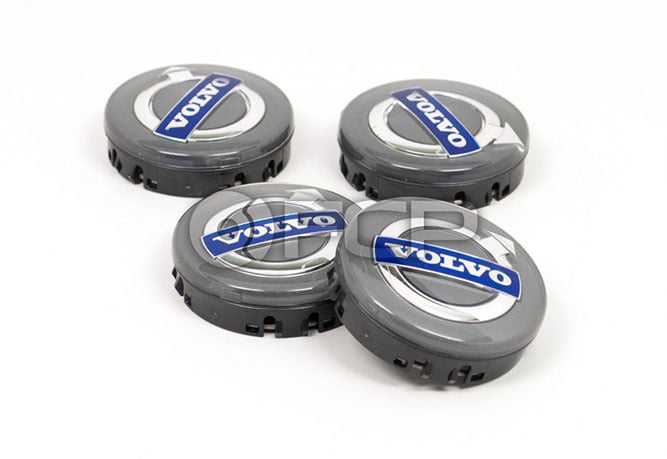
Finally, to finish off the wheels, it wouldn't be complete without a set of Volvo center caps. I love the look of the new "Ironmark" logo, and will surely update the look of my old brick.
There you have it. After a couple days and no more than about $50.00 in paint and sandpaper, I have myself a set of refurbished wheels to put on my car next summer. If you have any tips or comments, I'm all ears.