
If you've ever gone through the trials of removing a Vanos unit on an E36 BMW, congrats! You’re on your way to a well-functioning Vanos system. Vanos troubles can be very frustrating. They are prone to a nasty ticking noise and failed gaskets on the Vanos piston. If you go to BMW for replacement gaskets, they will happily offer you a rebuilt Vanos unit for a hefty price - they do not provide replacement gaskets.
The aftermarket o-ring is made from Viton
Since BMW provides rebuilt Vanos units with gaskets made from the material that is known to fail, problems will resurface with time. Aftermarket seals can be acquired from Beisan Systems. While the OEM o-ring is made from a material called Buna, the aftermarket o-ring is made from Viton. Viton is much more suited for engine applications as it resists higher temperatures and chemicals better than Buna.
If you wish to do the anti-rattle repair, you can get a Vanos rebuild kit from Beisan Systems that includes new seals and anti-rattle parts. To do the anti-rattle repair you will need to purchase a few special tools from Beisan Systems; including a special 18mm socket and soft vise jaw liners.
DrVanos offers rebuilt Vanos units with upgraded seals and anti-rattle bearings. It costs quite a bit more, but if you’re not in the mood to rebuild your Vanos, they do it for you! For those who like to save money by doing it yourself, let's get started.
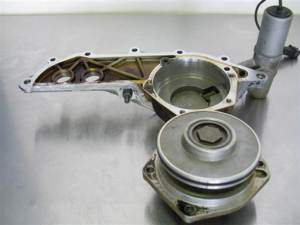
First, remove the VANOS unit from the vehicle.
Removing and Installing the VANOS Seals
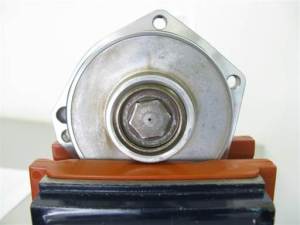
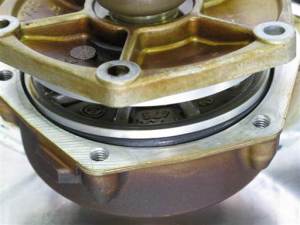
- Remove the Vanos cover bolts and remove the Vanos piston from the housing.
- Inspect the cylinder wall for any defects. It should have a very polished appearance.
- Cut across the Teflon seal with a razor blade and remove from the Vanos Piston groove.
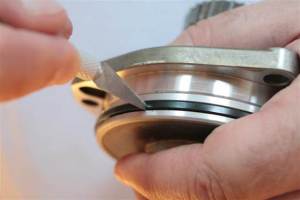
- Underneath the Teflon seal will be an o-ring. Cut it out with a razor blade and remove from the Vanos Piston groove.
- Clean any debris from the groove on the piston- be sure to use a cloth or towel that doesn’t deposit fibers.
Installing The Anti-Rattle Kit
Given that you decided to buy and install the Anti-Rattle kit, here is how to do it. You want to do this before installing the new o-ring and Teflon seal. Also, the soft vise jaw liners are a necessary tool when trying to perform this, without them the vise will damage the aluminum piston.
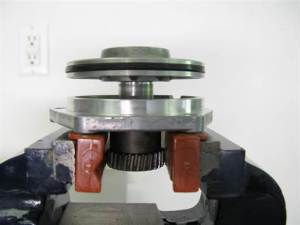
- Place the Vanos piston in the vise with the piston at the vise outer jaw.
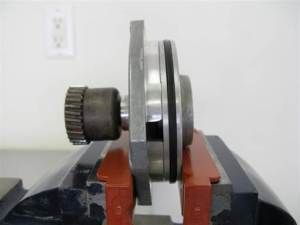
- Rotate the Vanos piston body so that the extrusion on the bolt hole rests on the jaw liner. As such.
- With the piston body oriented like this the bolt hole extrusions will counter-hold as you try to loosen the cover bolt.
- Using the special 18mm socket loosen the Piston cover bolt. But do not remove!
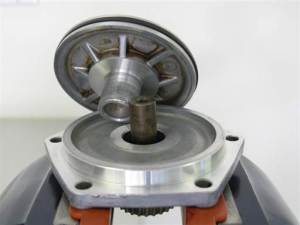
- So, now that the bolt is loose, loosen the vise and flip the Vanos piston body and tighten onto the splined shaft.
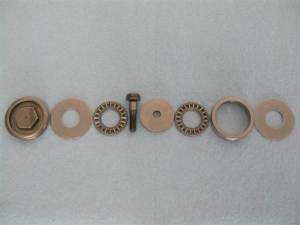
- When you remove the bolt completely you’ll start removing washers and thrust bearings.
Keep track of the order the washers and thrust bearings are removed.
After removing the cover bolt you should remove 1 flat washer and 1 thrust bearing.
- Using a T-30 torx socket loosen the torx bolt. It is a left hand thread, so left=tighten right=loosen.
- Next, remove the next washer and thrust bearing.

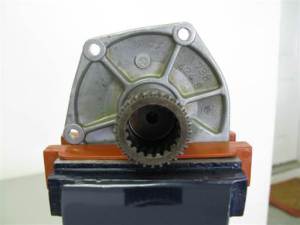
- At this point you can remove the Piston from the cover and splined shaft.
- Now you need to remove the outer bearing ring from the piston. This will not be re-used.

- Next, remove the washer from below the bearing. I used a pick tool.
- Clean the piston and bearing parts with brake cleaner.
- To prepare the piston assembly for installation, set all the washers and the new bearing in the assembly order.
Re-installation of bearings and washers is exact opposite of removal.
- Tighten the Torx bolt to 6 ft-lb. Be sure to not over-tighten.
- When installing the piston bolt cap, only hand tighten.
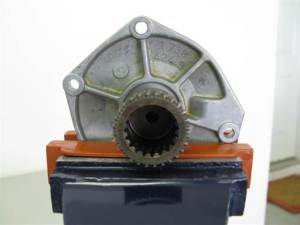
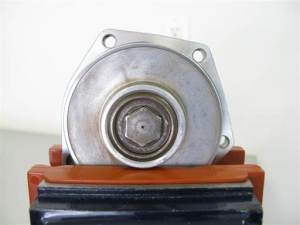
- Loosen vise and flip piston assembly and orient as such:
- Fully tighten the piston bolt cap to 30 ft-lb.
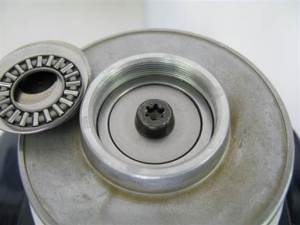
- When looking at the piston bolt cap you’ll notice a small hole in the center of the hex.
- Spray some WD-40 through the hole and rotate the splined shaft to distribute the oil.
- Install the new o-ring into the piston groove. It should go on easy, insert it at one end and stretch it over the piston inserting it into the groove at the other side. Be sure the o-ring isn’t twisted. Do not use tools to stretch the o-ring, use fingers.
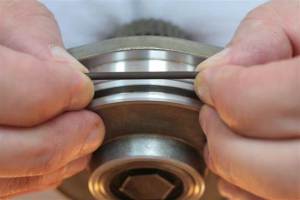
- Next install the Teflon seal, its rectangular. Insert into the groove at one end and stretch over piston and drop into the groove at the other end of piston. Make sure to not over-stretch the seal, it should take only moderate force to stretch over the seal.
If you’re doing this in moderately cool weather, soak the Teflon seal in warm water for a few minutes. Make sure you dry the seal before the install. After the Teflon seal is installed it will fit loose in the groove, so we have to let the seal re-size.
- Apply a thin coat of oil to the Vanos cylinder wall and to the Teflon seal.
- Insert the piston into the cylinder at a slight angle, if it feels like the seal is binding, reposition and re-attempt.
- Press the piston all the way down into the cylinder and allow it to sit for 2 minutes then remove. The seal should be close to original size now.
- Now, reinstall the piston into the Vanos body and re-mount with the 5 bolts. Fully tightened is 7 ft-lb.
- It should take moderate force now to move the piston up and down in the cylinder.
Now your Vanos piston has been completely rebuilt! Please refer to BMW E36 M3 Single VANOS Unit Replacement for re-installation of the Vanos unit. You should see improved performance and gas mileage as well as a major decrease in Vanos noise with the anti-rattle kit installed.


