- 09/12/2014
- 2 Min Read
- By: Tim Wong
How to Install a Valve Cover Gasket on a Redblock Volvo

Among the top most annoying problems car owners like us experience are oil leaks. Unless you don’t have a single care about your car, disappearing oil is usually a sign of something that’s just not quite right. For some cars, the engine will naturally burn oil, while unsettling, is fine. Other cars which burn oil, have issues.
My car luckily had nothing major, just a few leaks around the valve cover seal. Mind you, it took a while to get to this diagnosis. I arrived at this point after changing the oil cap seal and cleaning the engine block to make sure I knew where the oil was coming from. This fix was done on my 1991 Volvo 940 GLE. Lets get to it. I picked up the valve cover gasket set for the B234F. Although this applies specifically to the B234F, the installation on any other B23* engine will be similar.
First up, you’ll need to remove the spark plug wires. This is easily done with a large philips screwdriver. Lift off the cover and you’ll uncover the wires. A simple tug on the wire at each plug and it will pop out. There’s not a huge need to label or remember which wire goes where as it is impossible to install them incorrectly due to the length of the wires.
*Note: It not always advisable to tug on the spark plug wire to pull it out. When possible, always pull from the boot itself as this is the safest method of removal due to potential corrosion between the boot and the plug.
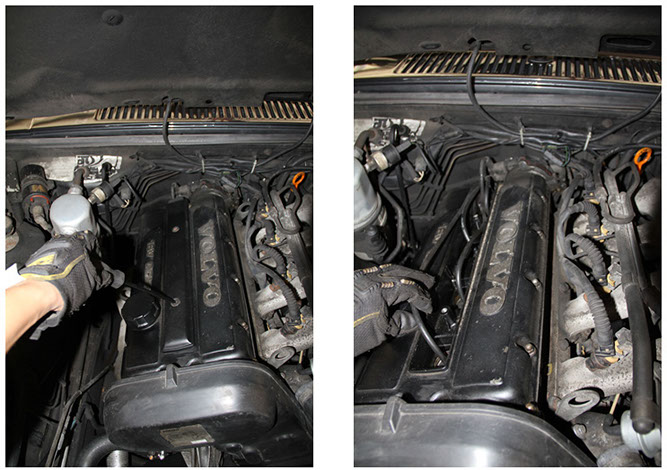
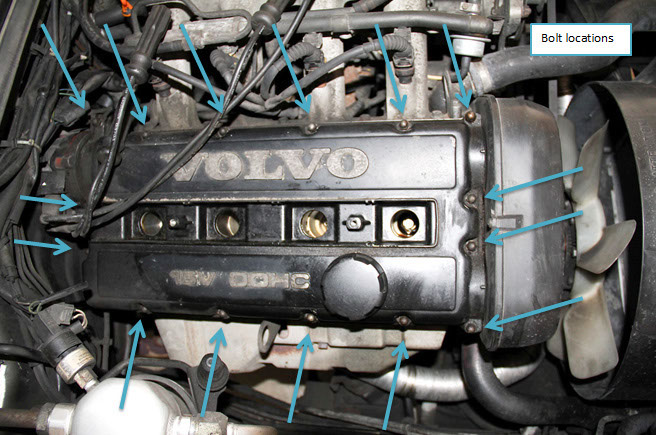
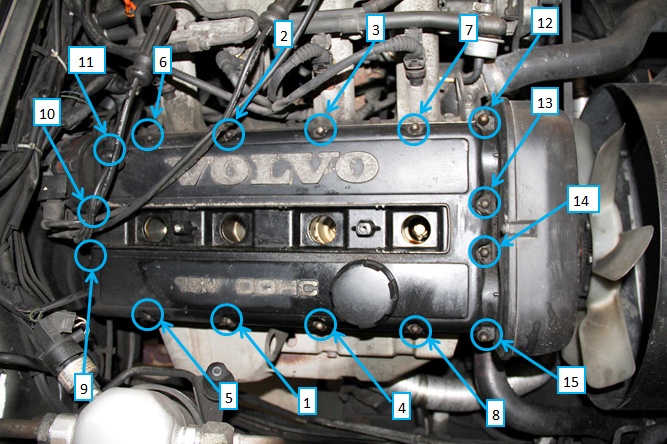
Once your wires are out of the way, use a 10mm socket to remove the valve cover bolts. There is no special method in removing them, other than making sure you don’t drop any. A magnetic socket would help here. Here are the locations of every bolt on the valve cover. Most are easy to get to, some are not.
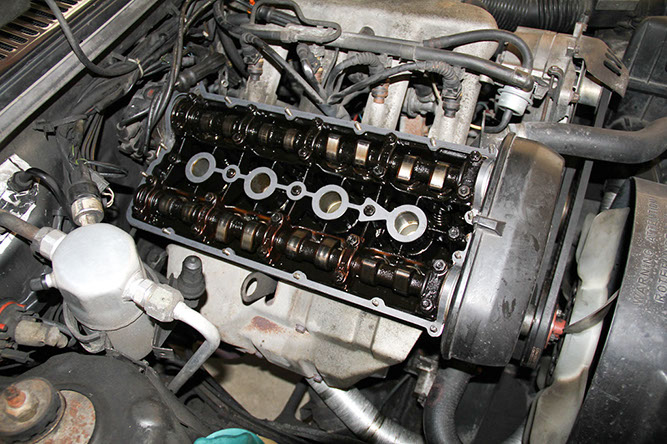
The easiest way to take the valve cover off is to remove the oil cap and pull the valve cover off from the flange on the inside. Don't even think of prying it off with a screwdriver. Next up: the gasket. For the most part the gasket will come off easily just by lifting it. If not, be very careful scraping it off the head. You can use a variety of tools, including paint scrapers or flathead screwdrivers. If you really want to be careful use a plastic scraper. You do have to be quite careful here as you don’t want any old gasket material falling into the channels of the head, potentially causing issues. In addition, the head is aluminum and it is very easy to put a gouge into the gasket mating surface which may cause leaks. If you accidentally gouge it, your best bet is to put some gasket sealer in that spot and hope for the best.
Really, the hardest part of this job is the removal of the gasket. Installation is relatively straightforward, but there are a few things to keep in mind. The rubber half-moon piece goes in a location at the back left of the engine. Use gasket or RTV sealant around this whole piece to ensure no leaks. It goes without saying in making sure the sealing surfaces are entirely clean of oil or old gasket. Make sure to check every corner because any leftover gasket material will cause sealing problems later on.
Next is the installation of the gasket itself. If you lay it on top, it will seem larger than it needs to be, but the extra size is there to accommodate the camshaft mounting points. Be very careful bending the gasket around the mounts because bending too much will break the gasket. If you do break it, don’t sweat it. Just use some RTV sealant to patch things up. Don't forget to install the gasket around the spark plug holes. It only goes in one way, so if it doesn't seem to fit the first time, flip it around and you'll see things line up.
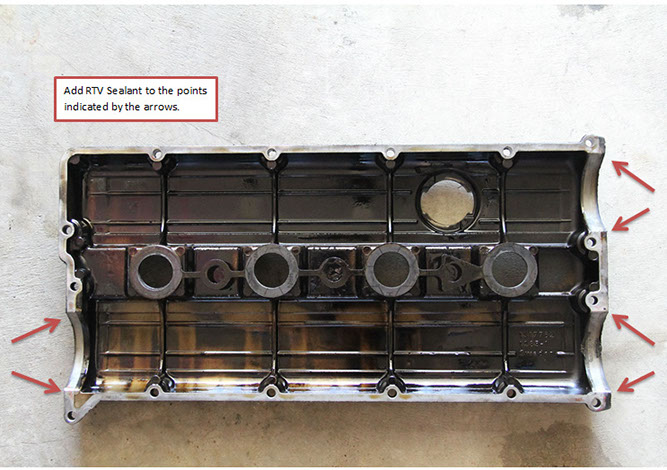
Next step is placing the valve cover on top. Before you do, put a blob of RTV sealant at each point indicated by the red arrows. 90 degree corners are notorious for leaking when installed with paper gaskets. Some people say to put sealant around the spark plug holes, but that's entirely up to you. It doesn't hurt to add some, it would just make removal of the gasket more difficult next time.
The final step is arguably the most important: tightening pattern. If you don’t do this step properly, you’ll have an uneven valve cover and your leaks will be worse than before. Follow the pattern below for a proper seating of the valve cover. It’s essentially a circular pattern, starting from the center. When tightening, tighten all bolts progressively, never tightening one bolt significantly more than any other. We want the cover to lay on top as straight as we can. As you feel one bolt tighten, move to the next one. Tighten the bolts to 8 ft-lb of torque. In layman speak, that’s a little more than finger-tight. There’s no load going through these bolts other than keeping the cover on, so all you need to do is compress the gasket slightly.
Reconnect the spark plugs, screw on the spark plug covers, and you’re good to go. Take your car for a spin, and have a quick check under the hood afterwards and admire your work. That’s of course, if your leak was coming from the valve cover gasket in the first place…