- 09/28/2014
- 2 Min Read
- By: Dan Bullmore
How to Give a W124 Mercedes a Facelift Using Stock Parts

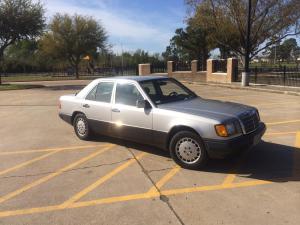 My pre-facelift W124 sedan
The W124 model Mercedes automobiles went through a few exterior design revisions throughout their history, most notably to the front and rear. My 1990 model was perfect for me, because I wanted to facelift the rear (I won't venture to make up a term for this), but “Euro” the front with appropriate headlights. Doing a full facelift on the front would not have been a difficult proposition, but I personally chose not to because I like the proud, chromed grille of the earlier W124 models. That being said, the total work I've done in making this car look how I wanted was not remarkable, but the results were fantastic.
Source the parts
Rear: Decklid filler panel, sourced from a salvage yard in matching color.
Sides: Later model “8-Hole” wheels, sourced from an elderly lady who had them laying around.
Front: Euro headlamp assemblies, replacement grille badge, sourced from the internet.
Wheels
I will start my discussion here with the replacement wheels, as the replacement is relatively straightforward, but there is one major caveat. Mid production, when Mercedes changed the wheel design on the W124 models, they changed the lug bolt design as well. Earlier models included a conical face where the bolt head contacts the wheel rim. Newer models have a hemispherical face. These should not be mixed up, as the wheels are designed for their particular lug bolts, and mismatching can cause poor fastening of the wheel to the hubs- a very dangerous condition. Also, be aware that there are different length bolts available. (As a side note, keep at least 5 of the old lug bolts for your spare in case you don't change it. If you do change it, keep one of the old bolts, as the conical taper is just the right size and angle for flaring the front control arm bushing sleeves. This will save you a lot of trouble if you ever do your FCA bushings on your own.)
[gallery type="square" ids="5755,5752,5753"]
When it comes to the rear deck, the facelifted vehicles included a decklid filler panel behind the license plate, and a slightly different tail light lens design. I have not replaced my tail light lenses yet, as I'm not sure if I prefer the amber or smoke gray, but the replacement is a simple matter of removing some fasteners from inside the trunk, and removing the assemblies. The filler plate, however, is slightly more complex.
The filler plate is attached around it's edge, and directly through the back into the deck lid. The difficult part deals with the studs around the edge. You will have to remove the black upper deck lid “handle” where it screws into the lid. This is because the filler panel has a foot that must go behind the handle. Once that is settled, it is time to secure the bottom edge of the filler panel to the bottom edge of the decklid. This is done by means of several metal clips that hold the studs that come through the back of the filler panel. If you are salvaging your panel from another vehicle, be very sure you keep these clips!
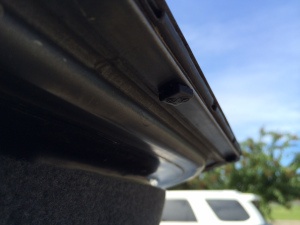 A shot of one of the clips that holes the filler panel to the deck lid.
Once finished, your car will have the updated filler panel, bringing you into the next decade of Mercedes design.
The Front
The facelift on the front of the car includes, basically, a new set of headlights which accommodate the slightly different shape of the new hood (also necessary). Since I elected not to replace my hood in preference of the old design, I instead purchased a set of “Euro” design headlights, and replaced my previous USDM ones. With the exception of swapping the hood, the job is the same in both cases. The work here is not too difficult. First, you must remove the corner turn signal lights. This is done by means of a clip, accessible under the hood which holds the corner light in place. The clip will be long and thin, and come out near the power plug for the light. Gently pull the clip in towards the grille while pushing the corner lamp out. Once it is out, you can disconnect the power, and you will be greeted by MOST of the fasteners that hold the headlamp in. Unfortunately, the rest of them are on the other side, near the A/C condenser, and are quite difficult to access. I did so with an 8mm offset wrench and plenty of time. Be careful with the sheet metal filler plate that goes under the headlight and above the bumper This is a very easy piece to bend, and it holds on on either side of the headlight. Installation is the reverse of removal. Be sure to aim your headlights before hitting the road, both for yourself, and as a courtesy to other motorists. I drove out to a field and aimed my headlamps against a line of trees for a rough adjustment, and then did a fine adjustment once all of my work was finished on the front.
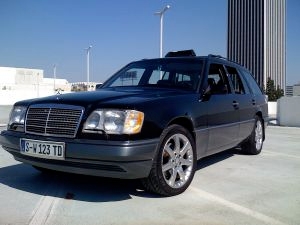 A post facelift 124 wagon
The results have been very pleasing to me, and in the end, isn't that what matters? I'm sure that some will opine that I should have finished out the facelift, or perhaps that I should have left my '90 model to look as it did before (I would tend to fall into this camp). But I have derived such enjoyment from having all of my favorite aspects of each year model- especially after having done it all myself. These cars are easy and affordable to personalize, and offer timeless beauty, no matter how you make it look.
Shop Mercedes-Benz at FCP Euro
 Dan Bullmore is a physicist and engineer from Houston, TX. Preferring the old to the new, Dan has owned many examples of Mercedes and Volvos and has devoted much of his time to maintaining and understanding them.