- 04/22/2014
- 1 Min Read
- By: Jay VanGorden
How to Fix & Reseal your Volvo 5 Cylinder Angle Gear

Previously, I posted, " How To Fix and Reseal Your Volvo XC90 T6 Angle Gear. " After it was published, I was approached by the 5 cylinder owners requesting that we put something together for them, too.
So, here it is. The following procedure is directly related to our Angle Gear Resealing Kit.
Oil leakage from the angle gear halves can be resolved by resealing and/or replacing the seals. The angle gear itself does not normally need to be
replaced. However, if you hear any noise or binding while driving or if there is any angle gear backlash, bearing damage, or excessive pinion shaft play found during disassembly, you should replace the unit.
Here’s a basic step by step on how to replace the seals and the steps needed for installation. This repair is strongly not recommended for beginning DIYers:
- Remove the angle gear.( Remove the right front wheel, axle bolt, hub, sway bar link, strut, right front axle and the 5 angle gear bolts. and drive shaft bolts. )
- Remove the 13mm fill plug and drain the fluid the best you can. This can be found on the side of the angle gear closest to the passenger side and will have a copper crush washer.
- Remove the axle seal, right side crown wheel ( Ring Gear )shaft seal, and pre-load adjustment nut O-ring. You can remove the seal with a screwdriver or pry bar. Before removing the crown wheel, make sure to mark it's position in relation to the housing. I suggest using a impact punch. You can also measure the height of the crown wheel to insure it's re-installed back to the same position. Remove the locking bolt and anchor and remove the nut. Volvo has a special socket for this but you can use a long screwdriver or pry bar to back it out. It just threads in so spin in counter clock wise to remove. Once the nut is removed, tap out the seal.
- Remove the pinion shaft seal from the angle gear. First mark the drive shaft flange in relation to the angle gear flange and remove the flange. Mark the position of the drive shaft flange center nut in relation to the housing and remove the nut. Remove seal, inspect the carrier plate, clean the mating surfaces and re-install the seal.
- Clean the angle gear using alcohol around the sealing surfaces and blow it clean with air when finished.
- Next remove the 10 screws and the cover separating the two halves. To make it easier you can tap it using a plastic hammer to release it.
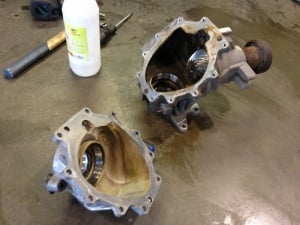
- Check out the pinion gear and crown wheel for any type of abnormal wear or damage.
- Check the pinion shaft for axial play or any kind of binding and also the bearing races, in both halves of the angle gear.
- If you find a bearing race is damaged, the pinion shaft has play, there is abnormal gear wear, or if there is any kind of binding, replace the angle gear.
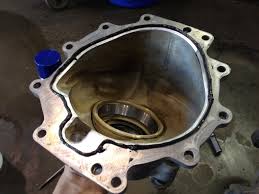
- If you find it to be ok, remove the left side crown wheel shaft seal and replace.
- This is the tedious part. Measure 3 mm from the inside of the flange and draw a line along the inside circumference.
- You'll need to file this so make sure you protect the bearing race from debris.
- File off the inner edge of the cover essentially making a tapered 30 degree angle up to the line that you drew.
- After filing you can now polish the chamfered edge with some emery cloth. Polish in a radial motion and clean when done.
- Remove and clean any remaining liquid gasket from both flanges. You can use scotch-brite and finish clean with alcohol when done.
- Apply a 5mm bead of chemical gasket approx. 1 mm from the chamfered edge you just filed.
 Complete the following withing 4-5 minutes to ensure that the two halves are torqued together while the sealant is still wet.
- Pay close attention to the routing of the sealant as shown. This is for the opening from the opposite side half which should be about 43mm wide.
- Note * Don't apply sealant to both halves.
- Install the 10 bolts and tighten them crosswise to 18 Nm. Then angle tighten them crosswise 85º.
- Install the axle seal.
- Install the preload adjustment nut o-ring from the angle gear. Lube the new seal, install, and re-install the nut back to it's original location. Tighten the locking nut to 50 Nm.
- Install the pinion shaft seal
- Install new left side and right side crown wheel shaft seal
- Install new bleeder pipe and filter.
- Fill the angle gear with 22 oz of gear oil and install new drain plug gasket
- Install the Angle gear ( Reverse from removal ).
Test drive. Smile, Relax, and celebrate. You just saved yourself over $1000.00