
Flip-keys certainly are fun - a neat little package with the key and the remote control all in one. A compact package when all you need is the remote to unlock the doors, and with the press of a button, the key flips out so you can start the car. My Volvo XC90 utilizes this type of key, as well as many other P2 Volvo models.
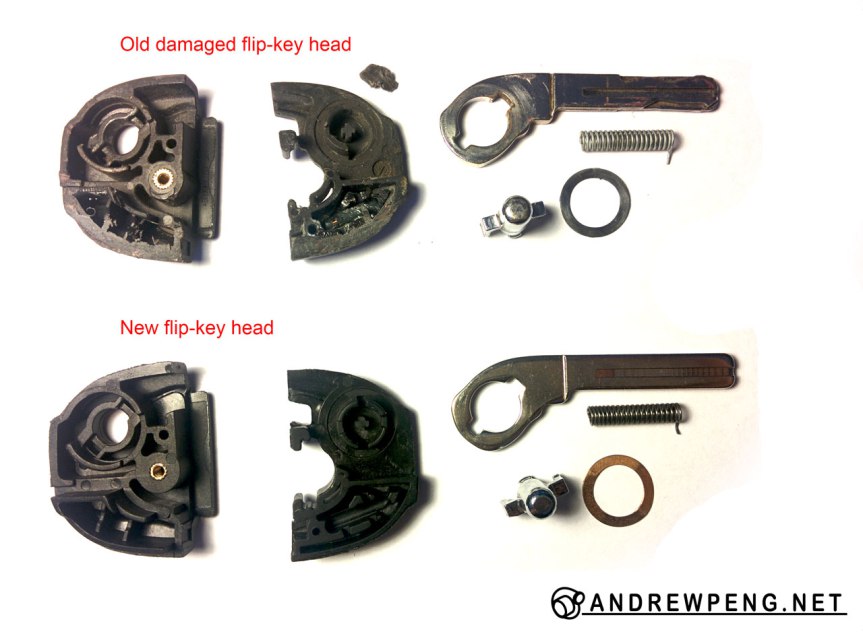
However, some models of the Volvo flip-key suffered from poor internal construction. The small plastic and metal parts were fragile, and if the key was dropped the plastic parts would often break. This would cause the key to either get jammed in the closed or open position, or the spring action would fail and the key blade would not stay in any position in particular, flopping around and catching on other things in your pocket.
Luckily, they are relatively easy to repair. You'll need a few items, all of which can be obtained on internet auction sites or China importers. The repair takes about an hour and you'll be dealing with very small parts. I used Xacto brand razor saws and hobby knives but any brand that makes a thin razor saw and precision hobby knife should work.
Tools you'll need:
- Replacement Volvo flip-key head
- Precision razor saw
- Precision hobby knife
- Torx T10 driver
- Small flat-blade screwdriver
- Large flat-blade screwdriver
- High-quality 2-part epoxy
Step 1: Separate the flip-key head from the body
[gallery ids="3095,3093,3094"]
Using the small flat-blade screwdriver, pop off the backing that exposes the battery. Use the Torx T10 driver to remove the screw that attaches the flip-key head to the body. Once the screw is removed, the flip-key head slides off.
Step 2: Saw through flip-key head to separate into halves
[gallery columns="2" ids="3096,3097"]
Using the precision razor saw, saw through the side of the flip-key head opposite the key blade. This will take some time to saw cleanly and neatly. The halves are glued together from the factory so it will take some time to work through the plastic pegs and glue. When it has been sawed through enough, use the large flat-blade screwdriver to separate the halves. You may have to saw through more or break off some of the standoffs to separate the halves. When prying, be careful when prying to prevent damage to the transponder chip which is encapsulated in glass.
Step 3: Remove transponder chip and key blade
[gallery columns="2" ids="3098,3099"]
The transponder chip is encapsulated in glass and glued into a small pocket in the flip key head. Using the precision hobby knife, carefully cut away any plastic that is holding the transponder chip in. Slowly scrape off the glue that holds the transponder in, and carefully cut around the chip to release it. With patience and gentle prying and careful cutting, the chip can be removed without damage. The key blade is easy to remove, just lift it up and take it out.
Step 4: Transfer transponder chip and key blade to replacement flip-key head
All of the parts drop onto the new flip-key head. Use a small dab of glue to secure the transponder chip inside the new flip-key head. Install the washer, spring, button, and key blade.
Step 5: Pre-load the spring and close the flip-key head halves
You need to pre-load the spring by rotating the button counter-clockwise. This is hard to describe but easy to do if you examine how the spring mechanism works. I found it easiest to leave the key blade in the open position, then pre-load the spring by rotating the button, then with one finger on the button, put the other case half on top and squeeze it shut. Test the operation of the flip-key before proceeding to the next step. If it didn't work, just separate the halves and try again. I also found it nice to bend the washer into a wave-shape to put more pre-load on the key blade to prevent rattles and make it fit better.
Step 6: Re-assemble key
Mix and apply the two-part epoxy to the halves of the flip-key head. Be careful when applying the epoxy to prevent sticking the moving components. Press the halves together firmly to close the gap. Mate the new flip-key head to the existing remote body and use the Torx T10 driver to screw the halves together. Pop the cover back on, wait for the epoxy to cure, and test it out! Pat yourself on the back for saving nearly $1000 by not ordering a new key from the dealer and programming it for your car.
About the Author: Andrew Peng
 Andrew is an aerospace engineer and car fanatic that enjoys working on his garage of Volvos and Subarus. When he's not busy attending car meets and shows or taking things apart, he enjoys driving his cars and finding interesting new ways to break them. He can be reached via his personal website at http://andrewpeng.net, Facebook, Google+, Instagram, or Twitter.


