
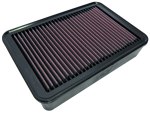
K&N filt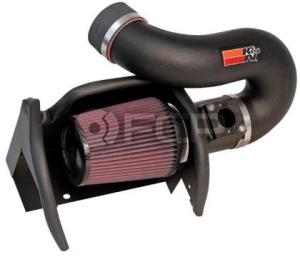 ers are great drop-in replacement air cleaners that are reusable and may also provide a slight performance benefit. I have a K&N panel filter installed in my Volvo XC90 V8 - not for the advertised performance gains, but because I didn't want to pay $20 each for an air filter. This is not an article on definitive performance (or lack of) benefits of a K&N filter. This is an article on cleaning and reusing your K&N filter.
The internet is awash with rumors, second and third-hand accounts, and speculation that the oil from a K&N filter can come off the element and damage or contaminate your MAF sensor. In all of the cars I've worked on, maintained, and owned, this has never happened. K&N insists that this isn't possible and even has videos online demonstrating their alleged inability to affect your MAF sensor - however this doesn't discount the possibility of user error in cleaning the filter.
Out of the box, the K&N filter usually comes pre-oiled in their trademark red oil. However it's a good idea to get into a habit of cleaning it regularly, for example every other oil change. Once the filter gets clogged with a large amount of oily debris it becomes very difficult and time consuming to clean.
This set of cleaning instructions is a modified set from K&N that I have been using. It uses all of the official K&N steps, but has additional steps to ensure success in cleaning and oiling it properly.
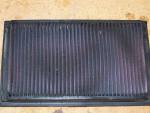 Step 1: Shake Excessive Debris Loose
Remove the filter from the car and shake out. Lightly tap it against a surface to shake the larger clumps of dirt and debris loose. This will make it easier to clean in the sink later, as the larger particles of gravel, insects, and other contaminants are removed now.
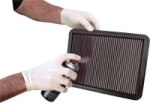
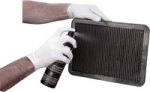 Step 2: Apply K&N Filter Cleaner
K&N has a special filter cleaning solution packaged in it's filter cleaning kits. It's specifically designed to dissolve away old filter oil, dirt, and grime, and not damage or shrink the cotton gauze filter element. Soak the filter element thoroughly with with the filter cleaner spray and let it sit for a few minutes. K&N notes that it's important to not let the cleaner dry on the element.
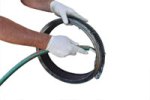 Step 3: Rinse With Low-Pressure Water
Rinse the filter with cool, low-pressure water opposite the direction of airflow. The water should be flowing from clean to dirty side (known as reverse-flushing) to remove the debris. It may be necessary to repeat steps 2 and 3, especially if the filter has a lot of small particulate contamination such as sand, pollen or dust.
 Step 4: Air Dry
To prevent damage to the cotton filter element, air dry only out of direct sunlight. Usually I set the filter to dry next to a fan while I continue working on the car, such as finishing an oil change or rotating tires. K&N specifically states no heat and no forced air drying. Don't use a hair dryer or compressed air. The filter will be a dull gray color right now as all of the oil has been removed.
 Step 5: Oil Filter...Carefully
This is the step that causes the most anxiety for people. How much oil should I use? How much is too much? It's simple and easy to do. I actually haven't seen a squeeze-tube of filter oil in a long time, all of the recent kits include aerosol spray cans. After the filter has dried, spray the oil into the pleats of the filter until you see it saturate it a deep red again. Make sure to spray in the direction of airflow for the filter on the dirty side. Don't try to do it all at once, I usually spray light coats giving the cotton plenty of time to absorb and take in the oil. Multiple lights coats do a better job than a single heavy coat.
Step 6: Blot and Remove Excess Oil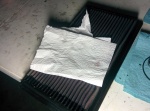
Maybe my memory is hazy from the aerosol spray oil, but I seem to remember a time when K&N included this as one of the steps. To prevent over-oiling (and possible contamination of the MAF sensor) - get a white paper towel and blot the pleats of the filter element. The paper towel will draw out excess oil. Do this until you don't see much oil on the paper towel anymore. According to K&N, you should allow at least 20 minutes for the filter to take in and wick the oil.
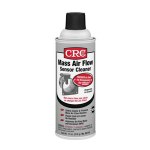 Step 7: Install and Test Drive...And Clean Your MAF Sensor
For the paranoid personality in all of us, install the filter and go for a quick spin around the block. If there were any issues with over-oiling the filter, now would be the proving point to see if it caused any adverse reactions in the car. If the car behaves strangely or lacks power, either the air intake system wasn't put back together properly or there is oil contamination on the airflow sensor. There are special cleaning sprays that can be purchased to safely clean out the MAF sensor. Just make sure to let the sensor dry completely before re-installing it. I find it a good idea to clean the sensor anyway, irregardless of if you over-oiled the filter or not. MAF sensors are expensive - keeping them clean and getting the most use out of them is always a good idea.
Happy cleaning, and say goodbye to disposable air filters for your car!
Let us know if you use K&N filter elements on your car, and what you think of them!


