- 02/21/2015
- 1 Min Read
- By: William Yelder
How to Adjust & Repair a BMW 5-Series Parking Brake (E34)

 The parking brake is often used in manual transmission cars as well as automatic transmission cars especially during DIY servicing. This system can fail over time or fall out of adjustment. When this happens the system begins to lose braking or stopping ability thus the car will begin to roll when engaged. This can be a dangerous situation when working under a car or parking on a incline. The parking brake should be actuated and tested often to ensure it will work when absolutely necessary.
Check to make sure that the parking brake can hold or stop the car from moving. Roughly two to three clicks is where you want it. Four is the limit for safe engagement. If the rear wheels do not lock up when the lever is applied, then the emergency braking system is in need of adjustment or repair.
Turn the gear until the rotor can't move
If found to be out of adjustment there are two locations where adjustments can be made. One location is under the parking brake lever via parking brake cables. The other is at the parking brake assembly via the geared adjuster under the rear rotors. First loosen the cables under the parking brake lever, then turn your attention to the parking brake assembly.
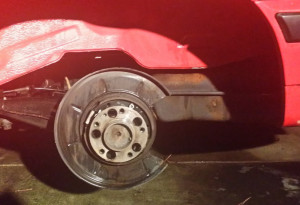
 Cables loosened, place the car into gear or park. Using a floorjack, jackstands, and chocks under the front tires to stop movement, lift the rear of the car and remove the wheels. Now you have to locate the adjuster. The easiest ways to accomplish this is by inserting a flathead screwdriver into a wheel bolt hole.
The parking brake adjuster was engineered to allow adjustment without removal of the rotor. Using a flashlight, locate the star-wheel adjuster through the lug bolt holes. You may have to turn the rear rotor by hand to locate it. The rule of thumb is to turn the gear until the rotor can not move then back off the adjuster so the rotor can move freely again.
From here, you can return back to the parking brake lever. Pull it up 4 clicks then tighten the cables in the car. Repeat this step if the wheels don't lock up, but back off the cable adjustment if the wheels no longer move freely when the lever is down.
Replacing Parts
When adjustment fails, the shoes are worn or the hardware is broken. The parking brake shoes are the most common failure point, and replacement is pretty simple and can be done by anyone with minimal experience and a few basic tools. Follow the same procedure as when inspecting and adjusting, but instead remove the rear caliper and rotors to get to the braking assembly. Compress the caliper piston slightly and remove it using a 17mm socket. Tie it away with some string or wire (speaker wire is the best to use if available) .
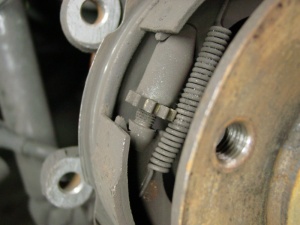
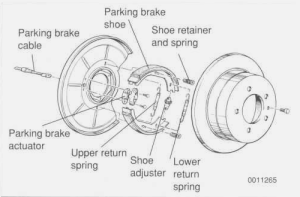 Using a hex socket or allen key, remove the screw holding the rotor to the hub. Rotor off, there is a clear view of the parking brake assembly behind the hub. The brake shoes are held into place by the adjuster, two springs, the spring tension screws and the parking brake actuator which is connected to the cable. Visually Inspect each piece to make sure they are up to the job. On occasion, the tension spring screws will wear and widen the mounting holes in the dust shield. I've had limited success trying to reform the mounting holes, for it would only be a temporary fix. In cases such as that replacing the dust shields is. Replacement of the shielding is beyond the scope of this DIY and should be performed by those of greater experience or a licensed mechanic - it requires hub removal.
Using an allen key or hex socket, carefully remove the tension screws. Once removed the brake shoes will be easier to separate from the other connecting parts. The two springs that sit next to the adjuster and the hinge can make reassembly a little frustrating. Once the adjuster is connected, actuator aligned, and tension screws fastened down, the worst is over.
Perform an adjustment after replacing any parts and enjoy.
About the author: William Yelder

William is an enthusiast, entrepreneur, and BMWCCA member from Freehold, NJ. Preferring the classic lines over modern convenience, he’s continuously improving the performance of his ’95 BMW 5-Series, One bolt at a time.