- 10/21/2014
- 2 Min Read
- By: Dan Bullmore
How to Access Console Switches & More on a Mercedes E-Class (W124)

One of the more annoying “features” of Mercedes automobiles between the 70's and 90's is the use of an external fader switch for the radio. Specifically in the W124 model, the radio only has one left and one right channel, which are split front and rear by the fader in the center console. While many owners have opted to splice and run the separate wiring from the fader switch up to a new stereo head unit or amp, I left the fader switch as it was. The biggest issue is that these fader switches deteriorate with time, causing one channel to completely drop out unless you fiddle with the roller. Contact wear seems to be the culprit, but a new switch is cheap enough that it usually isn't worth the time to disassemble the old one.
Some switches are fixed to the trim panel
In order to reach the fader switch on the W124, the center console wood must be removed. If you have a console mounted glove compartment, there should be two screws that hold it down to the center console, otherwise, you can just pull up the carpeting. This will reveal a single screw that holds the center of the wood panel to the console. You will now need to remove the plastic trim around the transmission shift gate. This is easily lifted with a plastic card or tool, or even a strong fingernail. Once out of the way, you can raise the back of the wood trim where the screw was, and gently pull up. Depending on the options on your vehicle, some of the switches are fixed to the trim panel and will still be connected at their plugs. It is very important to support the center of the trim panel when lifting, as not doing so will most likely cause the panel to crack. Work slowly so as to notice if any of the switches are hanging onto the panel. This trim panel actually curves up underneath the ashtray, so be careful not to damage the tray or its wood paneling.
-
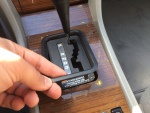
- The plastic surround on the shift gate should be removed before pulling up the panel.
-
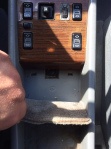
- Pulling back the carpet reveals the retaining screw for the wood panel.
-
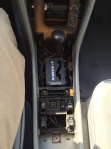
- This view of the console shows what you should expect to see after removing the wood panel.
With the panel out of the way, you have access to all of the switches in the center console, and some other interesting bits, such as the light bulb carrier for the shift gate illumination. The switches will pop out with a little convincing, but you must be careful not to break the delicate plastic backing. The radio wiring for the rear left and right run under this section of the console, so if you plan to do a true 4-channel stereo, you can start here by splicing the wires at the fader switch. Some have opted to put another rocker switch in the fader switches' location, as they are about the same size, and it takes care of the hole in the trim panel. Interestingly, I have also seen where owners have repurposed the fader as a potentiometer for controlling other loads such as ambient lighting. In my case, I am simply replacing the fader to retain the functionality of the system. My Becker radio has long since given up the ghost, but I'd like to find one in good shape some day and keep the original stereo system in the car. It does sound pretty good, in my view. Removing this panel is also important for troubleshooting electric windows, so knowing how to do it ahead of time can save you plenty of frustration down the road.
 While you're in there
With the console removed, there are a few bulbs and switches worth considering for replacement. There will never be an easier time than now!
Mercedes Instrument Panel Light Bulb - Osram 0005446794
Mercedes Door Window Switch - Genuine Mercedes 1248208910
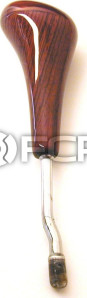
Mercedes Shift Knob Zebrano Wood (W124) - SK124Z90
Shop Mercedes-Benz at FCP Euro
 Dan Bullmore is a physicist and engineer from Houston, TX. Preferring the old to the new, Dan has owned many examples of Mercedes and Volvo vehicles and has devoted much of his time to maintaining and understanding them.