
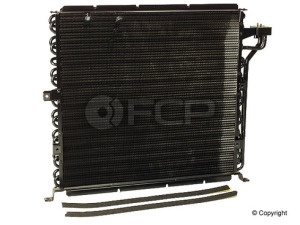
The A/C condenser is a very important part of an A/C system. It takes the pressurized hot gas, cools it, and brings it back to a liquid state. The liquid is then sent through the system to the receiver-dryer, and so on to the evaporator where a fan blows cool air through it into the cockpit of the vehicle. A/C condensers are usually located at the front of a vehicle, in front of the radiator.
Failure of the A/C condenser can occur from several things:
1. Age: Parts wear out, it's a curse of owning and driving a vehicle. Lots of service hours on an A/C system can wear out parts and the consistency of vibrations from driving can cause the condenser to crack in certain circumstances.
2. Flying Projectiles: For the most part the A/C condenser is very well protected by the electric cooling fan and its shroud, but that doesn't mean it is impenetrable. Small rocks can be flung from the road, through the grille, passing the fan and shroud smashing into the condenser causing a leak.
When the leaks do occur, and given they have been traced down to the condenser, replacement is needed. It's not a very difficult replacement but it involves several steps and a few special tools. Think of it as a radiator, but for pressurized gas rather than liquid coolant.
 Items Required:
- New A/C Condenser
- New Gaskets
- Manifold Gauge Set for R-134a (Special Tool) Rent from Autozone
- Vacuum Pump (Special Tool) Rent from Autozone
- 1 Jumbo Can of R-134a refrigerant/oil mix
- Make sure that the A/C system doesn't have any pressure on it.
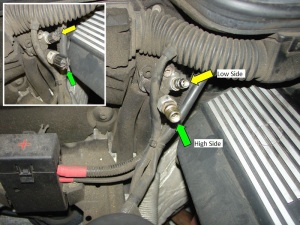
- Lift the hood and hang the manifold set on the hood latch and make sure all the valves are closed.
- Next, plug the low side (blue hose) into the low side port. If you see pressure (not vacuum) you need to take it to a shop to be evacuated. It is illegal to release R-134a into the atmosphere so please don't do it. It's also very toxic and you should be wearing gloves and safety glasses.
- If you do receive vacuum, you may have a small leak or not but may be able to re-fill it or add a stop leak additive.
- Raise the front of the vehicle, refer to proper jacking etiquette from your owners manual. Either by jack stands or wheel ramps, the vehicle needs to be raised high because the condenser needs to be removed form the bottom of the vehicle.
- Remove the front bumper. Pry the trim off on the front bumper with a flat blade screw driver. Underneath the long piece of trim that goes around the corner on each side of the bumper will be two nuts. (4 in total)
- Remove the screws (8 or so) from underneath the left and right brake ducts. And then remove the brake ducts from the bumper.
- Remove the fog lights or disconnect their harness's so they will slide out with the bumper.
- In each wheel well there should be 1 or 2 small screws adhering the splash guard to the bumper. Remove them.
- Remove the four nuts that were under the trim pieces on the front bumper. The bumper should pull forward. Remove carefully! If you're getting snagged up by the splash guards in the wheel wells, make sure there are no screws adhering the splash guards to the front bumper. When removed, set the bumper somewhere it wont be kicked or tipped over.
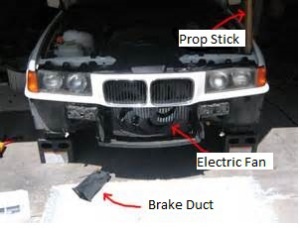
- Remove the upper plastic shroud covering the radiator.
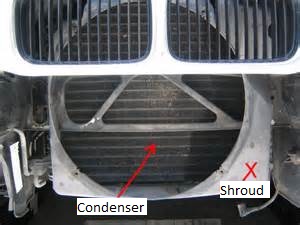
- Remove the 2 screws holding in the condenser.
- Remove the 4 screws holding up the electric auxiliary fan, and disconnect the wiring harness.
- After the fan is removed, remove the plastic shroud that was behind the fan. There should be two screws visible through the kidney grilles. With an extender you should be able to reach them.
- Remove the splash guard that was underneath the auxiliary fan.
- Remove the big plastic shroud in front of the condenser.
- Remove the A/C lines to the left of the condenser. Once removed, plug them with a towel of some sort to keep debris from entering the lines.
- Now, you should be able to maneuver the A/C condenser and remove it from the vehicle.
- Install your new condenser and re-attach the lines using new gaskets. Your new condenser may look a bit different, but as long as the mounting locations are the same everything should fit fine.
With everything hooked back up we are ready to move onto our next step which is recharging the A/C system. This section requires the use of the vacuum pump. If you are unable to get a vacuum pump in any way, it's time to take your car to a shop that can vacuum down the system and properly recharge it. Without a proper vacuum pulled on the system for at least 30 minutes in a warm (60+ degrees Fahrenheit) environment, moisture will not boil off and your system's integrity will be compromised from the inside out. The boiling point of water decreases while under vacuum, hence the need for this very important step.
Vacuum & Recharge
- Make sure there is enough oil in the vacuum pump and reconnect the A/C manifold gauge if you removed it, and hook up the yellow hose to the vacuum.
- Turn on the pump, then open the red, blue and yellow valves. You will want to run the pump for at least 30 minutes.
- Shut off all the valves and then the vacuum. Your system should be air and moisture free!
- There are a few ways to recharge the system, you can do it through the manifold gauge. Or, if your can of refrigerant came with a low side gauge and hose hook up; you can do it straight from the low-side port. The easiest is to buy the can with the gauge and hose. So, hook the hose up to the low-side port by the firewall.
- Start the car and set the A/C system on high, then start spraying the refrigerant with the can tipped upside down. Shake the can to help dispense all the refrigerant. Watch the gauge on the can, pressure should rise as you dispense the contents of the can and the air coming out of the vents should be getting colder. Once all of the contents have been dispensed, you're done!
If the gauge on the recharging unit rises as you dispense and then slowly falls after you let off, there may still be a leak in the system. Turn the car off and listen for hissing or whistles around the A/C components. There may be a seal you need to replace.
About the Author: Tony Robinett
Tony lives in Spokane, Washington and is a 3-D Design Engineer, machinist, and welder. When he's not at work he is designing and fabricating parts for his M3, and other BMWs alike.


