- 06/07/2022
- 8 Min Read
- By: Adam Goral
How To Replace The Water Pump On A Volvo V60, XC90, S60, & More (P3 & SPA Platform)

Volvo's new generation of electrically driven water pumps offer a substantial boost in efficiency over outgoing pulley-driven units. The lack of belt drive allows for new packaging options for the cooling system. If you're nearing 100,000 miles, it's around this time that you can expect to see failures in either the water pump or thermostat. Luckily, the water pump is easy to replace with the tips and tricks below.
Other benefits to the electric water pump include reduced power drag on the engine's serpentine belts and pulleys, the ability for a PWM signal from the ECU to control the pump (flow) speed independent of the engine RPM, and coolant circulation is possible without the engine running. This benefits the stop/start system as well as aiding hot engines on summer days after shutdown.
Volvo models and years applicable:
This water pump replacement kit fits a range of Volvos, including:
|
|
|
|
|
|
|
|
|
|
|
|
What are the symptoms of a bad water pump?
-
- Squeaking from the water pump at idle
- Low coolant light on the instrument cluster
- Intermittent or constant overheating
Ignoring the signs of a failing water pump and thermostat housing can be extremely detrimental. There's the possibility to cause irreparable engine damage due to overheating.
Volvo doesn't have a regular service interval on the water pump. However, you can expect to have to replace it as early as 75,000 miles. For the most part though, water pumps start to need replacing around the 100,000-mile mark.
How long will it take to replace my water pump?
Book time to complete the job is over 2 hours. If you're doing the job yourself for the first time, you can expect it to take you around 3-4 hours if you're an avid DIY'er.
How much does it cost to replace my water pump?
If you plan to take your car to the dealer to have this job done, you'd be looking at it costing north of $800. By purchasing the parts through us and doing this job yourself, you will only pay a fraction of the cost. Plus, when you need to replace them again, you can make use of our Lifetime Replacement Guarantee.
Tools required to replace your Volvo V60 water pump:
- Ratchet set
- Torque wrench
- Metric socket set
- Torx socket set
- Metric wrench set
- Hook pick set
- Plier set
- Extension Set
- Airlift II Vacuum Cooling System Filler
Parts required to replace your Volvo V60 water pump:
Other parts to replace when replacing your Volvo V60 water pump:
Volvo P3 Water Pump Torque Specs:
- Water pump bolts - 18 lb-ft
- Intake manifold bolts - 13 lb-ft
Steps required to replace your Volvo V60 water pump:
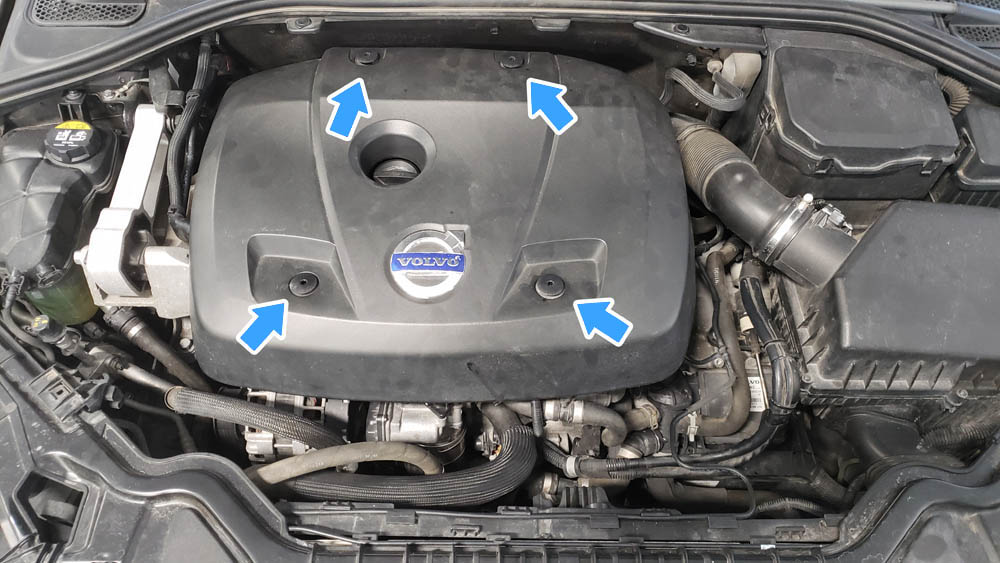
Step 1: Remove the engine cover
Start by removing the four plastic Torx fasteners that hold the engine cover in place. With this off, you can get a good look at the water pump that's the focus of this DIY.
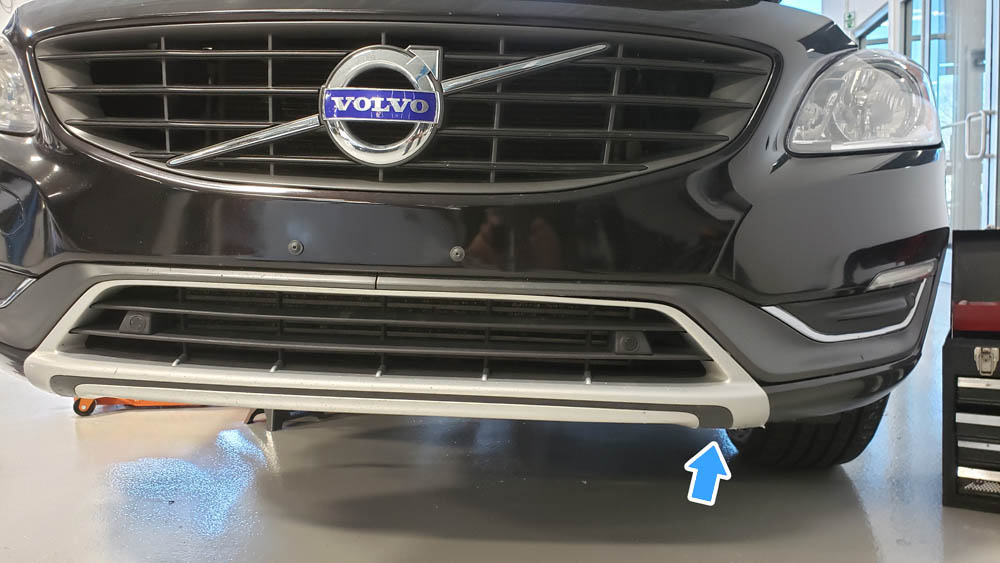
Step 2: Open the coolant reservoir and remove covers to access the drain
*Always use a jackstand when going under a car*
Open the coolant reservoir and safely lift the front of the car to gain access to the drain petcock on the bottom of the radiator. An air shield will need to be removed as well.
The coolant will flow straight to the left out of the petcock bung. You may choose to use a hose to direct coolant into a receptacle for recycling, or let it splash out into a catch tray. All of the coolant will not come out. Make sure to completely close the petcock when done draining, and don’t forget to reinstall the air shield before dropping the car.
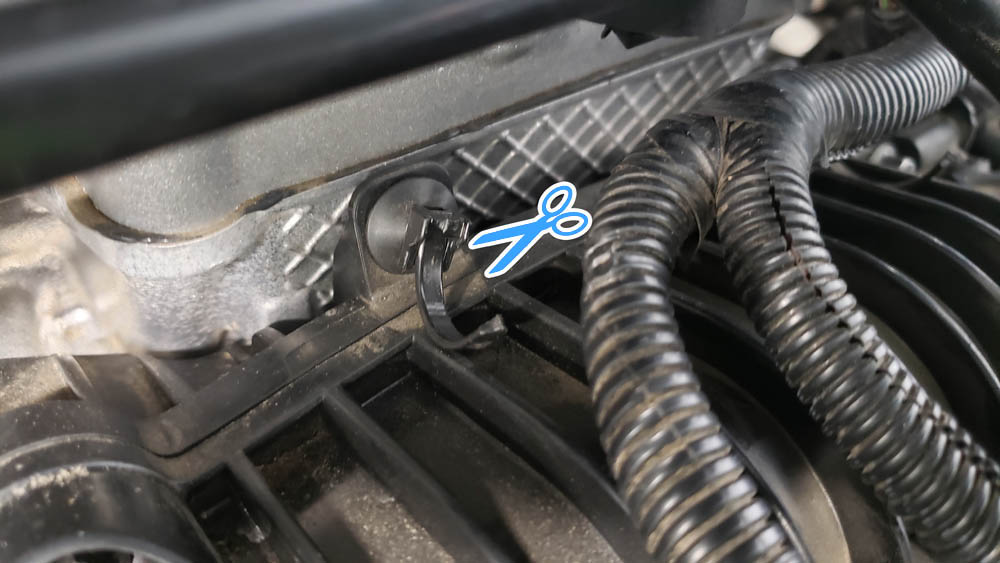
Step 3: Remove cable ties
We will now begin to remove the intake manifold by removing relevant cable ties holding a variety of hoses and wiring harnesses to the unit. Many of these will break, so you may find cutting them and pulling them out to be an easier solution than careful removal. In the case of this vehicle, most were already broken before starting the job.
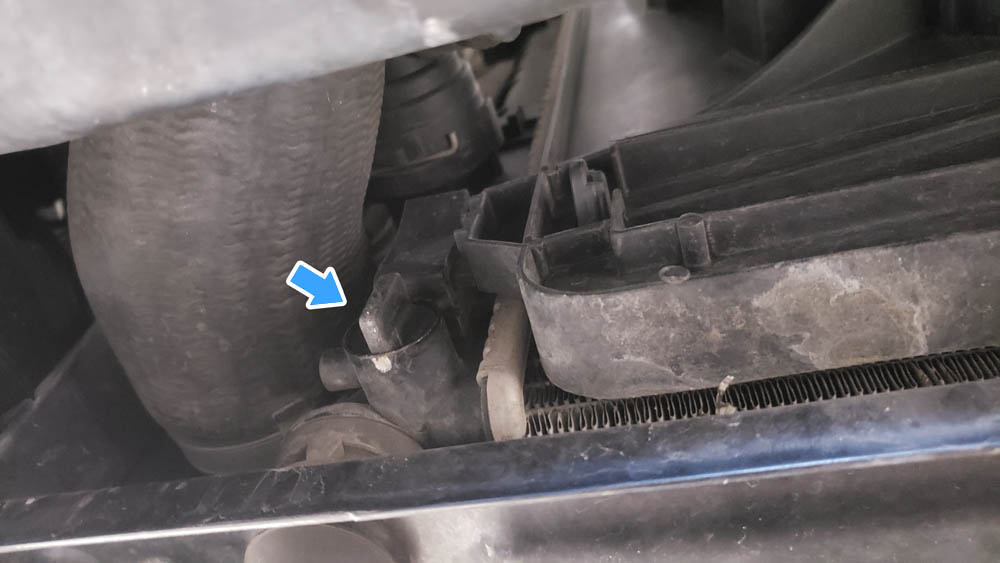
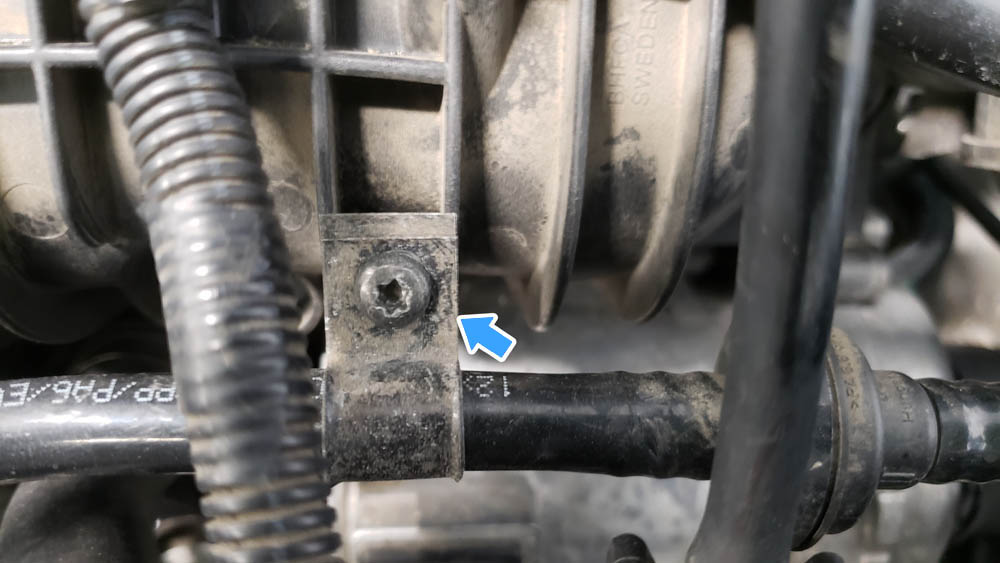
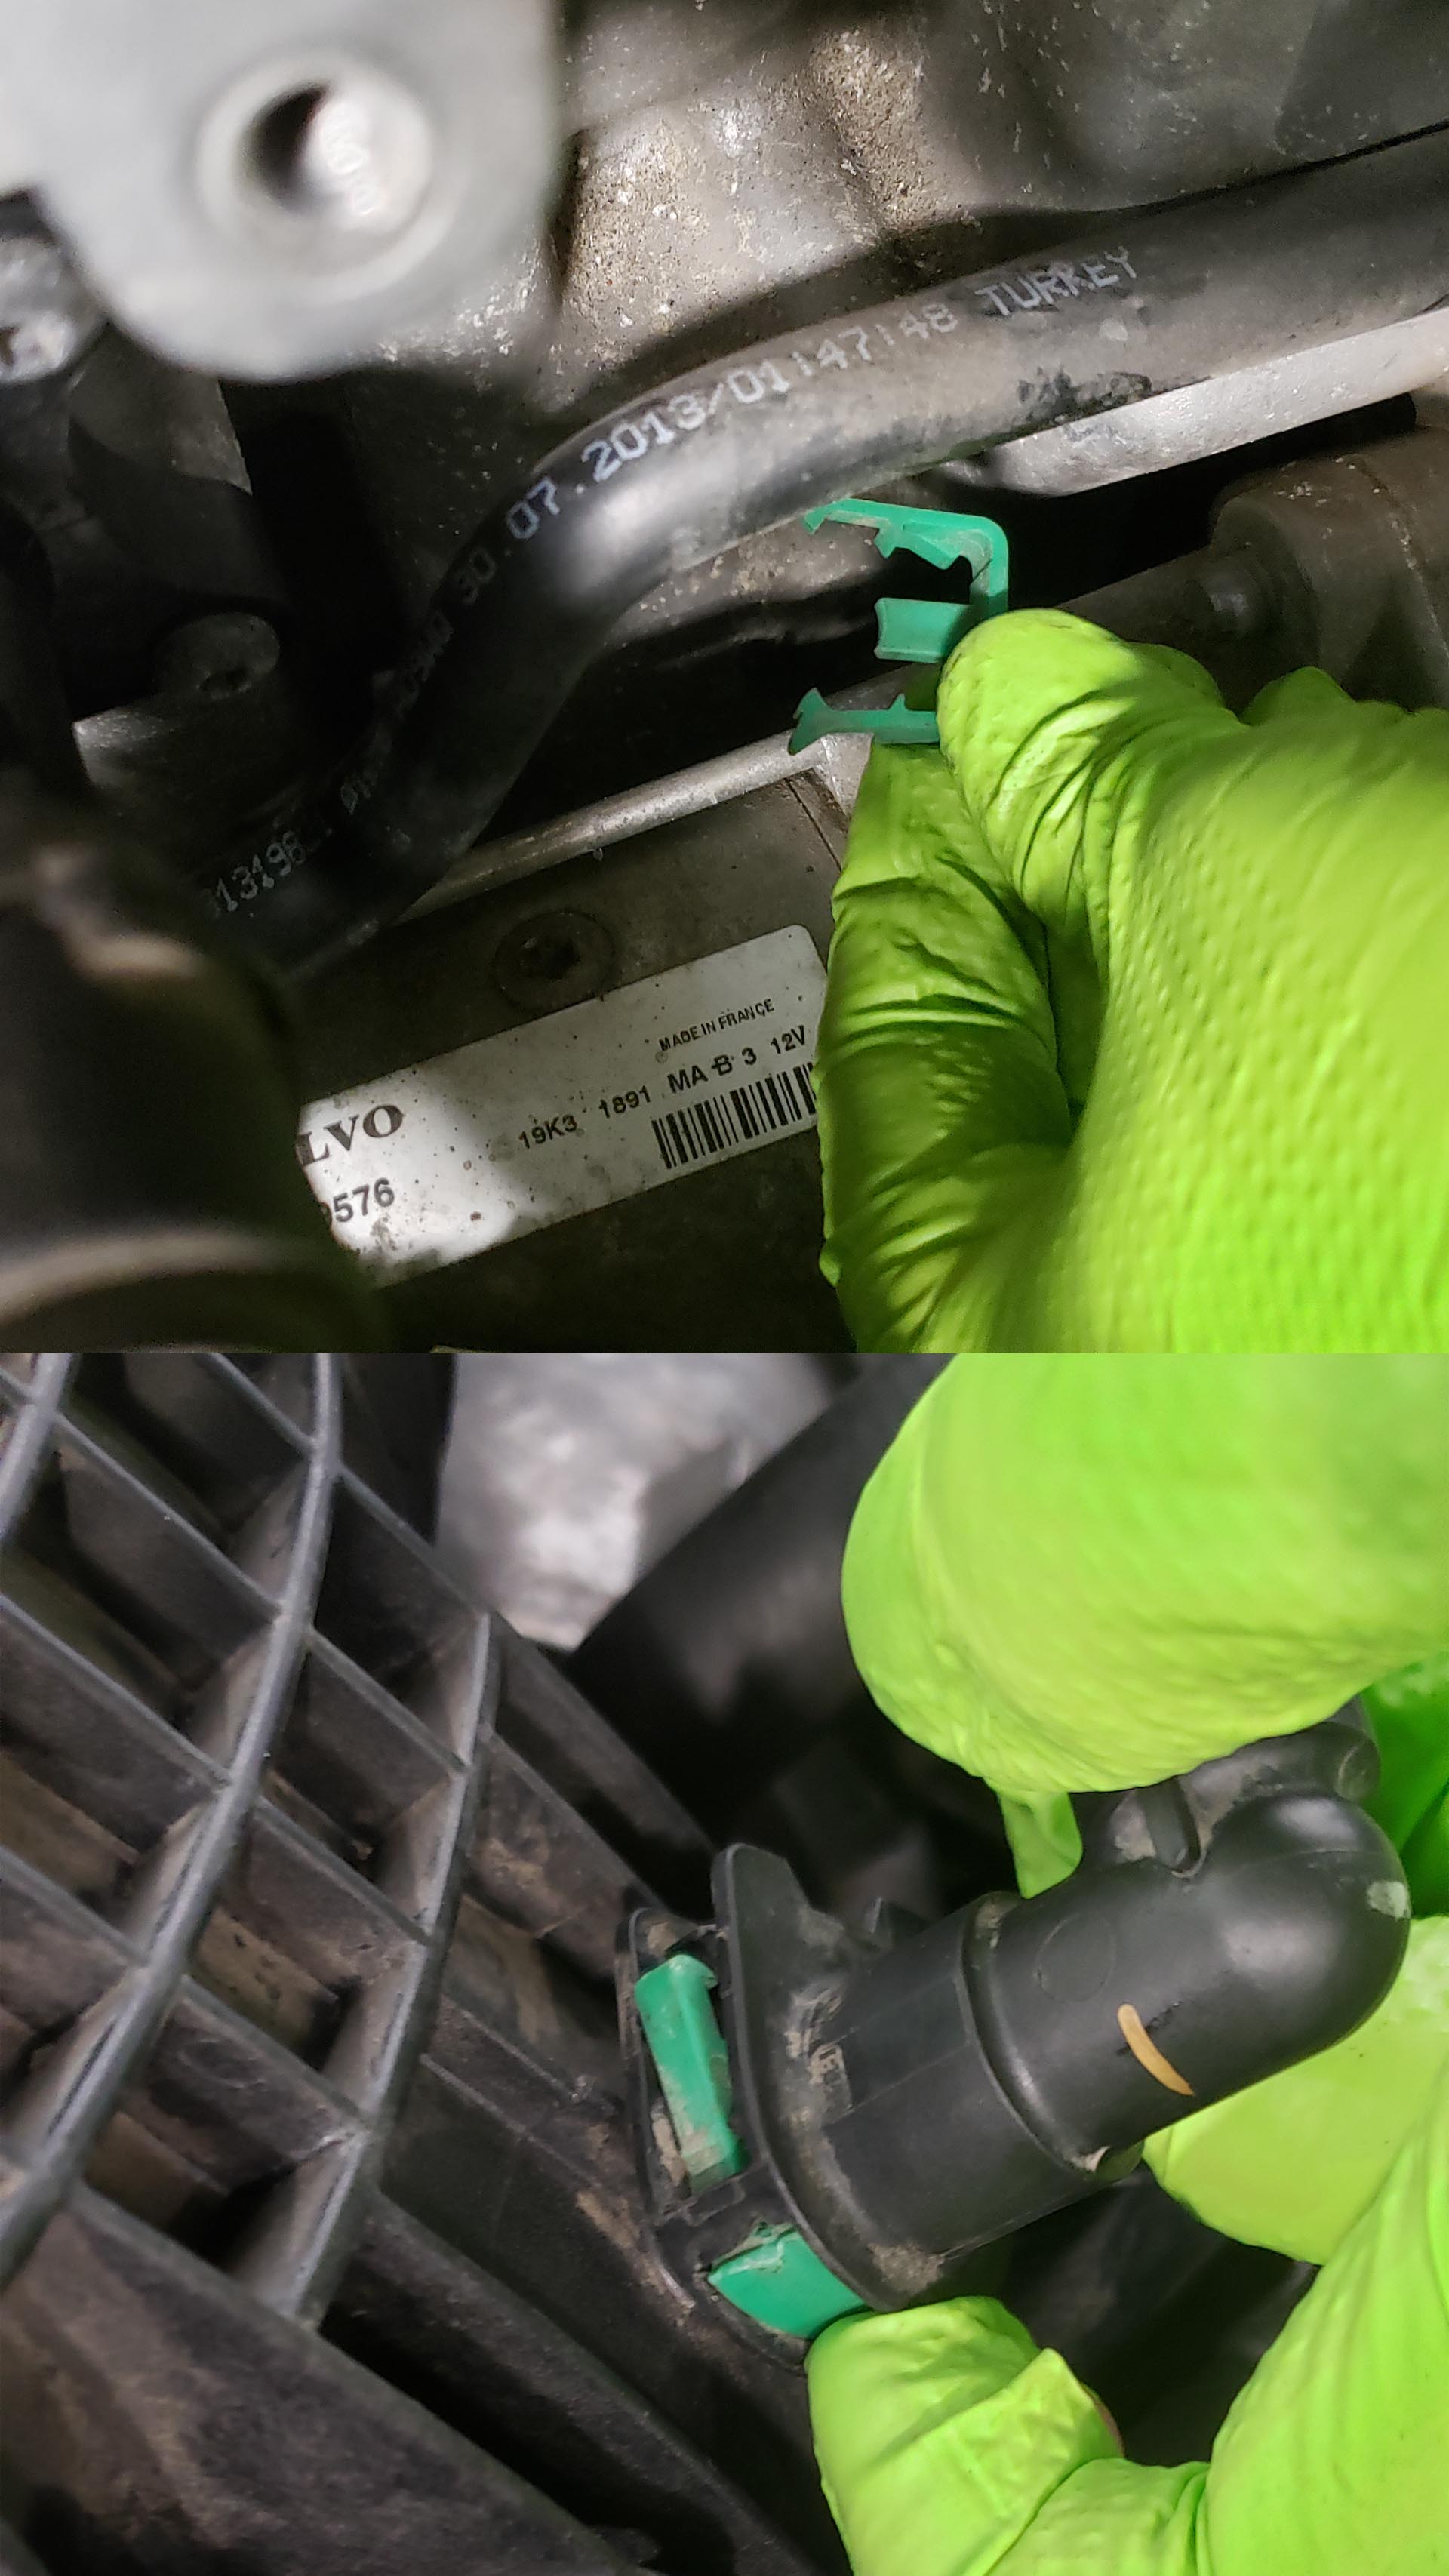
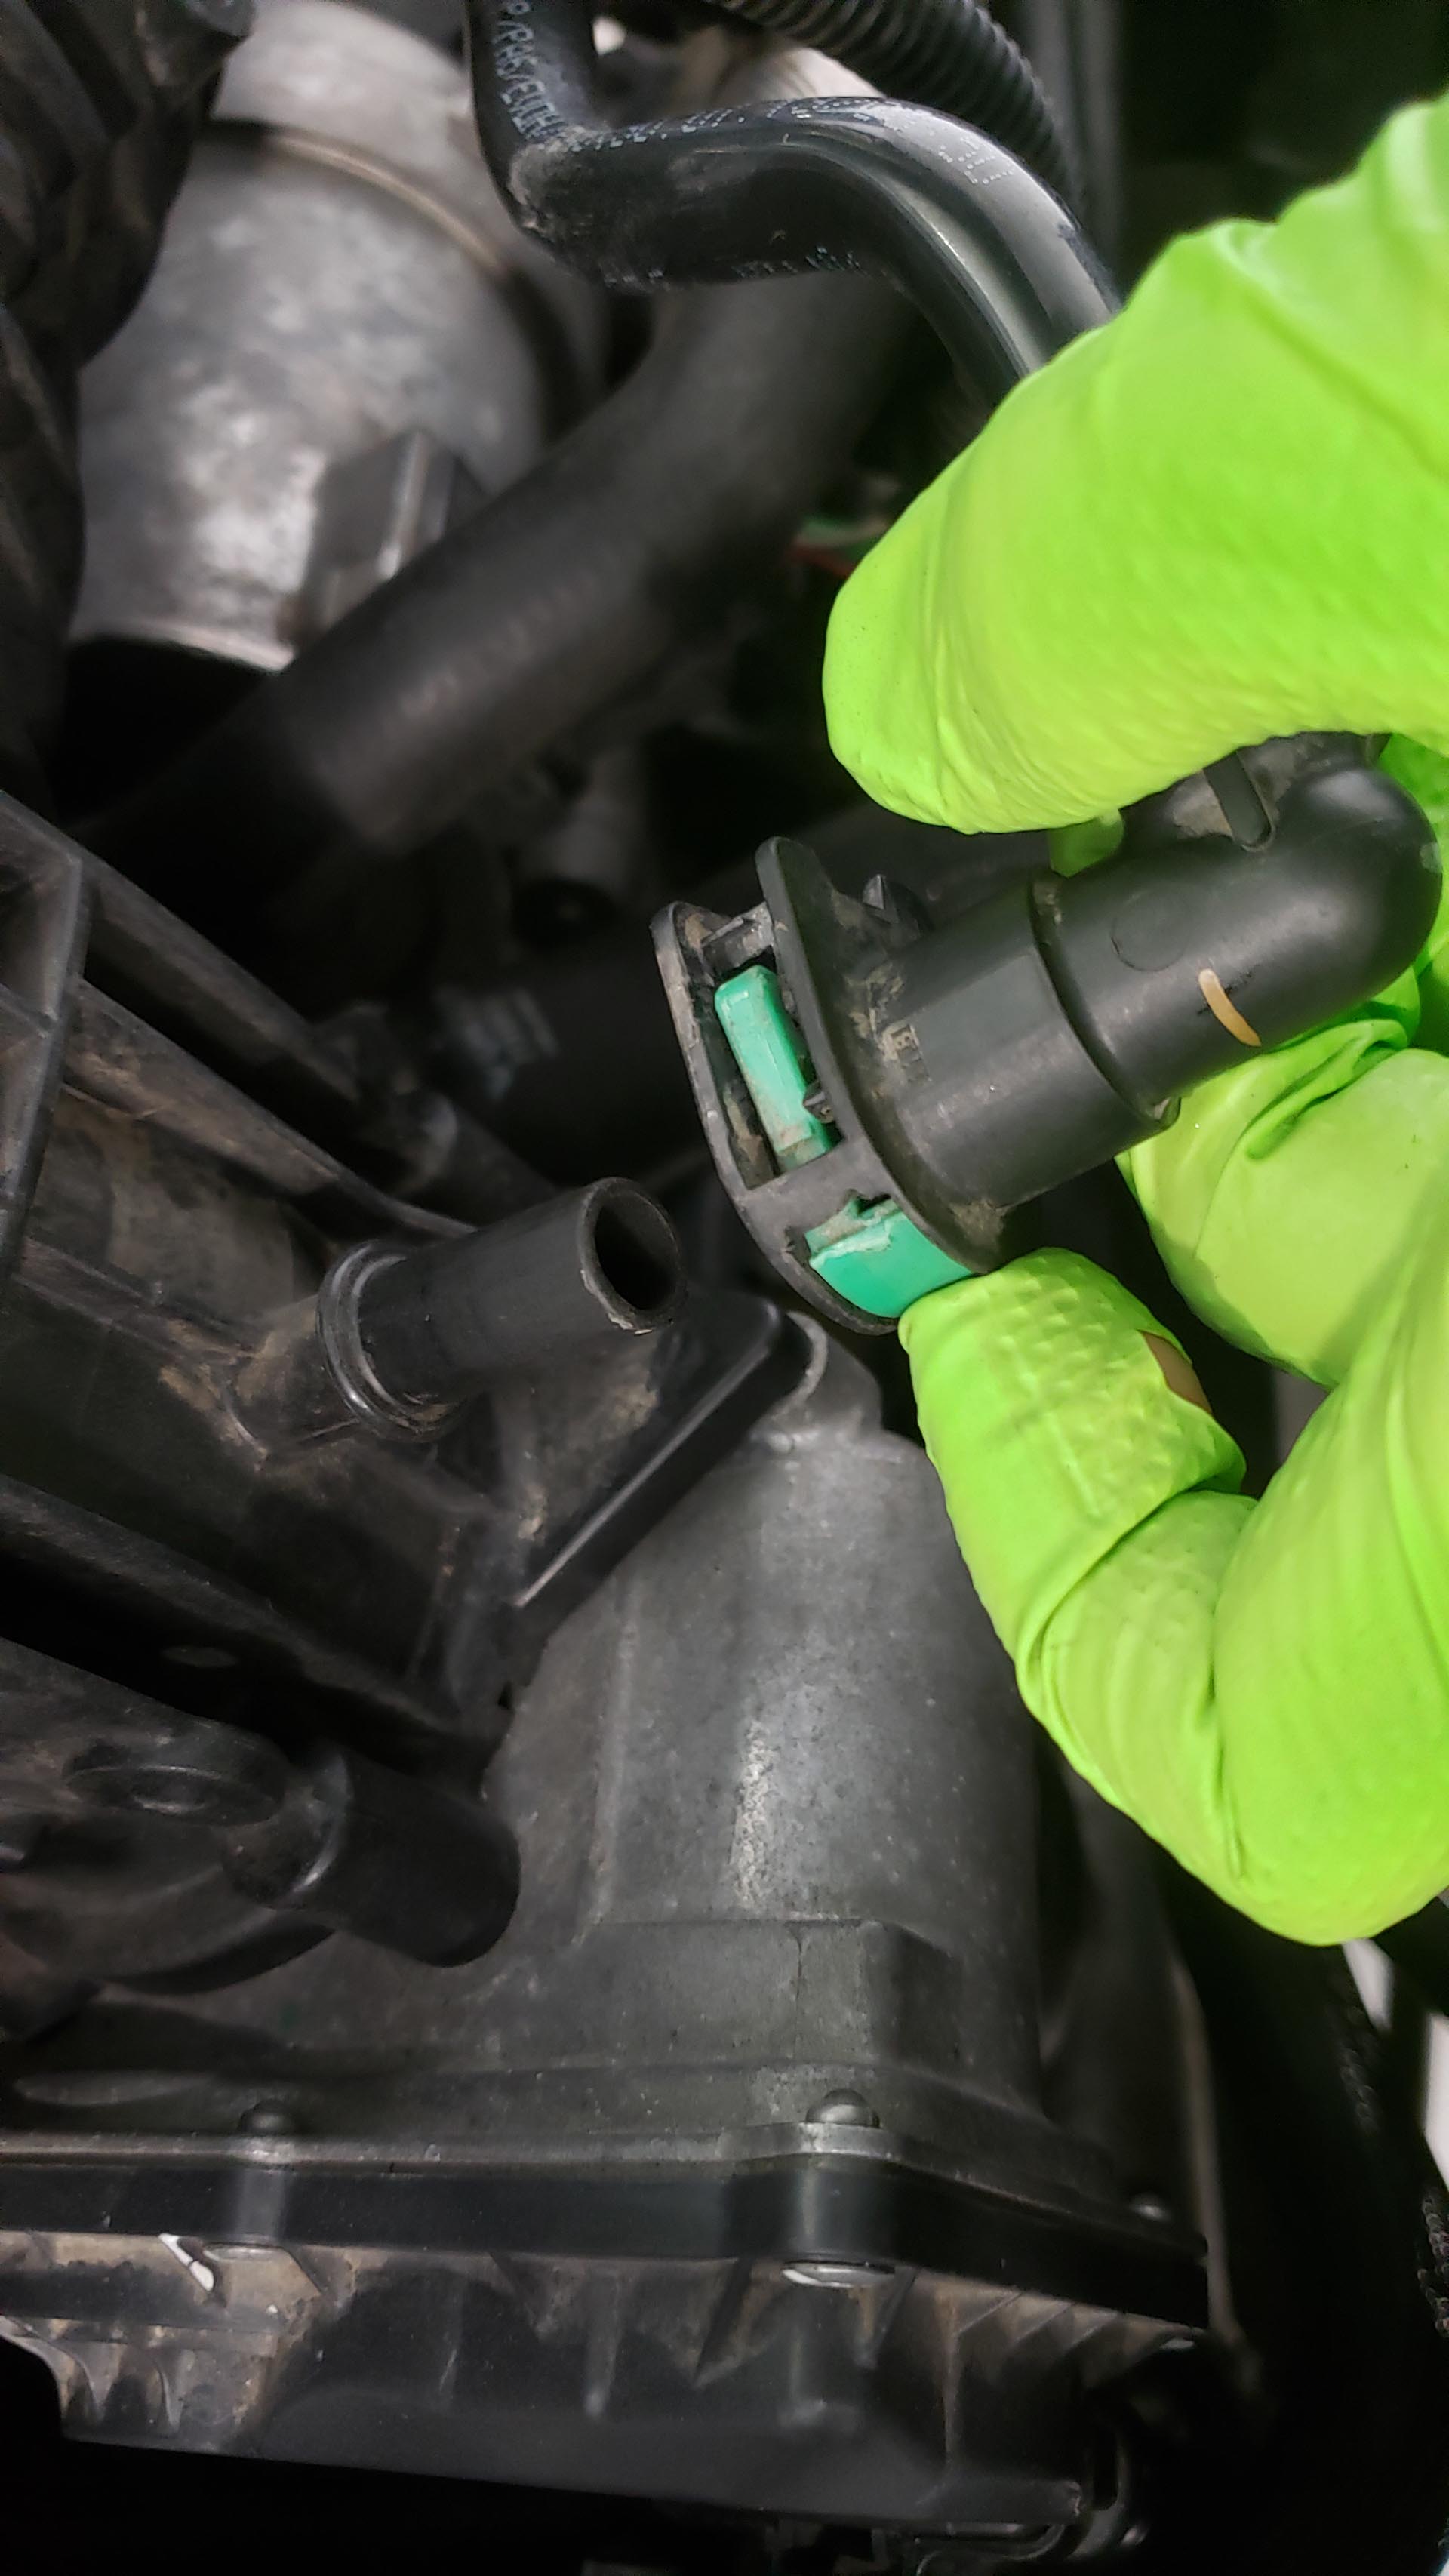
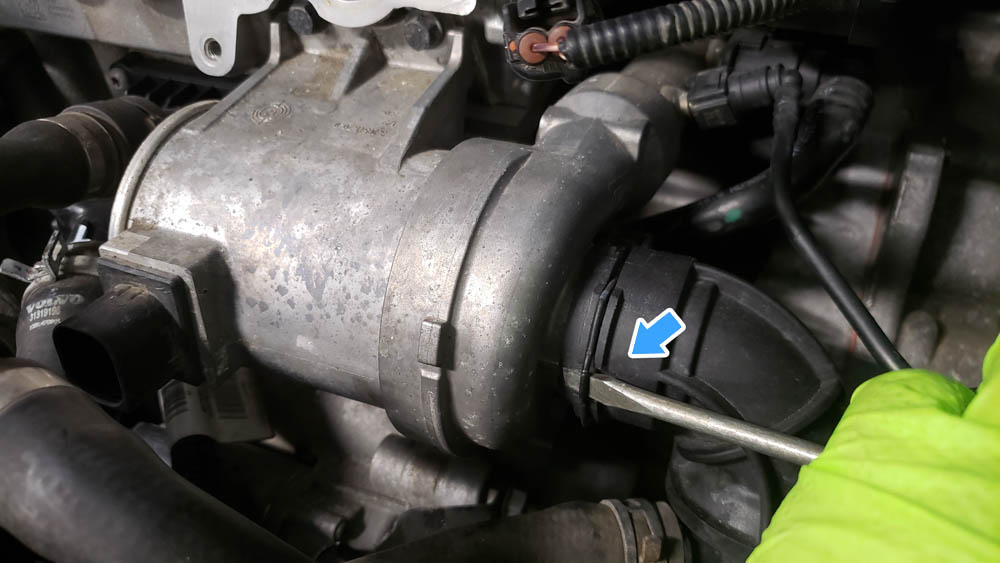
Step 4: Remove the hard line air hose and clips
Remove the hard line air hose using a T25 torx bit. Remove the air line connection to the intake manifold above the throttle body by first pulling the green fastening clip from the pipe connection, and push in on the other side to release.
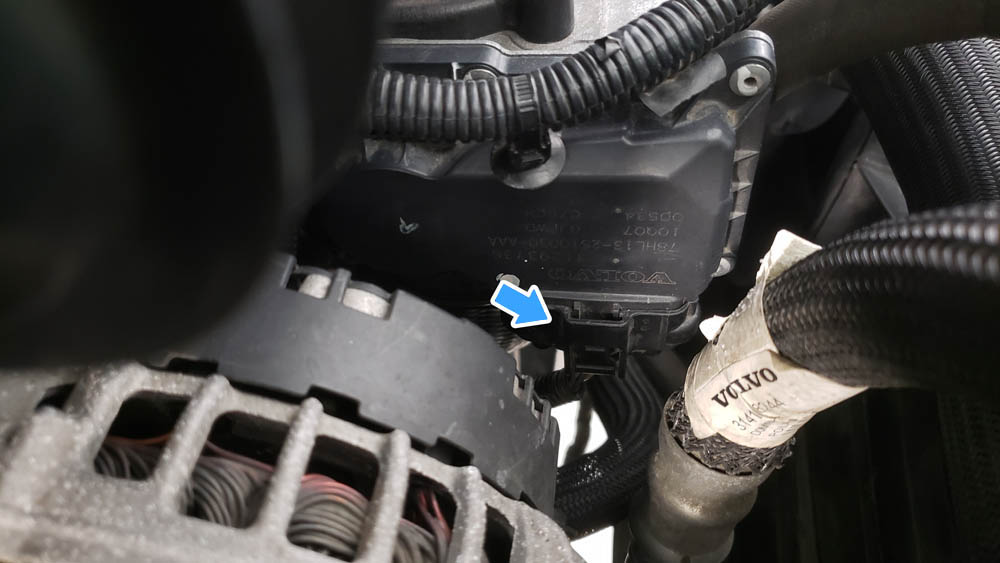
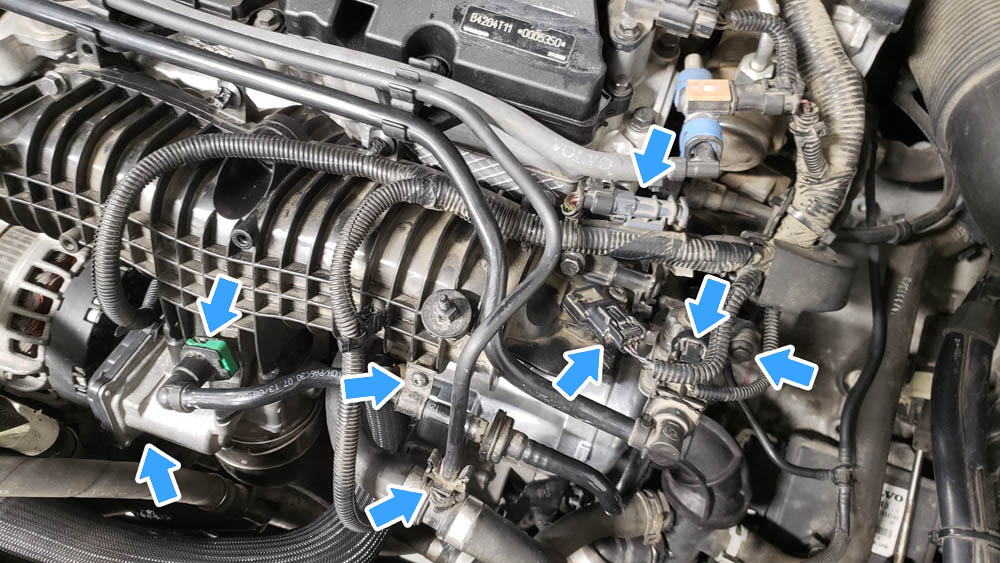
Step 5: Disconnect wiring bundle and electrical connectors
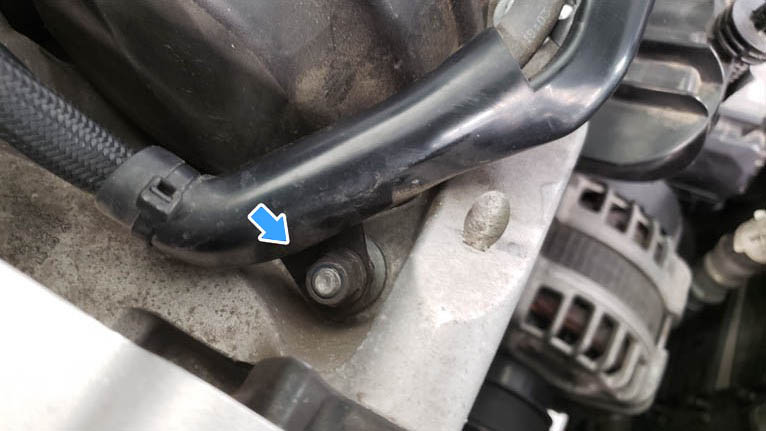
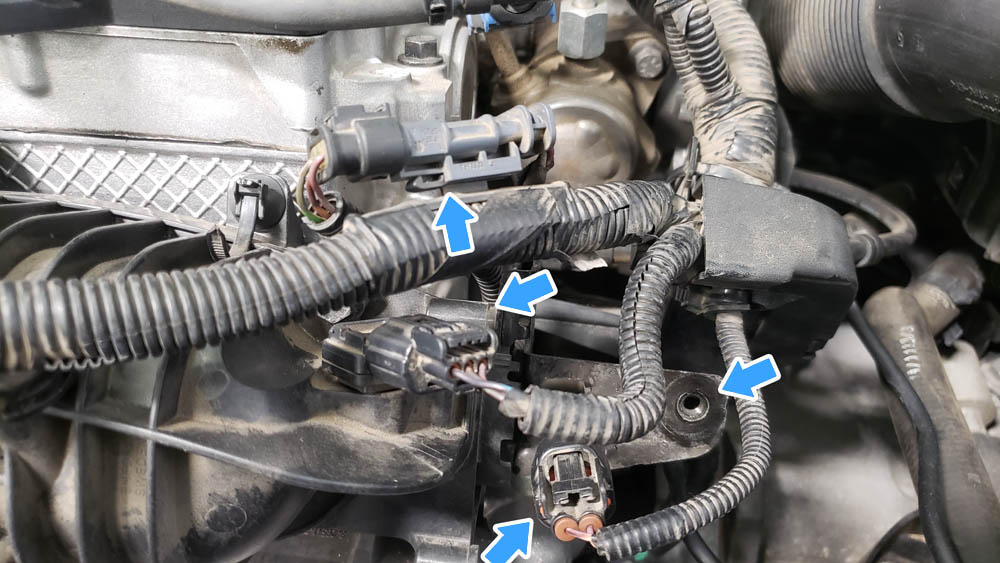
Remove the 10mm nut holding the wiring bundle to the engine above the alternator. Be careful as the plastic bracket is brittle and can get hung up on the threads. Remove the 3 electrical connections and associated bracket on the right side of the engine.
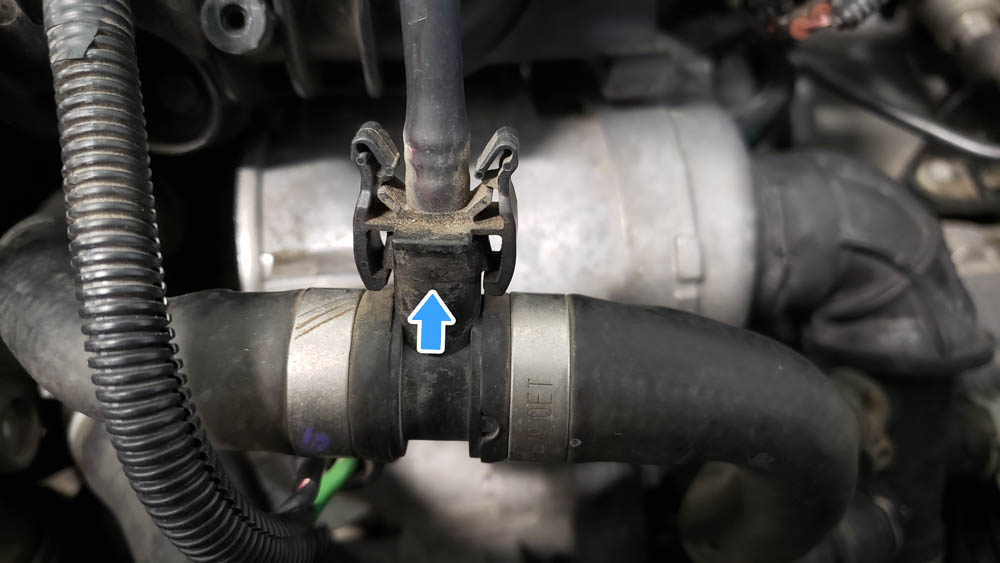
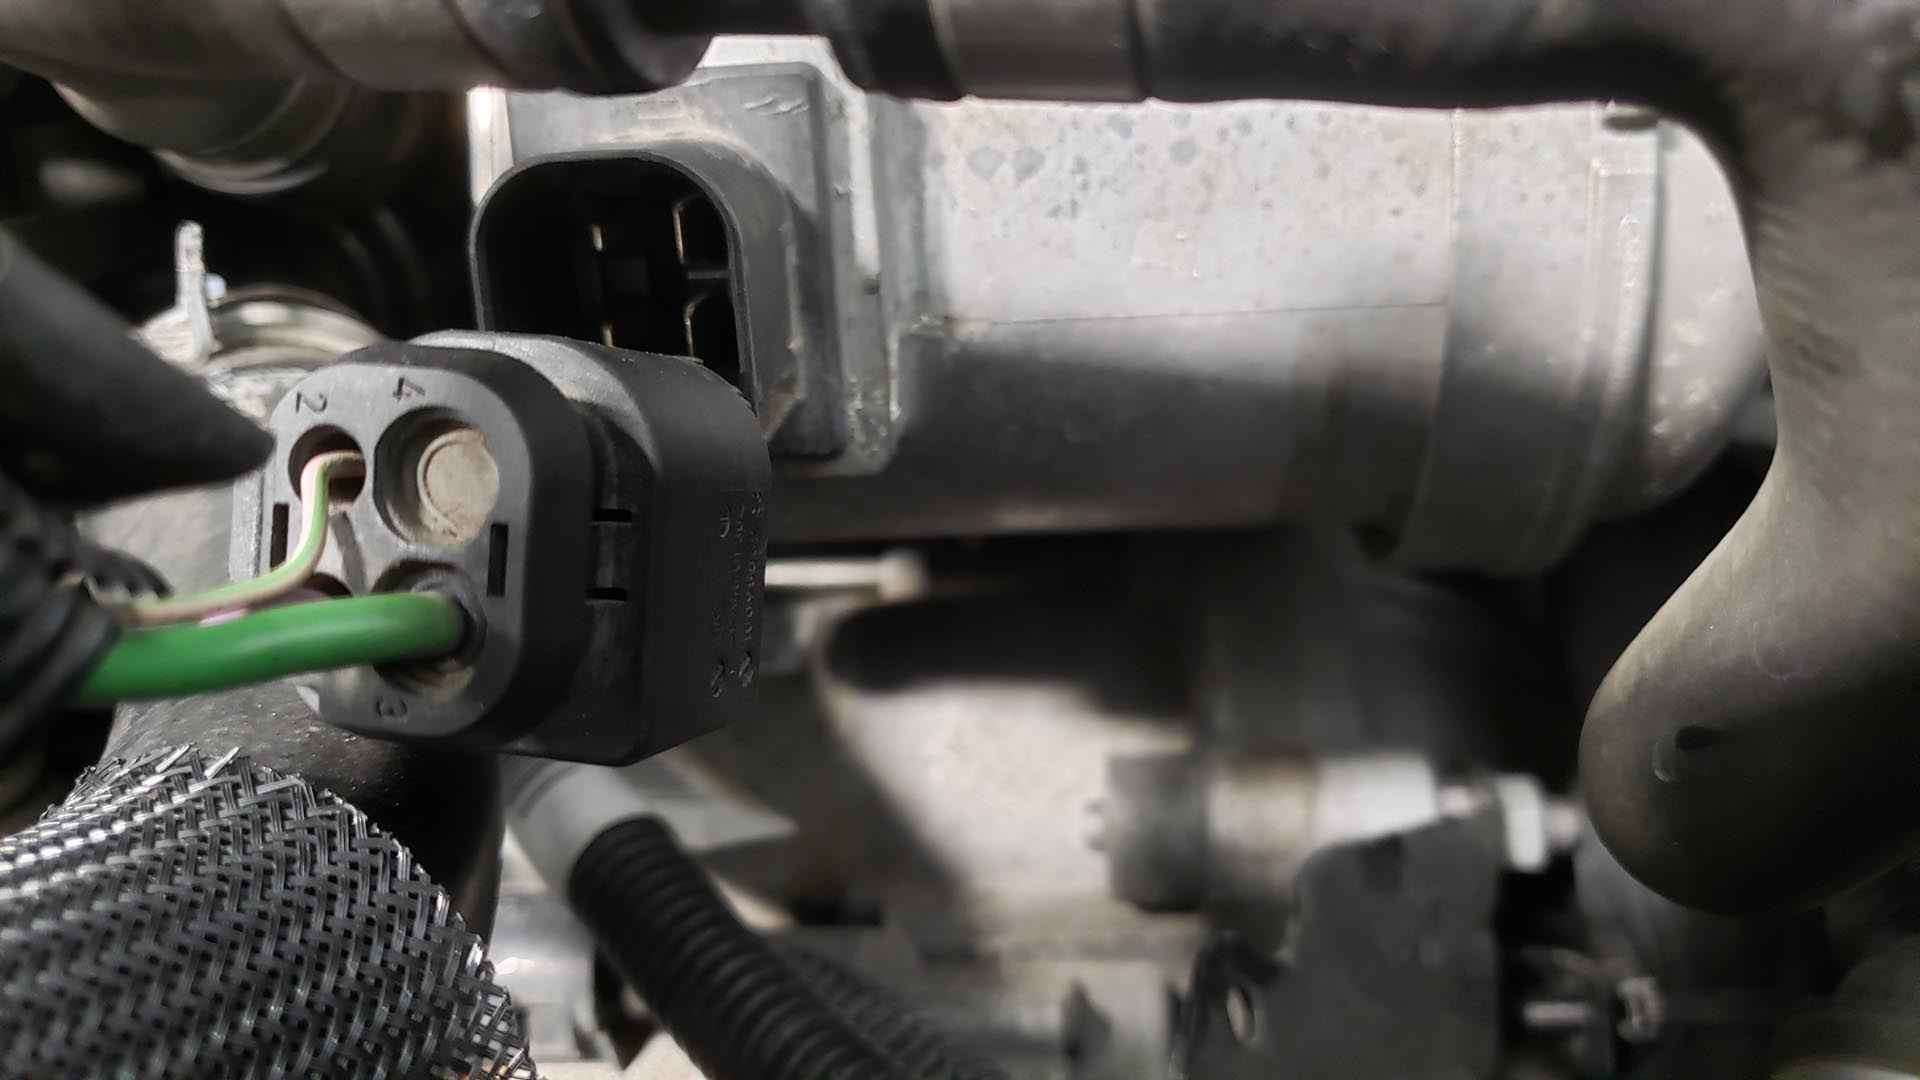
Gently remove the coolant hard pipe from the hose tee (this is also a brittle plastic component). Remove the water pump hose electrical connector and move the entire harness out of the way.
The last step is to unplug the main electrical connector to the water pump.
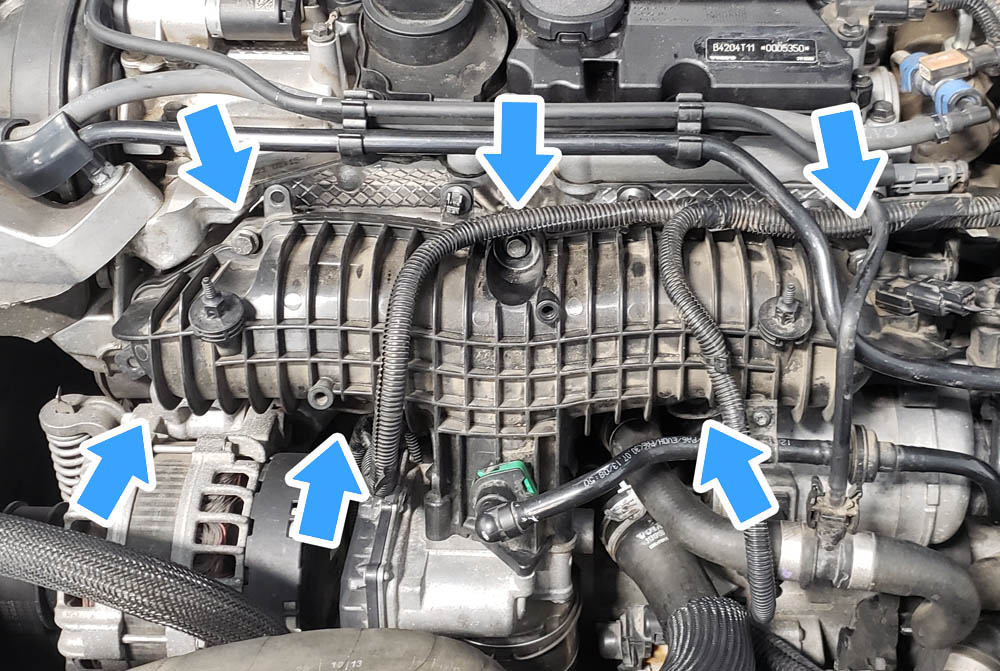
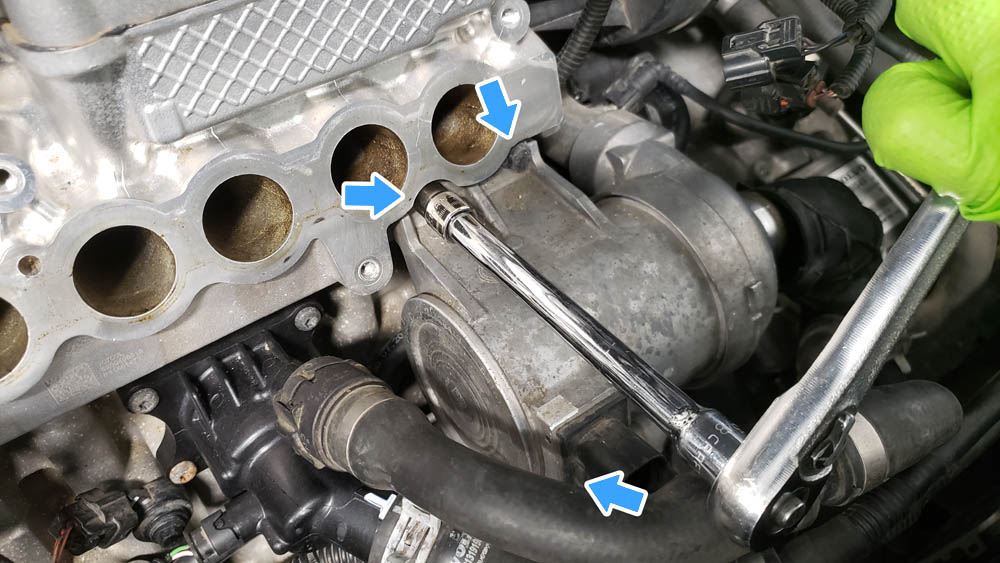
Step 6: Unbolt the intake manifold, throttle body connector, and intercooler piping
Start by unbolting the intake manifold.
With the manifold free to pull forward from the cylinder head, you can easily access the throttle body electrical connector, and then the intercooler hose pipe connection.
Once unbolted, you can remove the intake manifold and throttle body together as a single assembly.
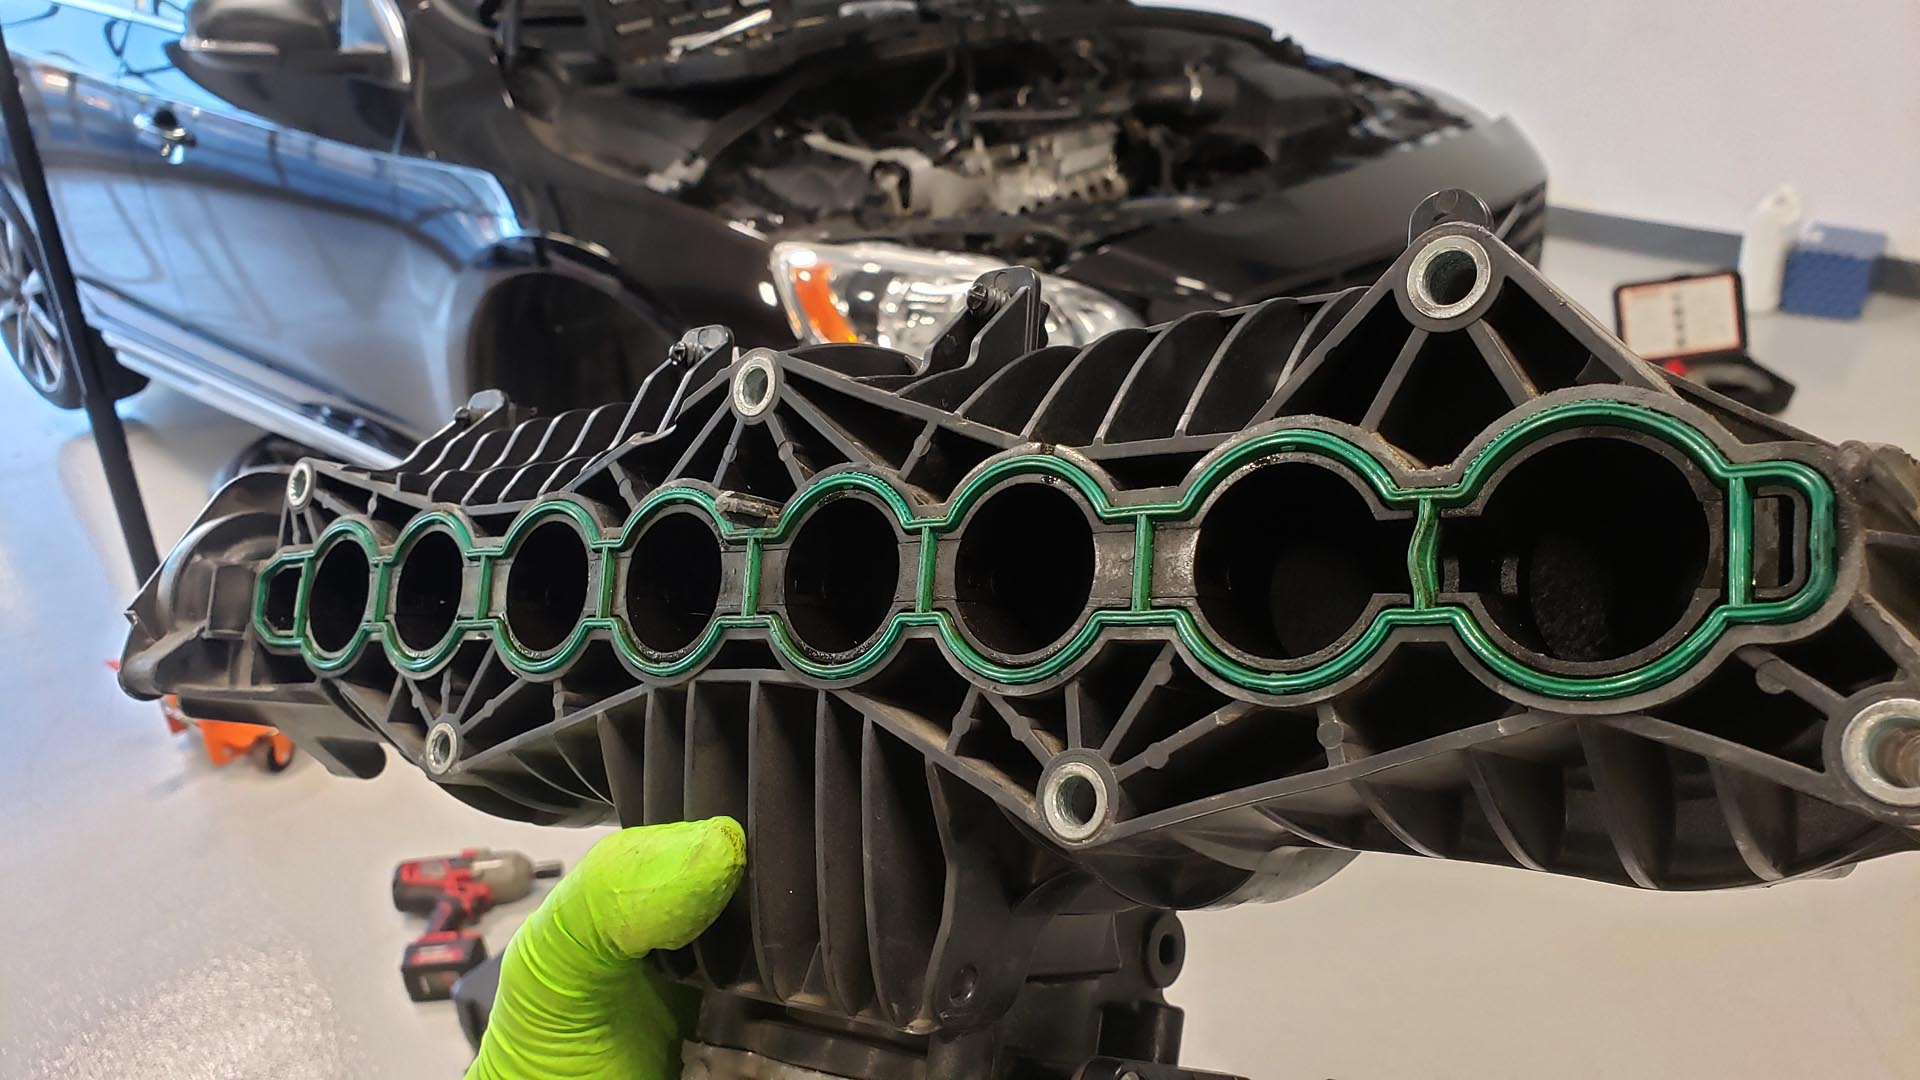
Step 7: Replace the intake manifold gasket
Since it's recommended to replace the rubber gasket while the manifold is off, we include a new one in the kit. There's no reason not to replace this gasket now while everything is apart. It's an affordable way to save yourself from future headaches. I recommend blocking the intercooler pipe with a clean towel or rag to avoid dropping anything into it later on.
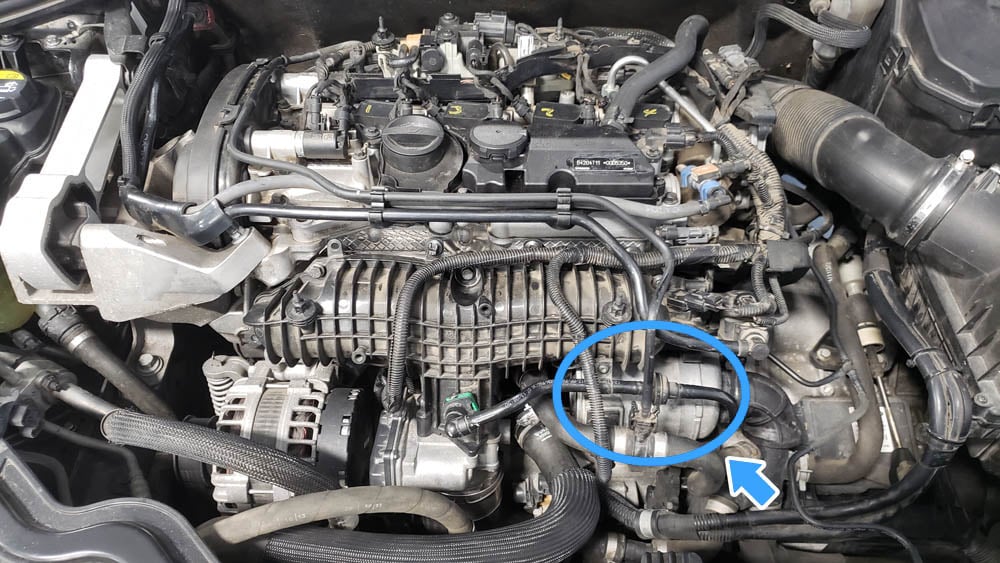
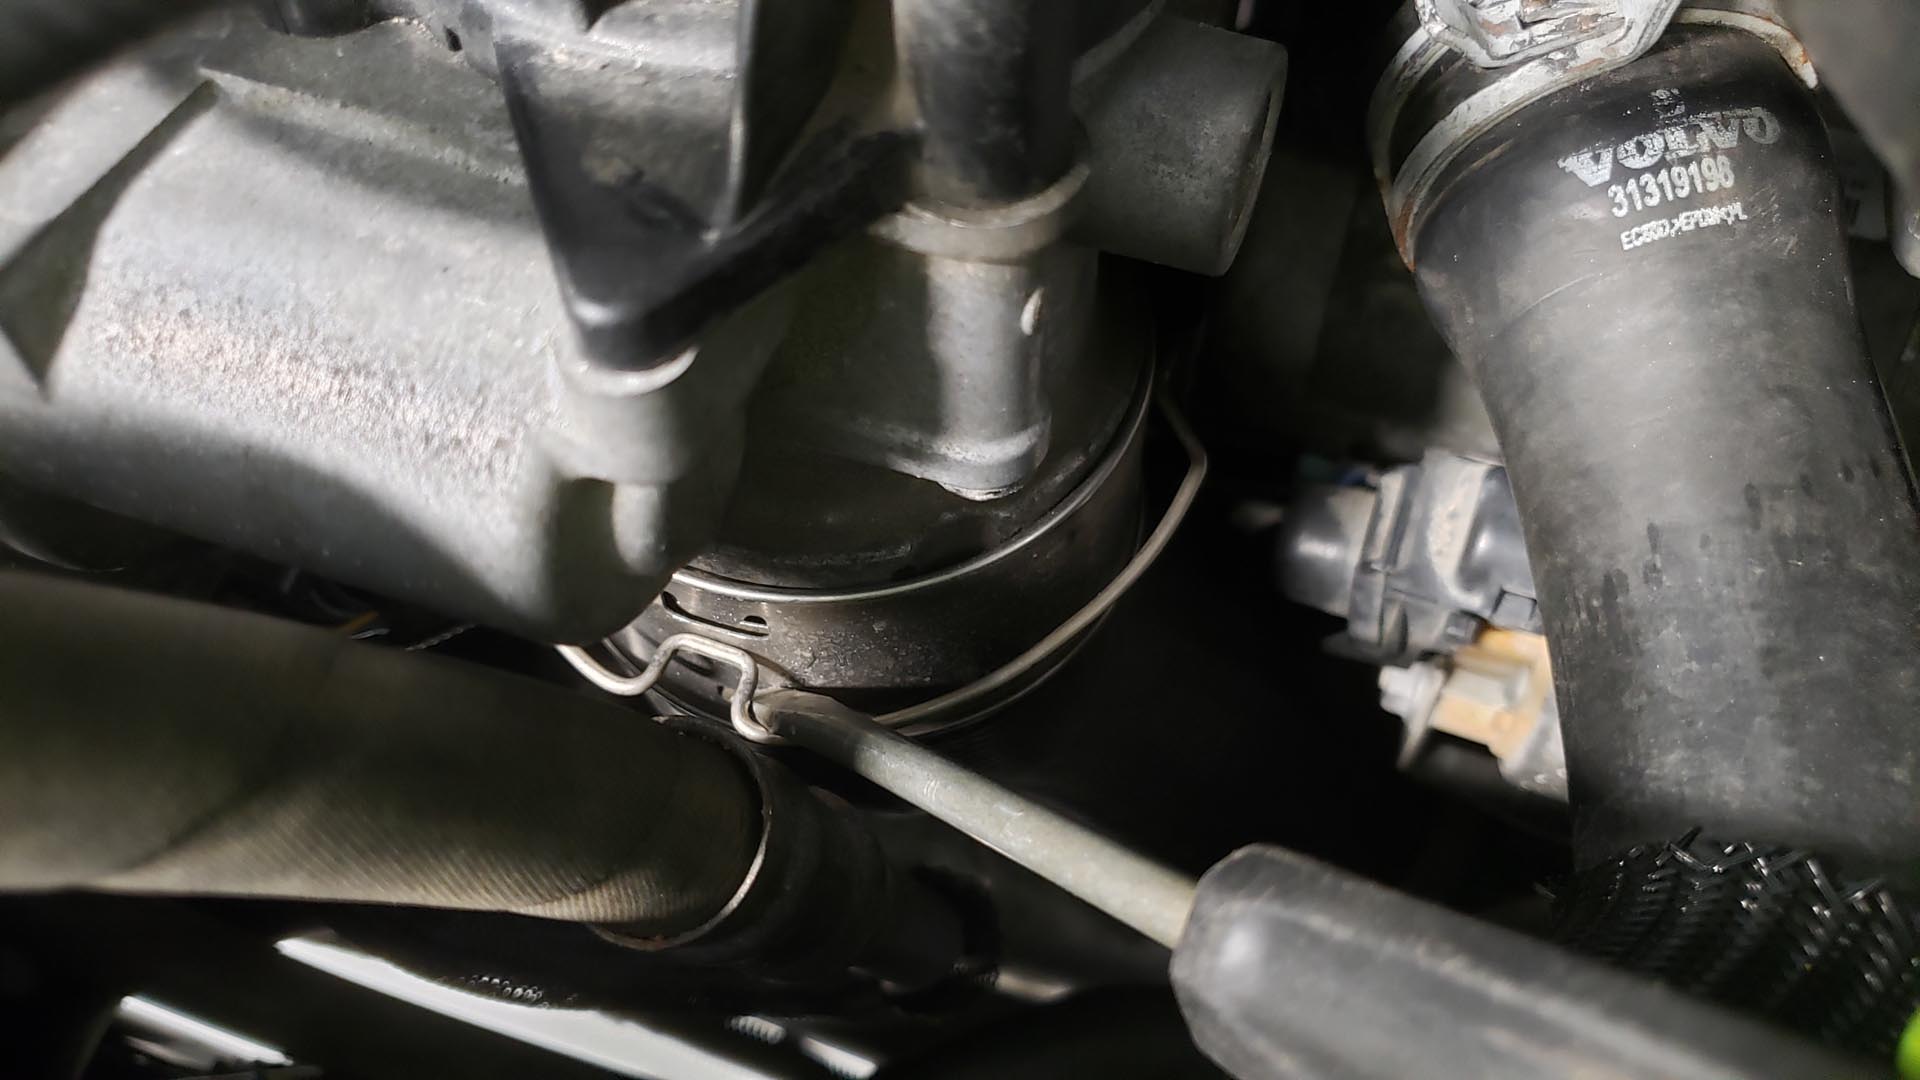
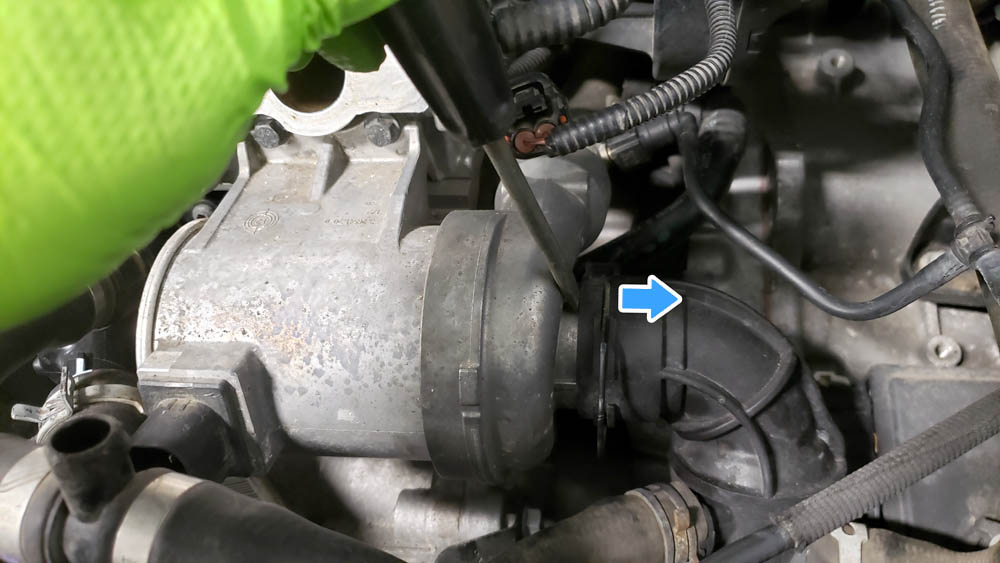
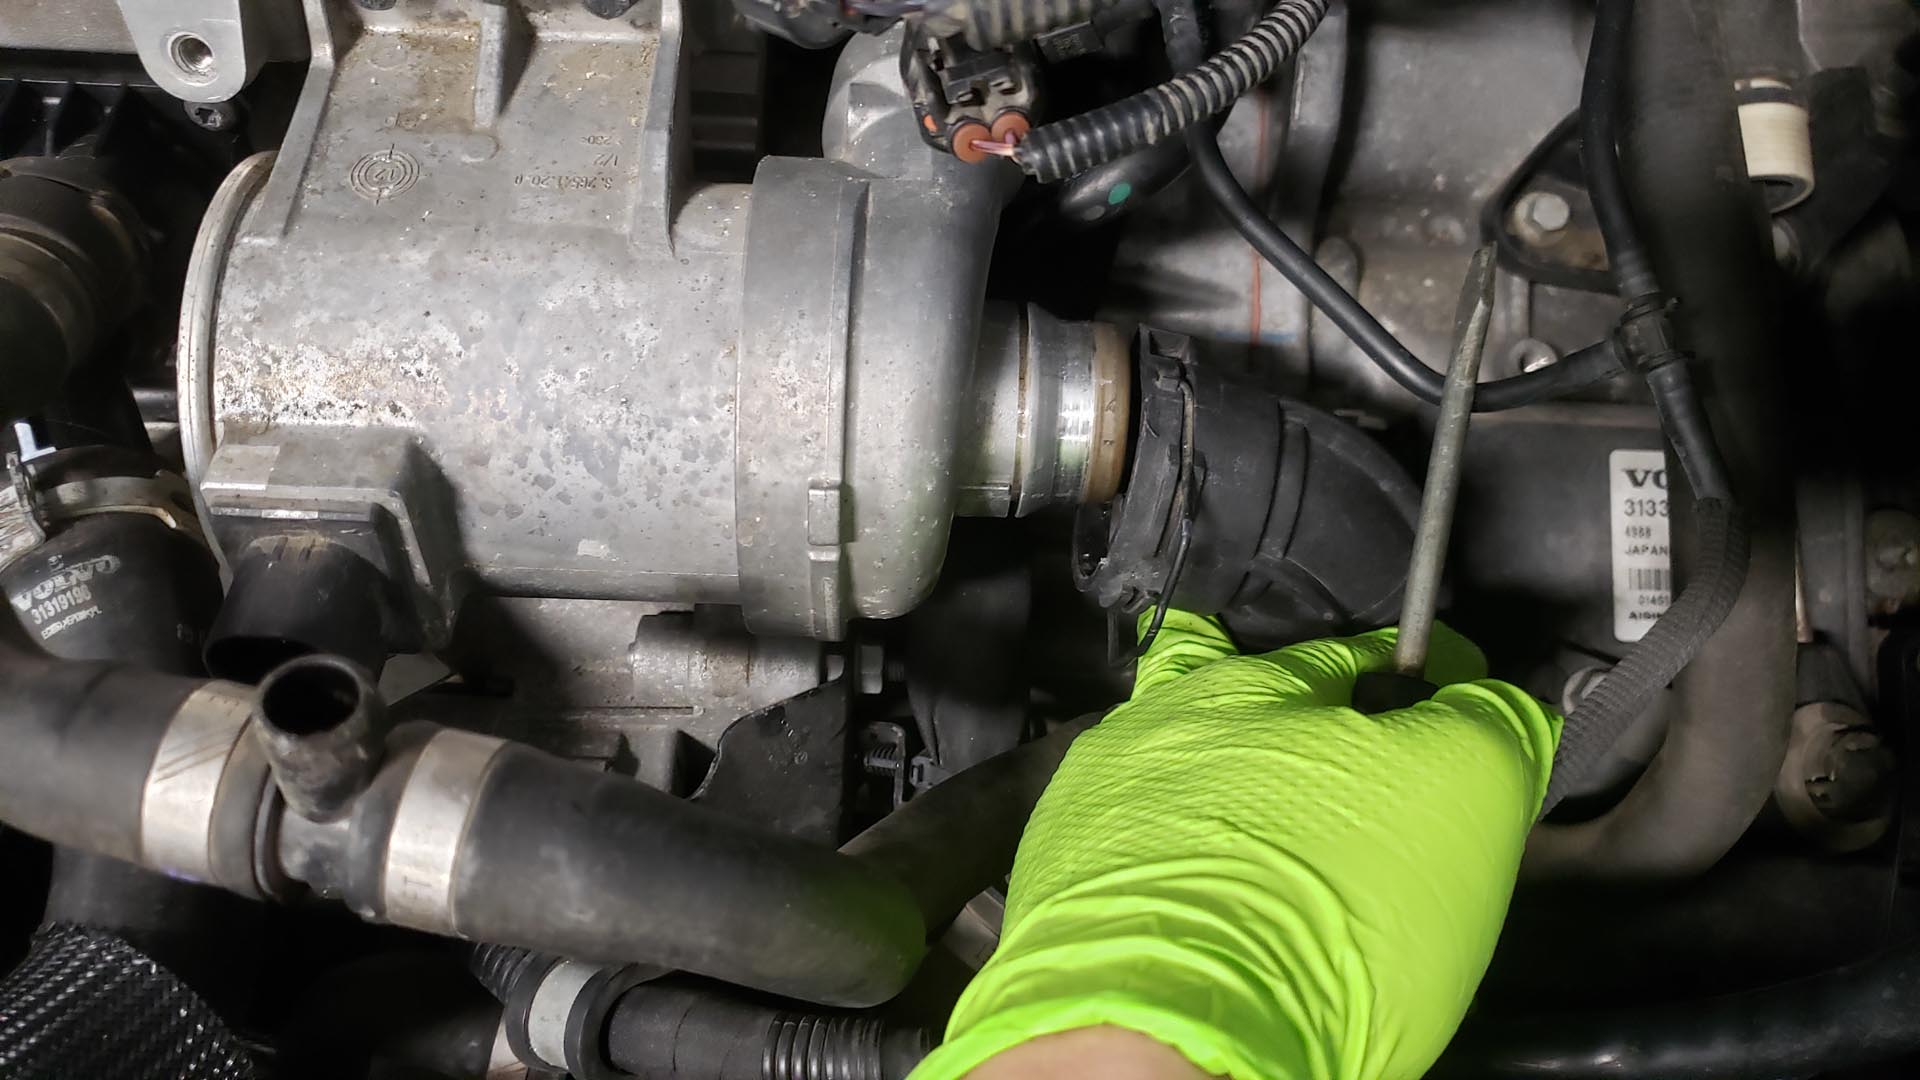
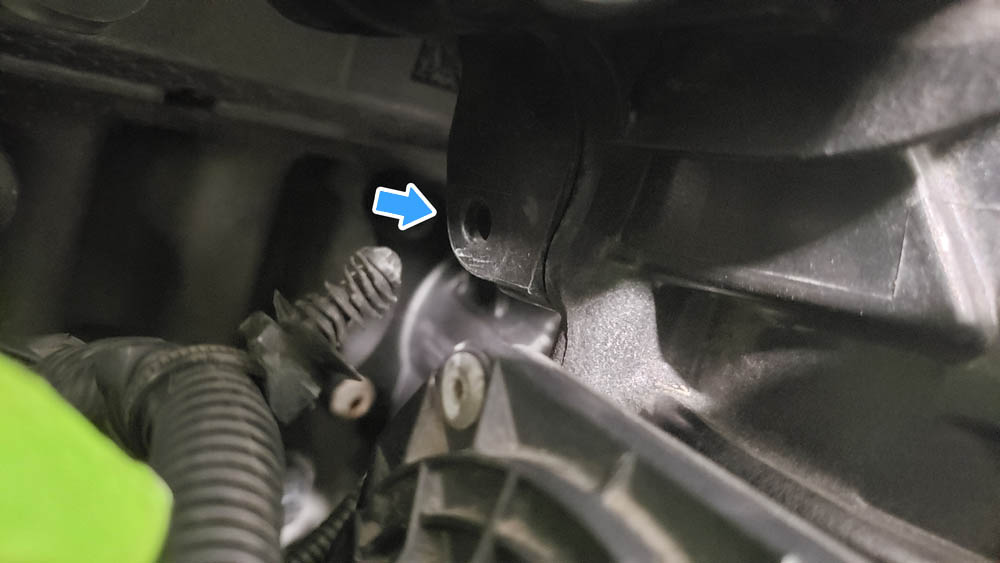
Step 8: Remove the main coolant pipe
First, remove the main coolant pipe going to the pump using the metal clip. With a little leverage it can be pried off. There's typically a small amount of corrosion present that can make it tough to remove.
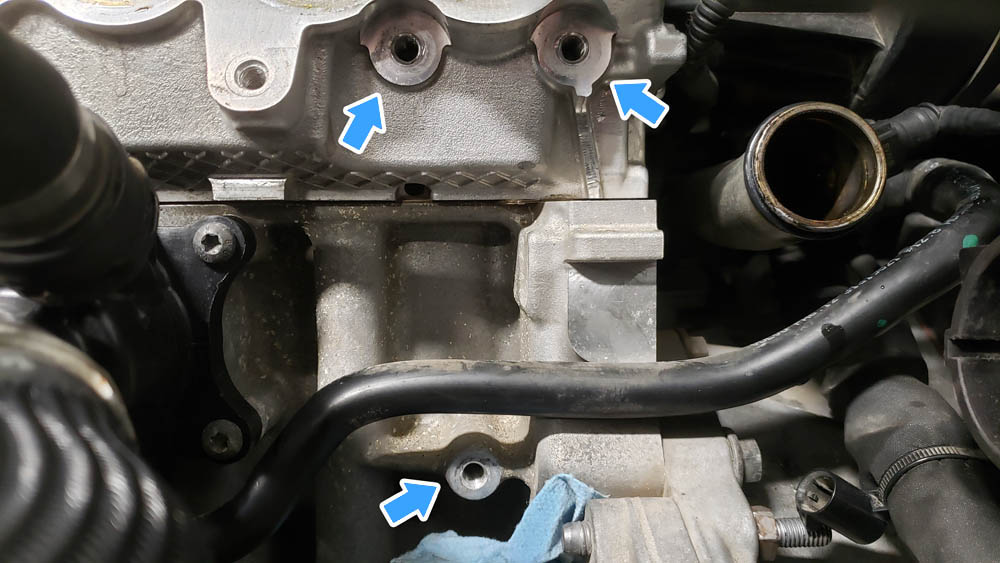
Step 9: Unbolt and remove the water pump
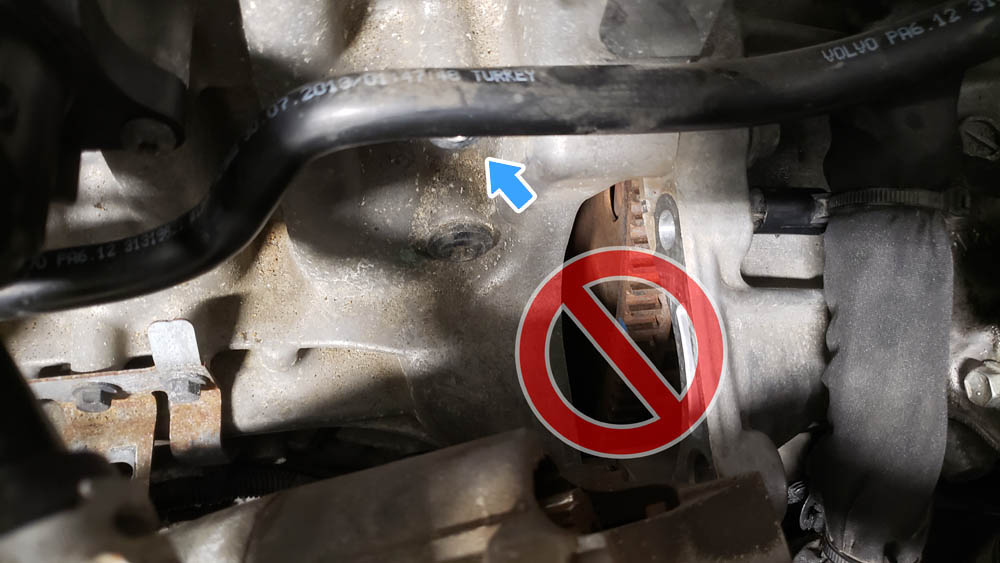
Before the next step, take special precaution to not drop any of the water pump bolts as you remove them. Directly underneath the water pump is the starter motor gap into the bell housing. If you drop one of these bolts into the transmission bell housing, you will not be able to start the car until it is removed.
If you do happen to drop a bolt here, you might run into issues. If you get lucky, you may be able to fish it out with a magnet. If it takes a bad bounce, you may need to remove the entire transmission to retrieve the bolt. Stuffing a shop towel between the starter motor and the water pump can help avoid this situation, as well as using magnetic sockets. The arrow below shows the location of the lower water pump bolt, with the starter motor removed for illustration.
Unbolt the three steel bolts holding the pump to the engine. These bolts can be reused.
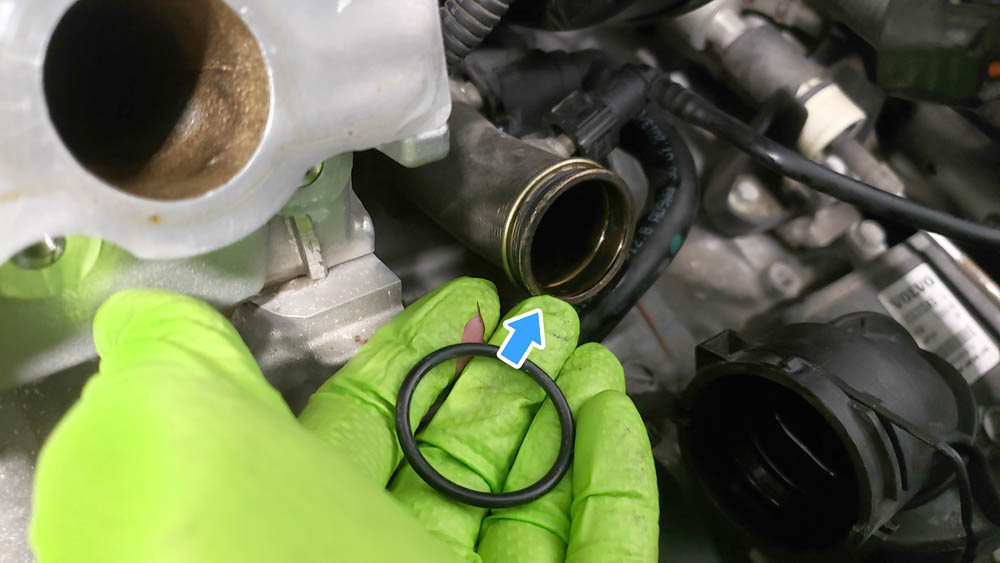
Step 10: Replace the water pump o-rings
Examine and replace the water pump o-rings. The seal inside the plastic coolant hose cannot be replaced independently, so take note to make sure it has a nice round profile and is clean. If you choose to replace the hose, the part number is 31368642. The other o-ring on the water pump pipe should be replaced with part number 976045.
This is an opportune time to replace the thermostat as well, 31686560. The thermostat is in a black plastic housing located directly to the left of the water pump and is replaced as a single unit.
Step 11: Install the new water pump
Position the new pump over the three bolt holes and ensure the new o-ring seats securely into the pump housing. I found it successful to insert the lower bolt through the water pump mounting bracket before moving it into position. Applying pressure here can keep the bolt from falling.
Step 12: Reinstall the intercooler pipe, intake manifold, and reconnect electrical connectors
Before bolting the intake manifold back on, remove the towel from the intercooler pipe and reconnect the intercooler hose to the throttle body. Now you can connect the throttle body connector and bolt the intake manifold onto the cylinder head. When reinstalling the intake manifold, you want to work from the inner most bolts to the outer most, tightening them slowly. Once they're all snug, torque them in the same pattern. Once they're all torque'd, go around one last time to ensure that none loosened.
Take note to reconnect any hose ties to their respective receptacles, replacing broken once as you encounter them. Instead of using Volvo-specific cable ties, you can use basic zip ties if that's all you have available.
Fit all electrical and coolant hose connections back together and triple check everything is connected and tight before moving on.
Step 13: Refill the cooling system and test
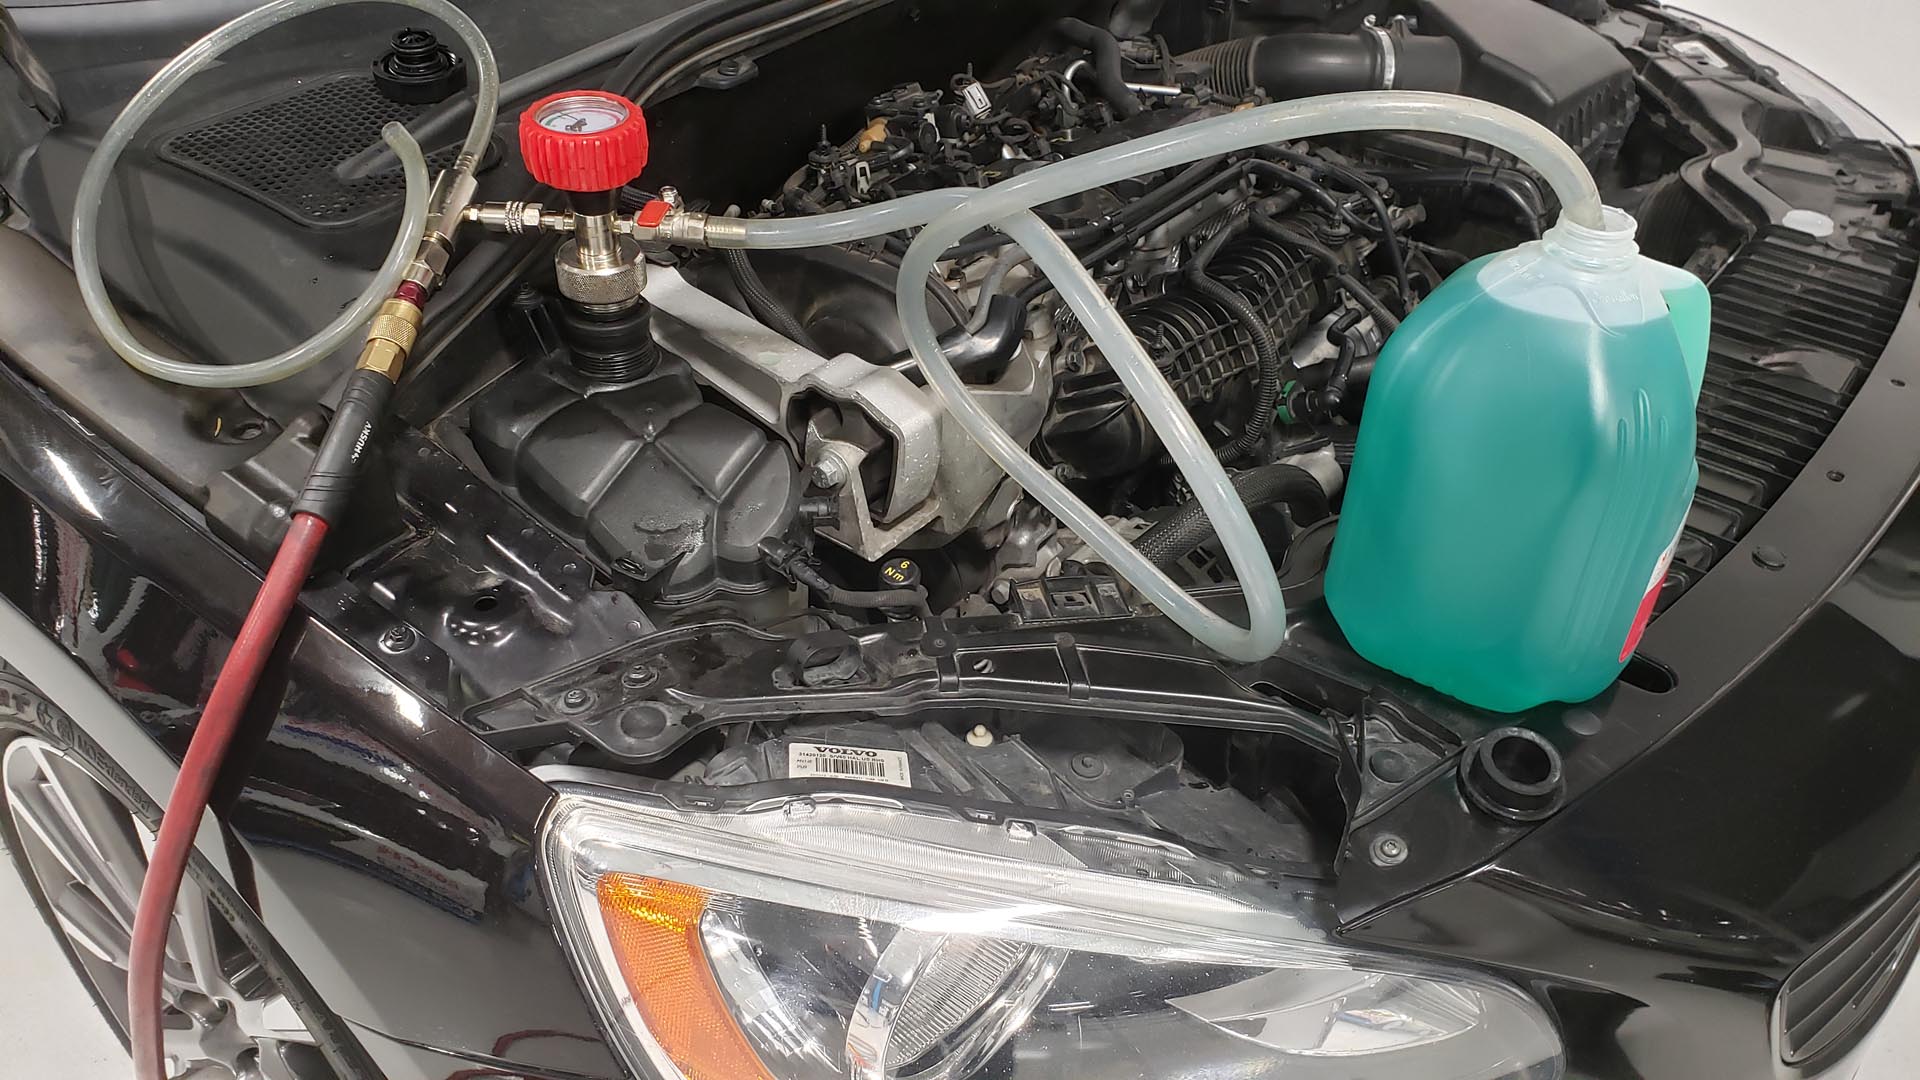
Attach a pressure bleeder on one side to the coolant reservoir. Make sure the connection is air-tight, as a slight air leak will keep the tool from functioning properly.
Pre-mix a half-gallon of Genuine Volvo coolant (included in the kit) with a half gallon of distilled water, and insert the draw tube. Hook up a pressurized air hose to the air hose fitting and allow the Venturi effect to create a vacuum in the system.
Around 90psi from the compressor is recommended to adequately generate a vacuum. The soft hoses will slightly collapse during this period. Close the air valve and open the draw tube valve. The vacuum in the system will fill to the exact required amount. A more in-depth tutorial on how to use this tool will be available elsewhere.
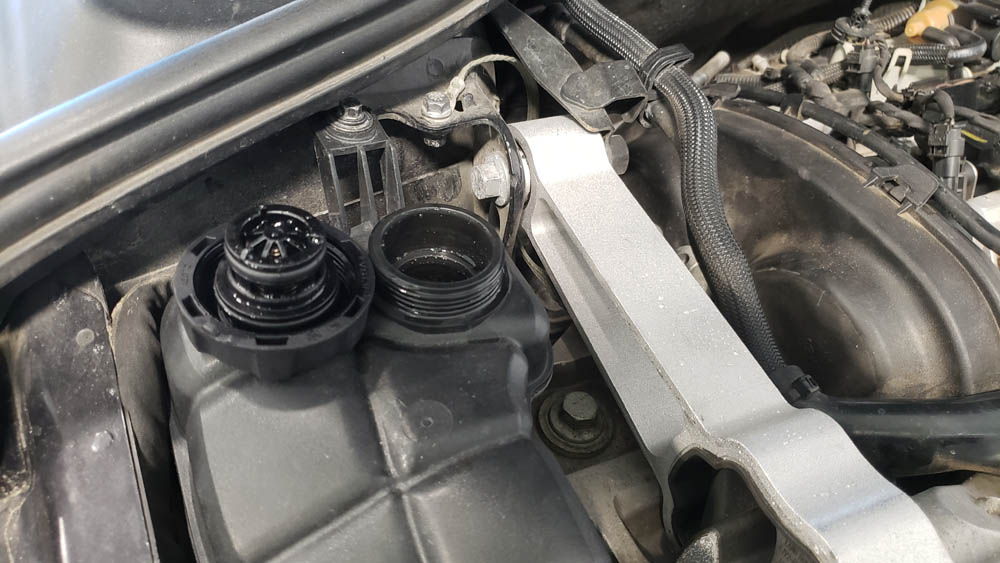
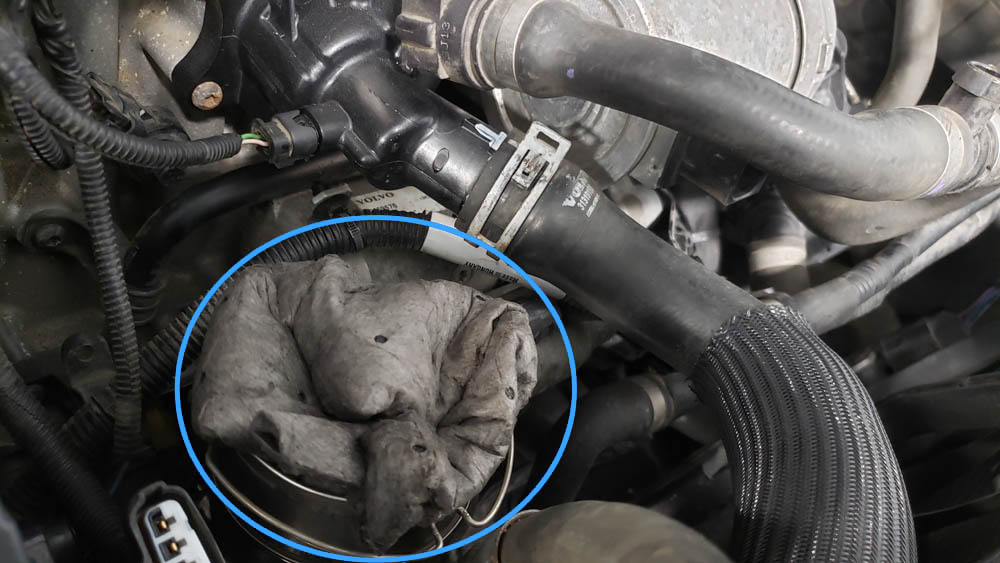
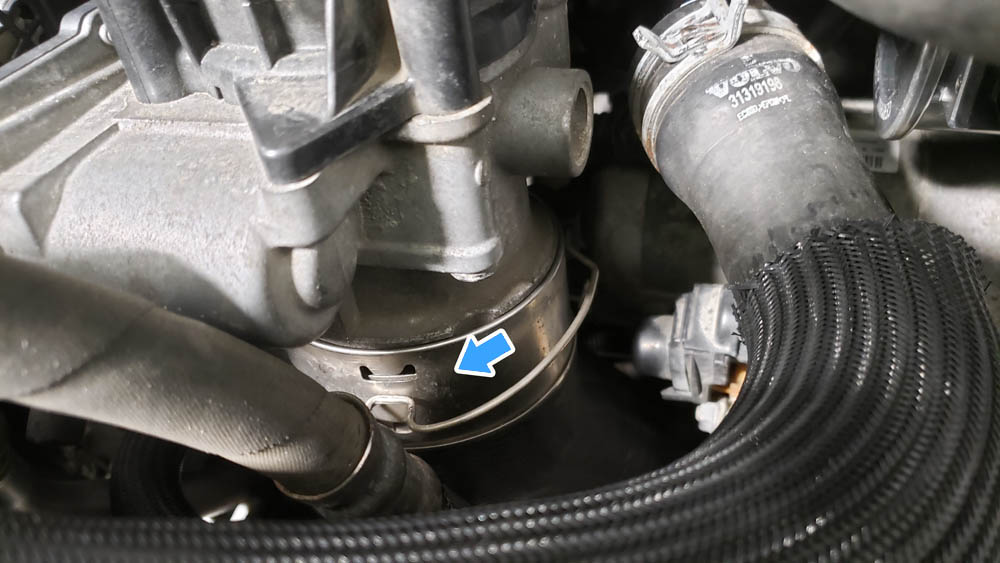
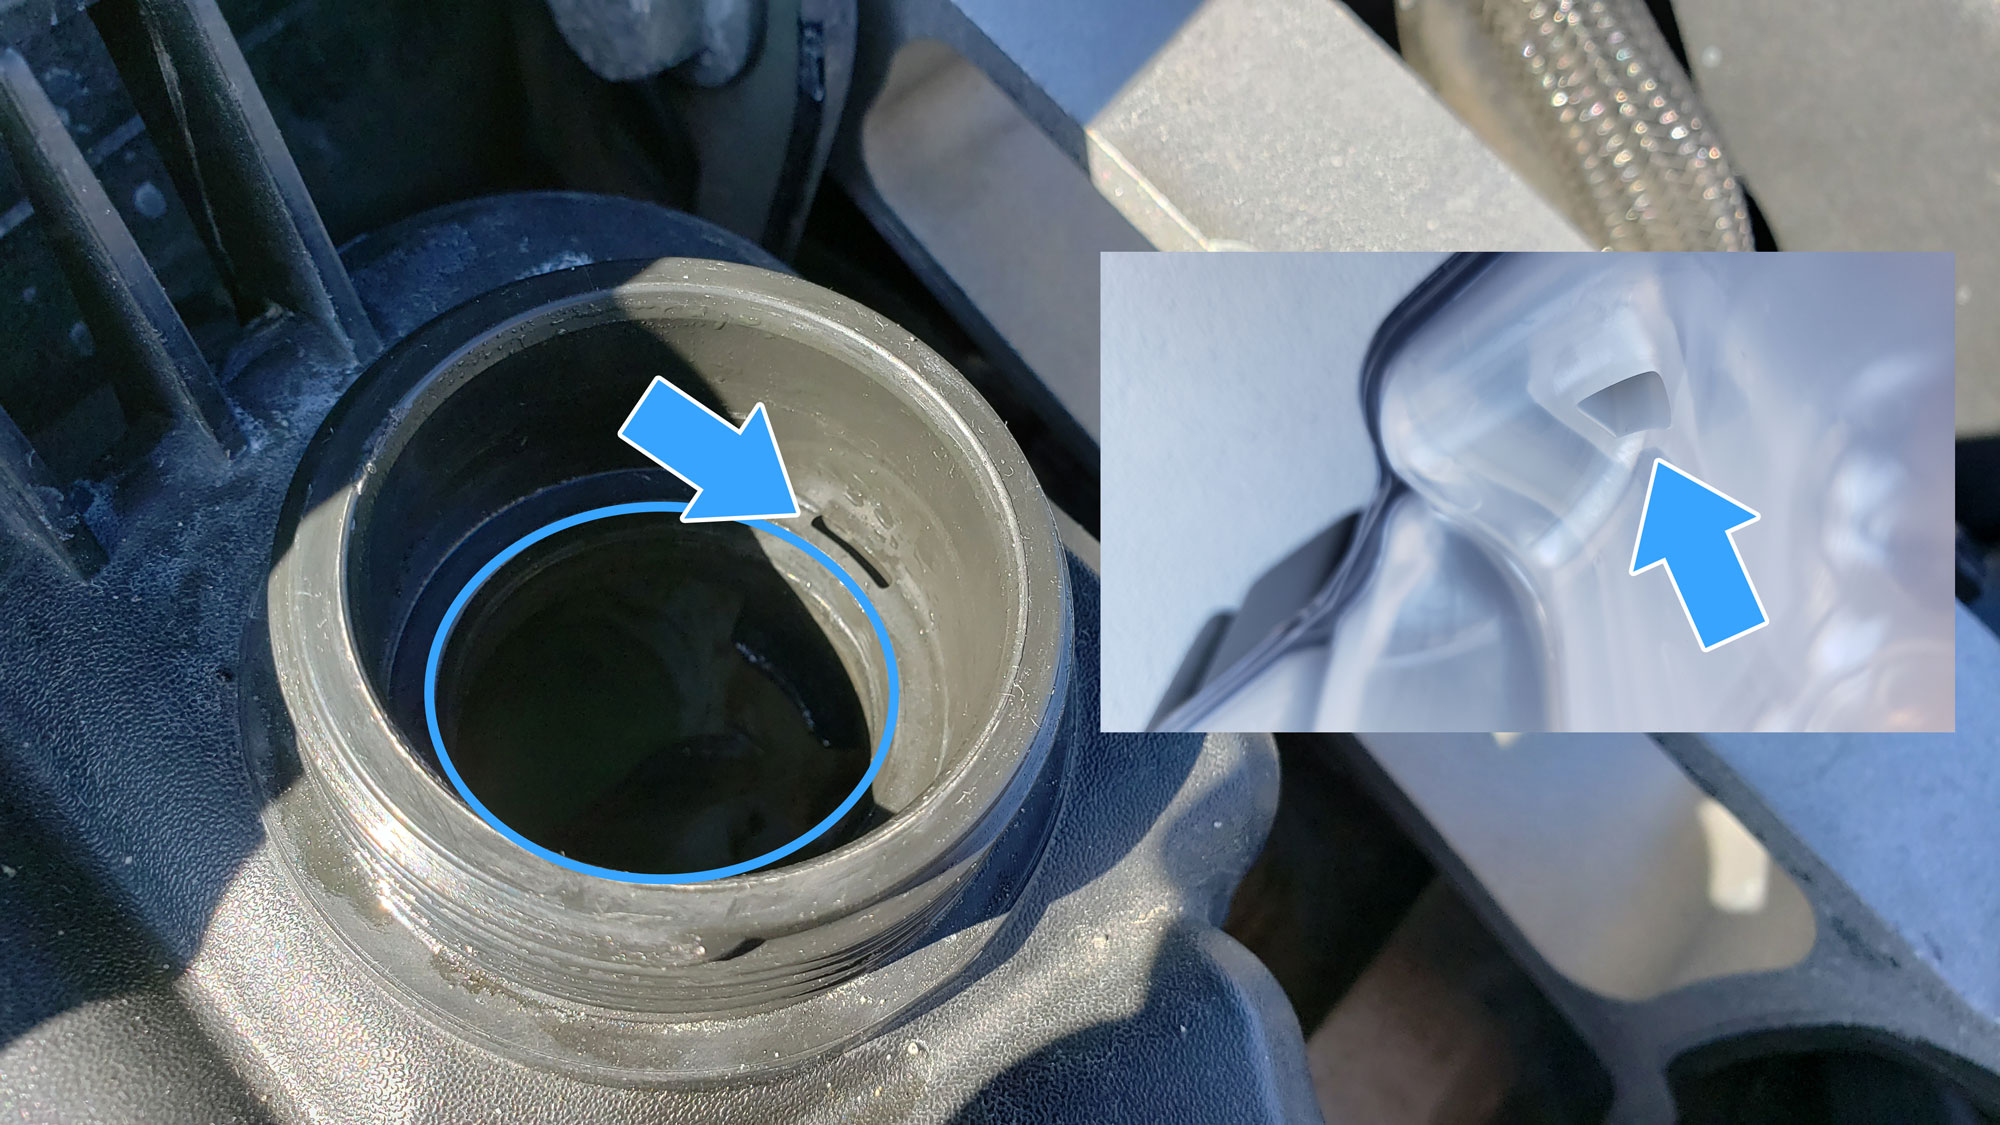
Take note: Some Volvo coolant reservoirs have a drainage slot above the coolant cap o-ring seat. When using a vacuum coolant bleeder, make sure the vacuum makes a seal on the inner circle highlighted in blue. Otherwise, air will be drawn up through the slot and the tool will not work. If the vacuum bleeder doesn't make a seal, you can cover the hole to build vacuum in the system.
Let the car idle for a short bit and look for any leaks. Make sure there weren't any hard pipes cracked during removal and installation. The Drive-E engine won't easily warm up to operating temperature while idling, so at this point, take the car for a short drive to allow the engine to reach temp. Once achieved, return for a final inspection, install the engine cover, and the job is complete.
This is one of those fairly straightforward jobs with not much that can go wrong. You should be good as new with a fully functioning water pump.
If you're interested in more DIYs for your Volvo, you can visit volvo.fcpeuro.com or subscribe to our YouTube channel.


