- 03/22/2021
- 10 Min Read
- By: Christian Schaefer
How To Replace BMW F30 Fuel Injectors (N20 & N26 Engine)

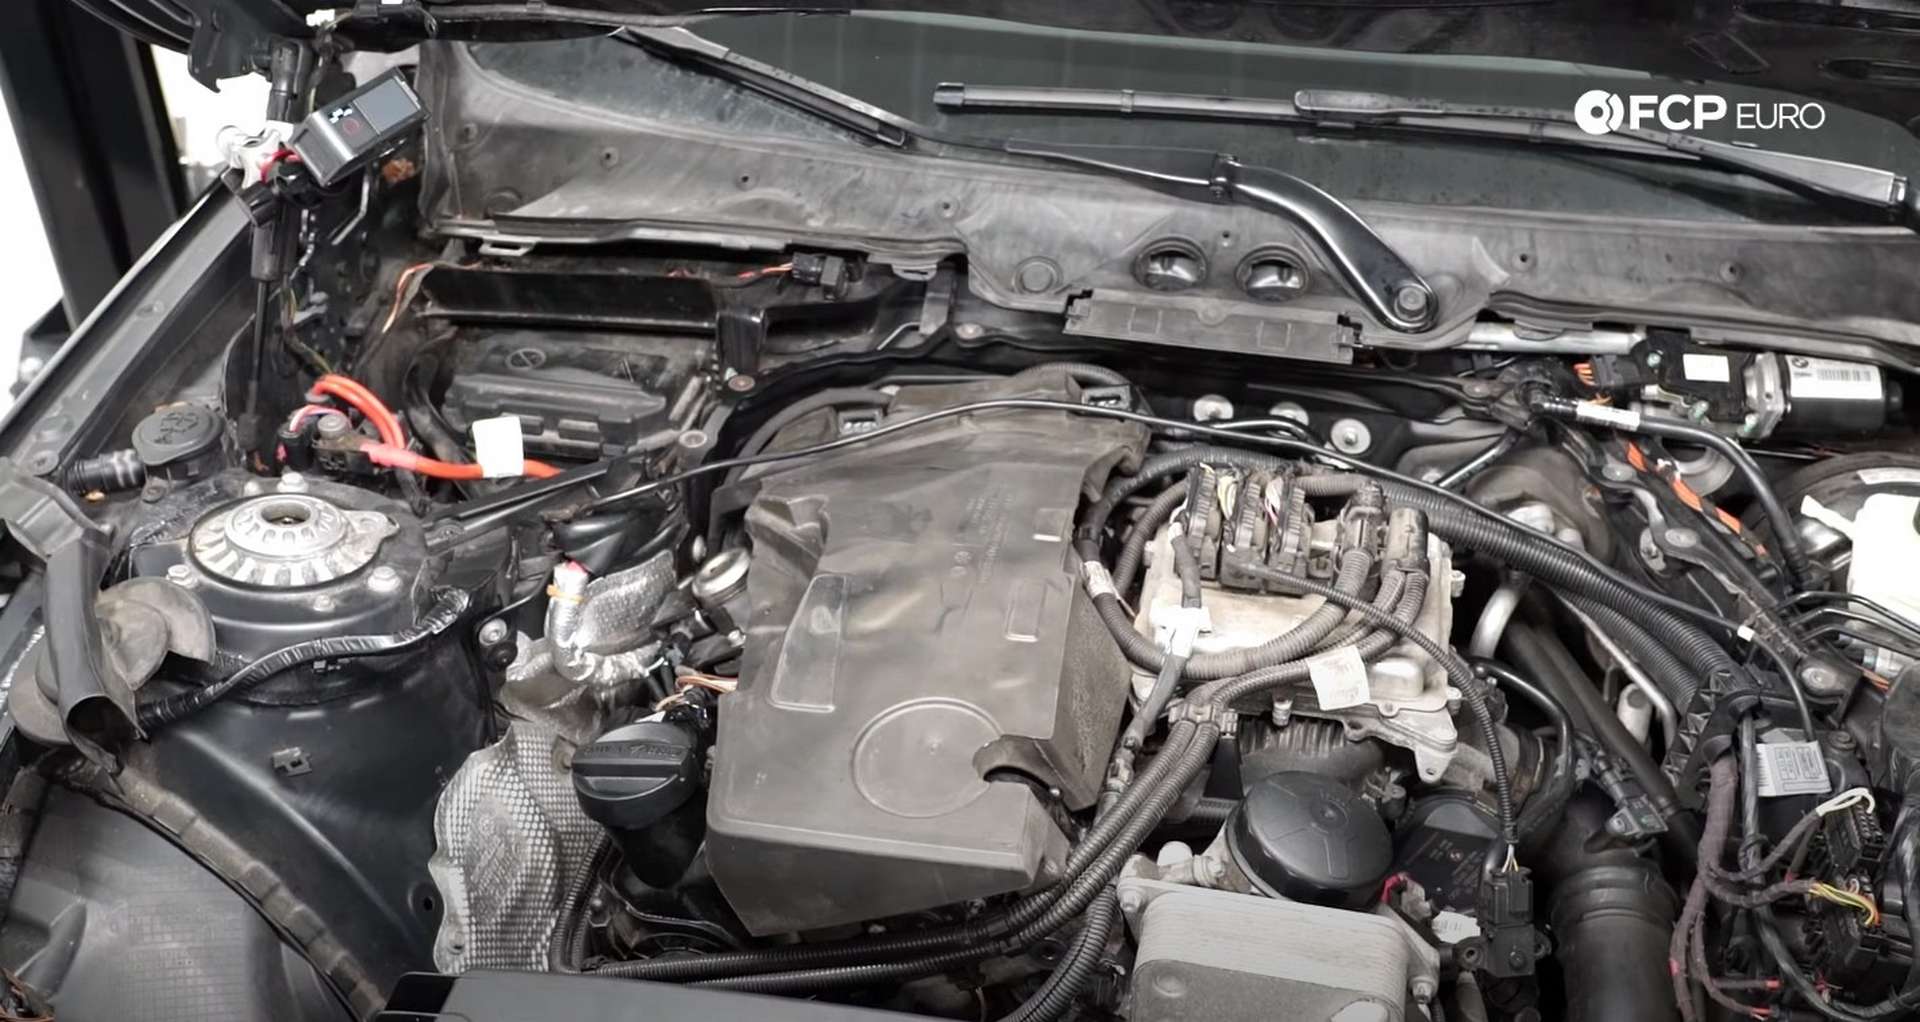
The direct fuel injection on BMW's N20 and N26 engines allowed them to produce a four-cylinder with excellent fuel mileage and plenty of power. Rather than sitting in a fuel rail on the intake manifold, the injectors sit in the cylinder head above the spark plugs. That allows them to spray their fuel directly into the combustion chamber. Because of the direct injection, the N20/26 uses a high-pressure fuel pump and hard fuel lines in the engine bay. The pump and lines all use threaded connections to contain the pressure.
There is more than just pulling the injector out and replacing it with a new one. Each injector has a specific calibration code that the engine computer uses to determine how long it needs to hold open that injector. You'll need to use a scan tool to reprogram the ECU with the new calibration numbers for each injector if they're different from those you remove. Follow along carefully below to ensure you don't miss a step.
BMW models and years applicable:
|
|
|
|
|
|
|
|
Symptoms of BMW F30 fuel injector failure:
- Hard starting
- Misfires
- Poor fuel economy
- Poor engine performance
An injector can fail in two ways; releasing too much fuel or not enough. Too little fuel causes the cylinder to run lean. Too much air and not enough fuel will result in a hot cylinder temperature and a lack of ignition. A lean misfire is something you can hear and feel. The engine will sound far less smooth than it usually does and will create more vibration. The chances are that the engine computer will pick this up too and alert you to the issue through the check engine light. Leaky injectors or ones with damaged spray patterns will also cause misfires. Too much fuel or a poor spray pattern can make the engine struggle to ignite the fuel and air mixture.
Regardless of how they fail, you should expect poor performance and fuel economy. These engines are calibrated to run perfectly in a set range of parameters. When something causes them to be outside of those, it will be noticeable.
What will it cost to replace the fuel injectors on an N20/N26-powered F30 BMW?
The job's cost depends on how many injectors you need to replace and what tools you have at your disposal. We sell a fuel injector kit with four new injectors and the decoupling rings needed to install them. That'll run you right around $400. Individually, you can get an injector for about $90 and a decoupling ring for approximately $10.
To install the injectors properly, you need a couple of specific tools. First, there is the injector removal tool. The tool bolts to the head in place of the injector hold-downs and thread into the tops of the injectors to pull them out with its reverse thread pattern. Additionally, you'll need a scan tool that can go into your engine computer and recalibrate the fuel injectors. The injector removal tool will cost you around $100, and the scan tool we sell that is capable of reprogramming the injectors will run you right around $500.
How long will it take to replace the fuel injectors on an N20/N26-powered F30 BMW?
The injectors are pretty easily accessible once the engine bay plastics are out of the way. The injector removal and installation process is pretty simple, too. Set aside around two hours to be safe. You need to be careful when working with the fuel line connections as any cross-threaded connections are a definite high-pressure fuel leak.
Parts required to replace the fuel injectors on an N20/N26-powered F30 BMW:
Tools required to replace the fuel injectors on an N20/N26-powered F30 BMW:
- BMW Fuel Injector Removal Tool
- 8mm Socket
- 10mm Socket
- E6 Socket
- E8 Socket
- E18 Socket
- 14mm Wrench
- 17mm Wrench
- Picks
- Ratchets
- Ratchet Extensions
- Rivet Pliers
- Adjustable Pliers
- Torque Wrench
- Scan Tool
- Rags
Steps required to replace the fuel injectors on an N20/N26-powered F30 BMW:
Step 1: Expose the fuel injectors
Grip the front of the engine cover and pull up to pop it off of the front locating pins. Then grab it by the right side and pull up to pop it off of the last pin. The pre-2013 engines also have two vacuum lines on the passenger's side of the cover that need to be disconnected before you can remove the cover.
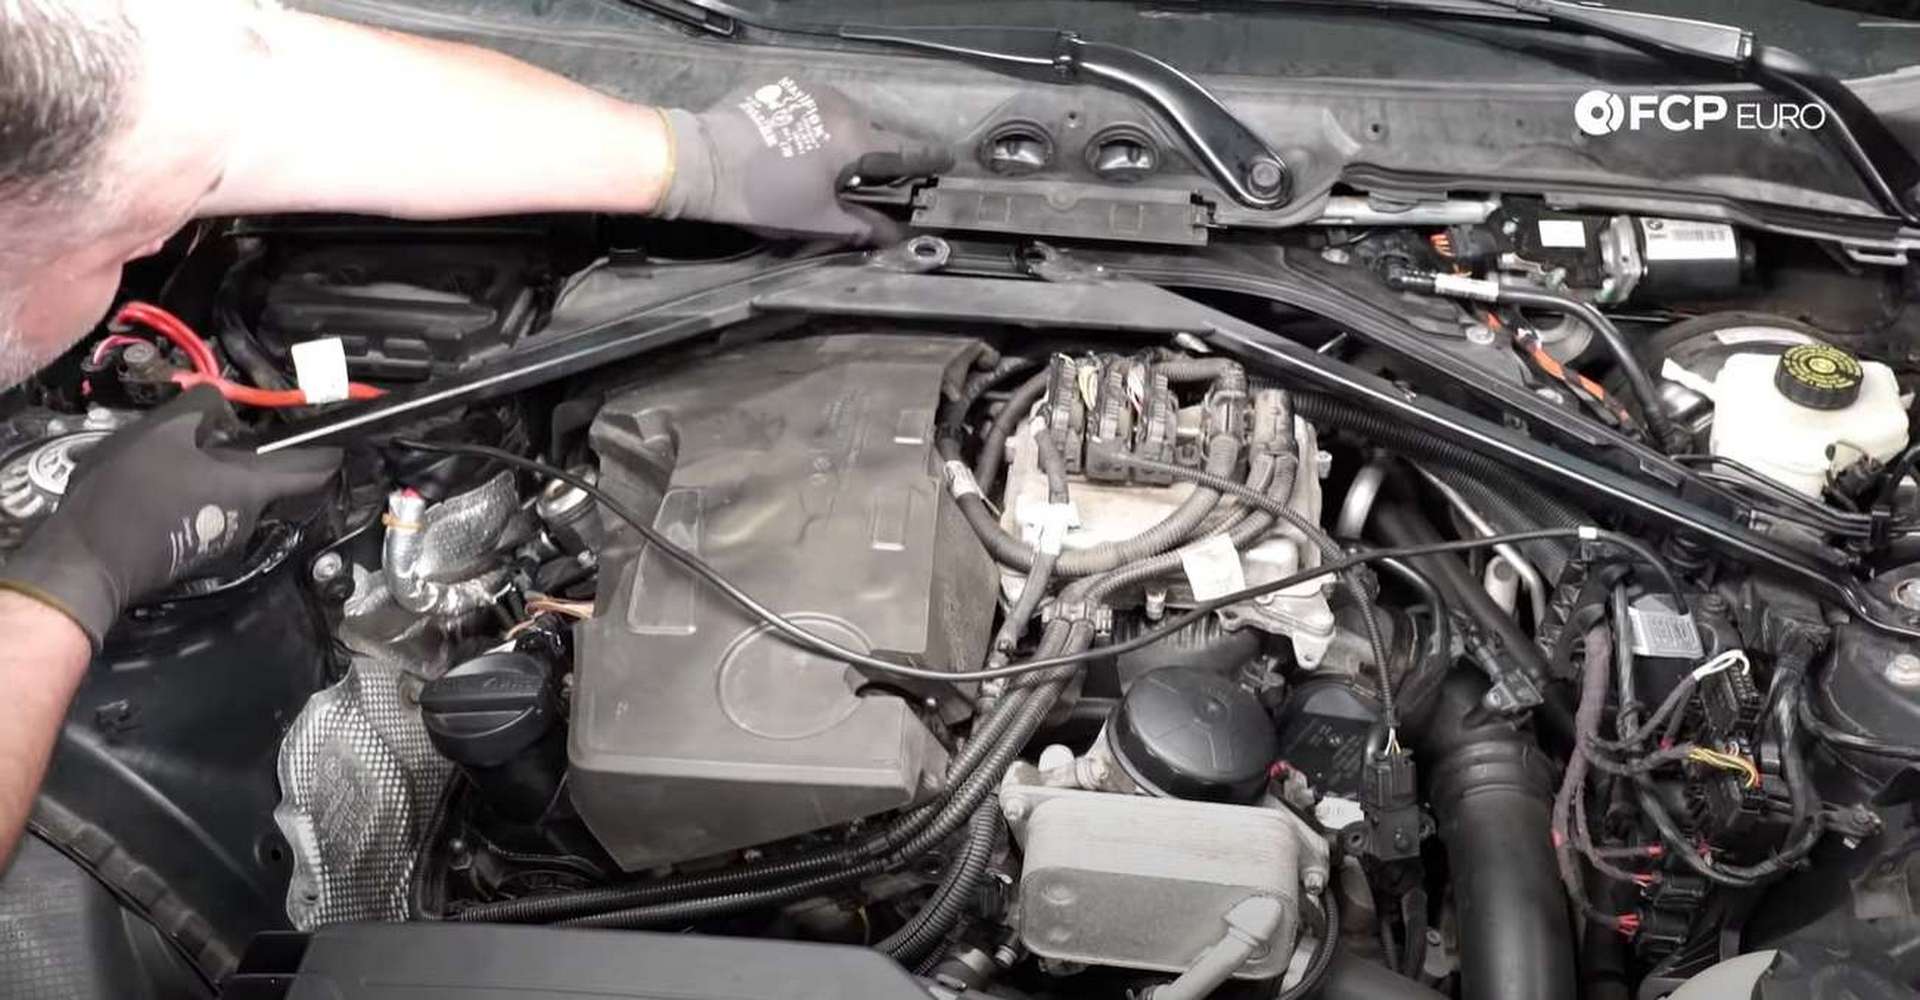
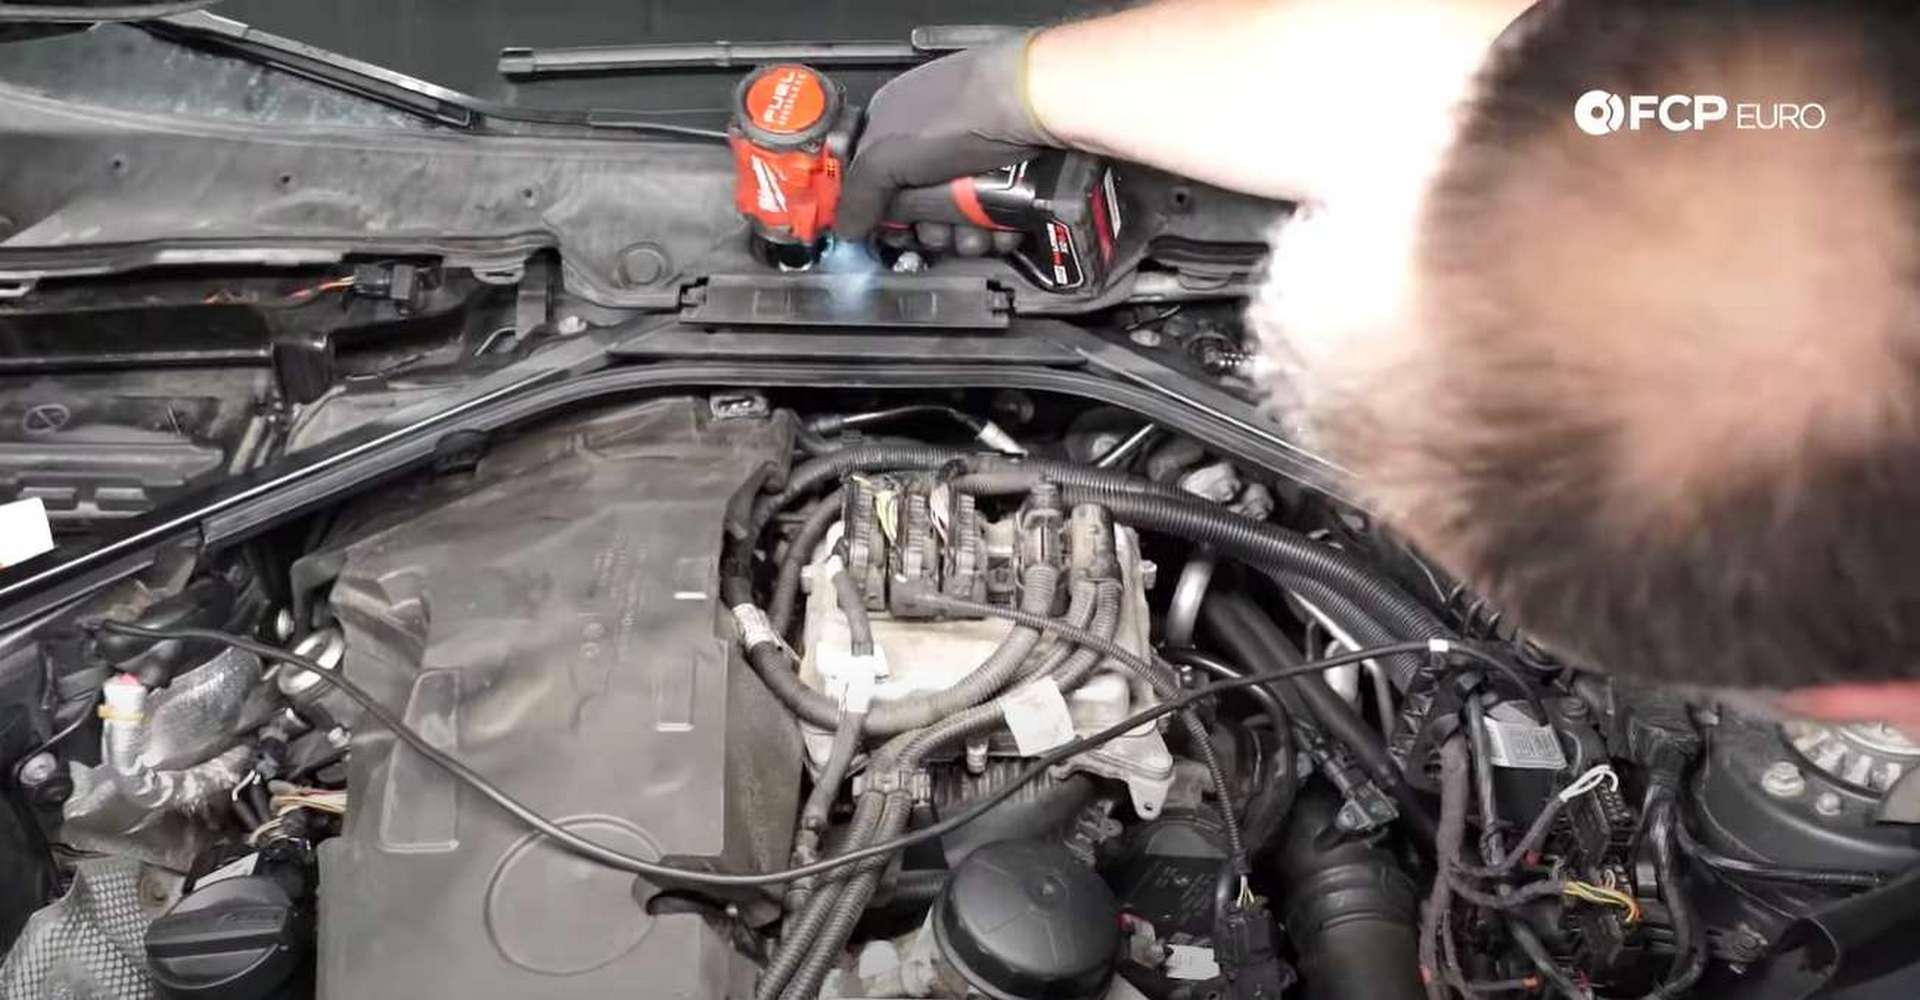
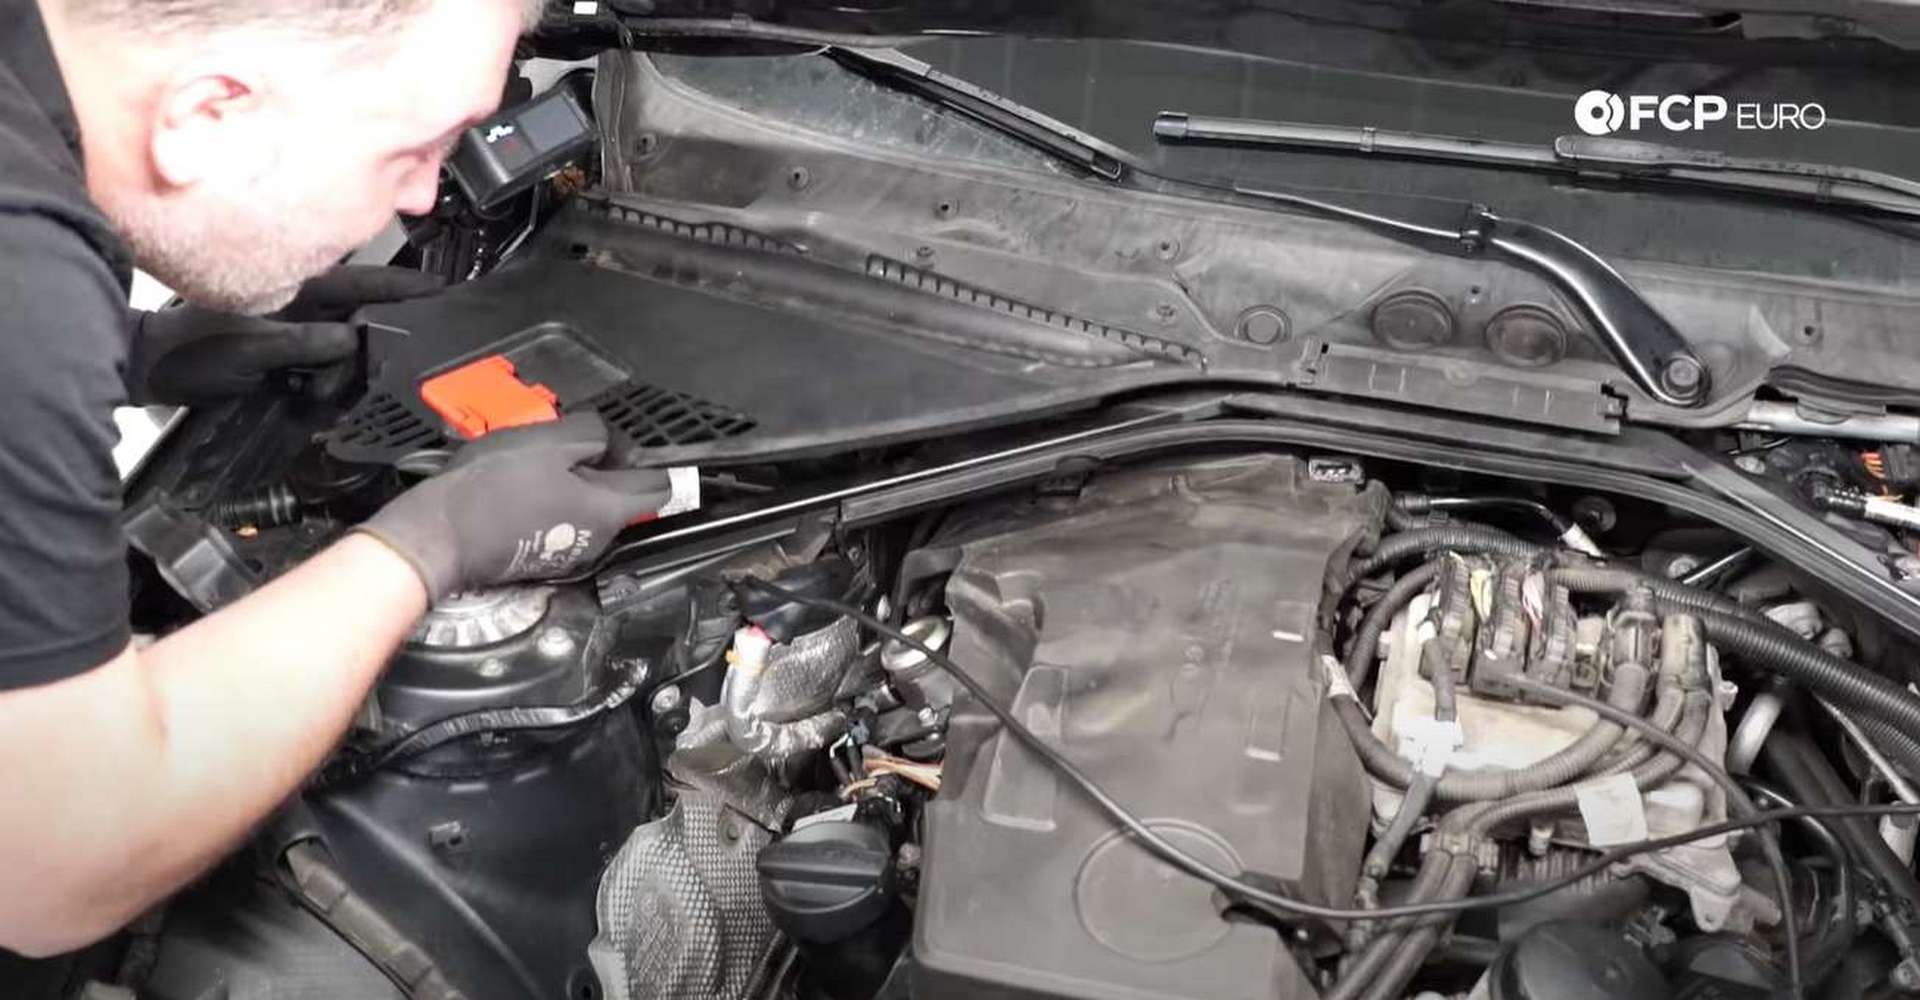
Underneath the plastic engine-cover is a foam noise-reduction pad. Pull up on it to remove it from the engine. Then move to the engine cowl. Use a 10mm socket to rotate the fasteners at the back of the cowl, a quarter turn. Then, remove the plastic rivets, securing them near the fenders.

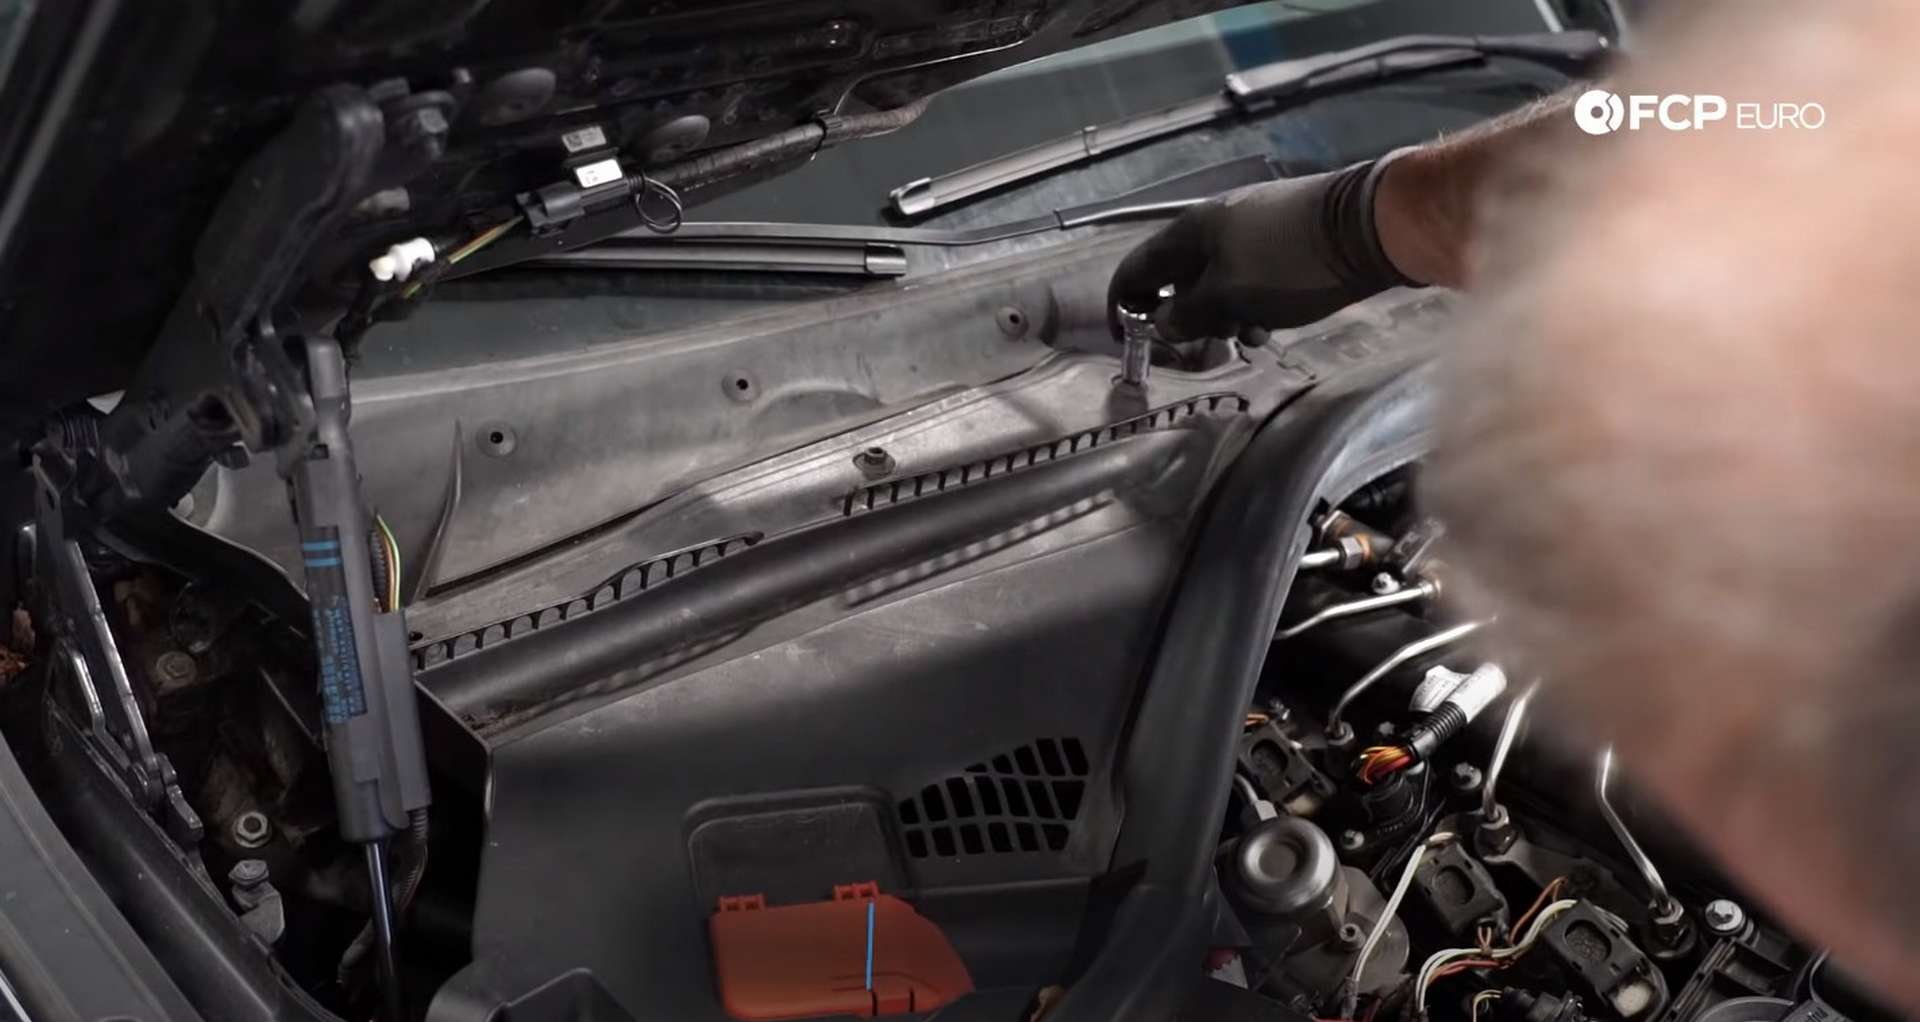
Removing those forward cowl pieces exposes the strut brace. Remove the two plugs from the rear cowl's center to reveal the strut brace's firewall mounting bolts. Then, pull the rubber strut covers off and remove the bolts with an E18 socket and pull the brace out. You need to remove a plastic rivet to remove each strut cover.
After that, remove the cover that sits below the brace. Use a 10mm socket to remove its seven bolts.
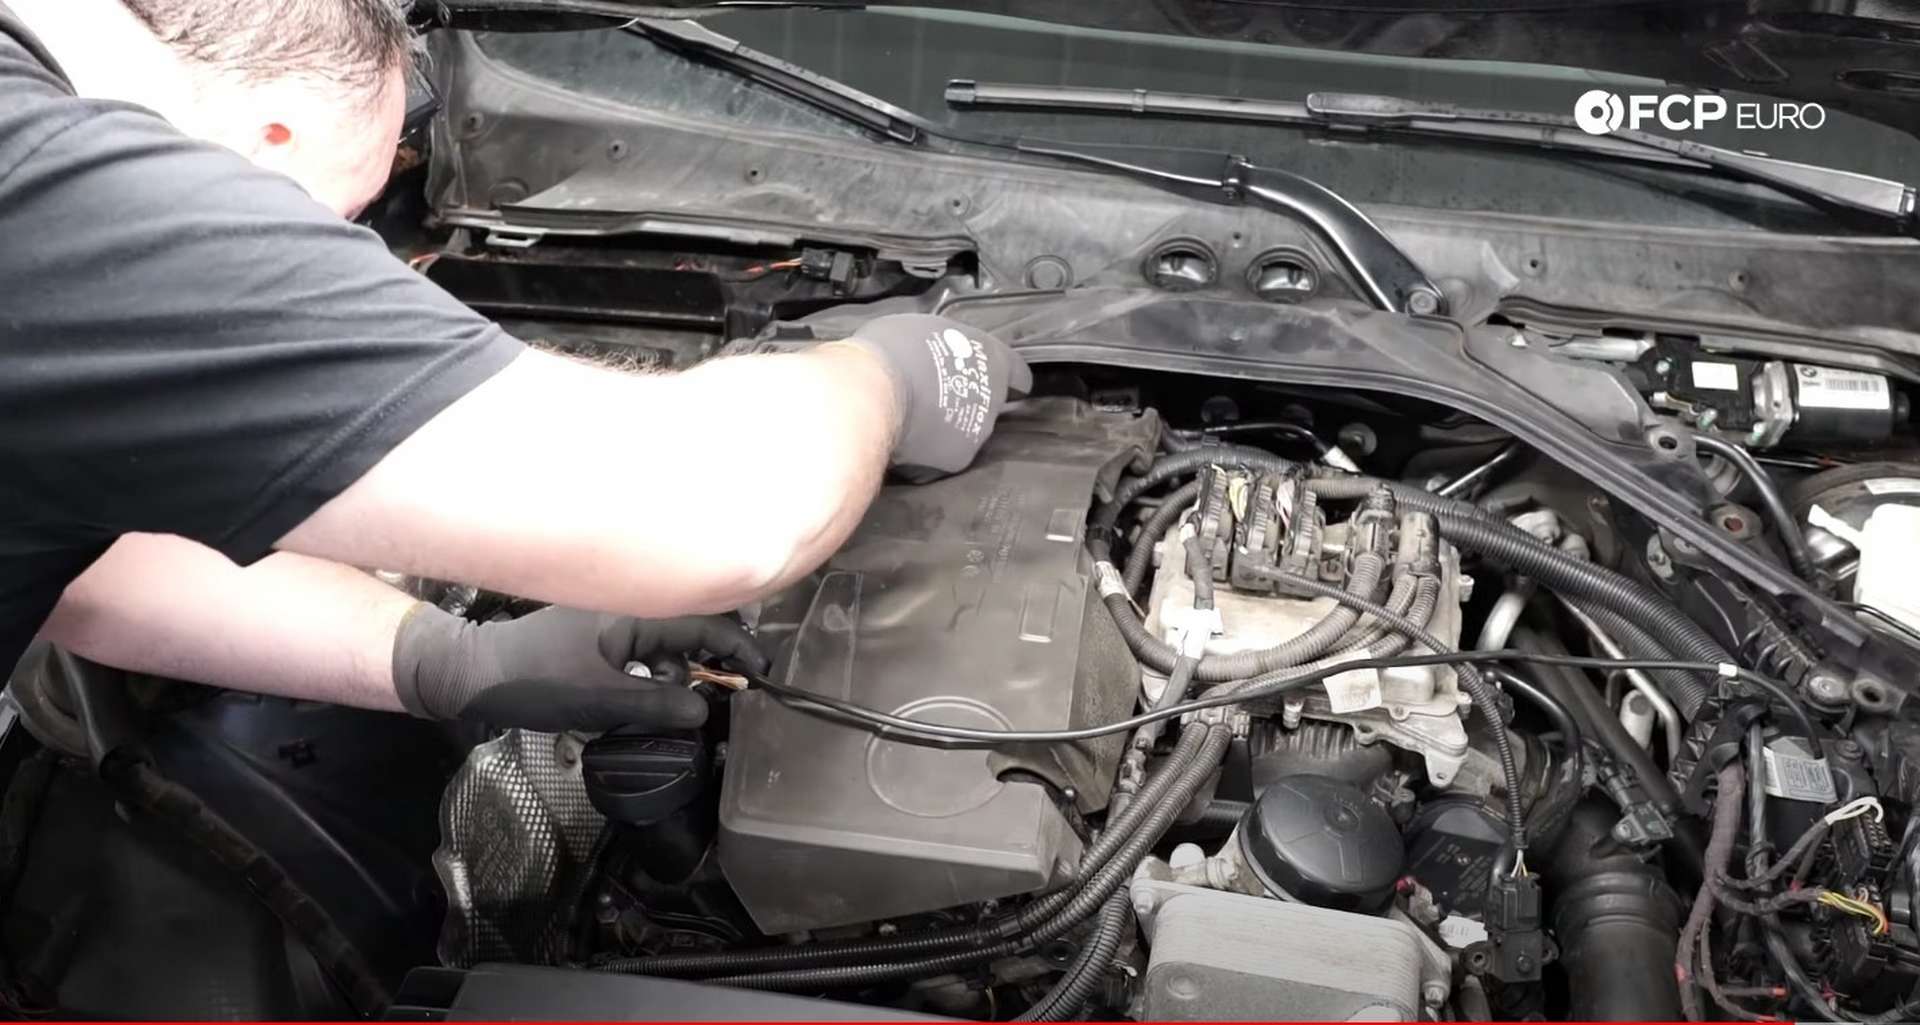
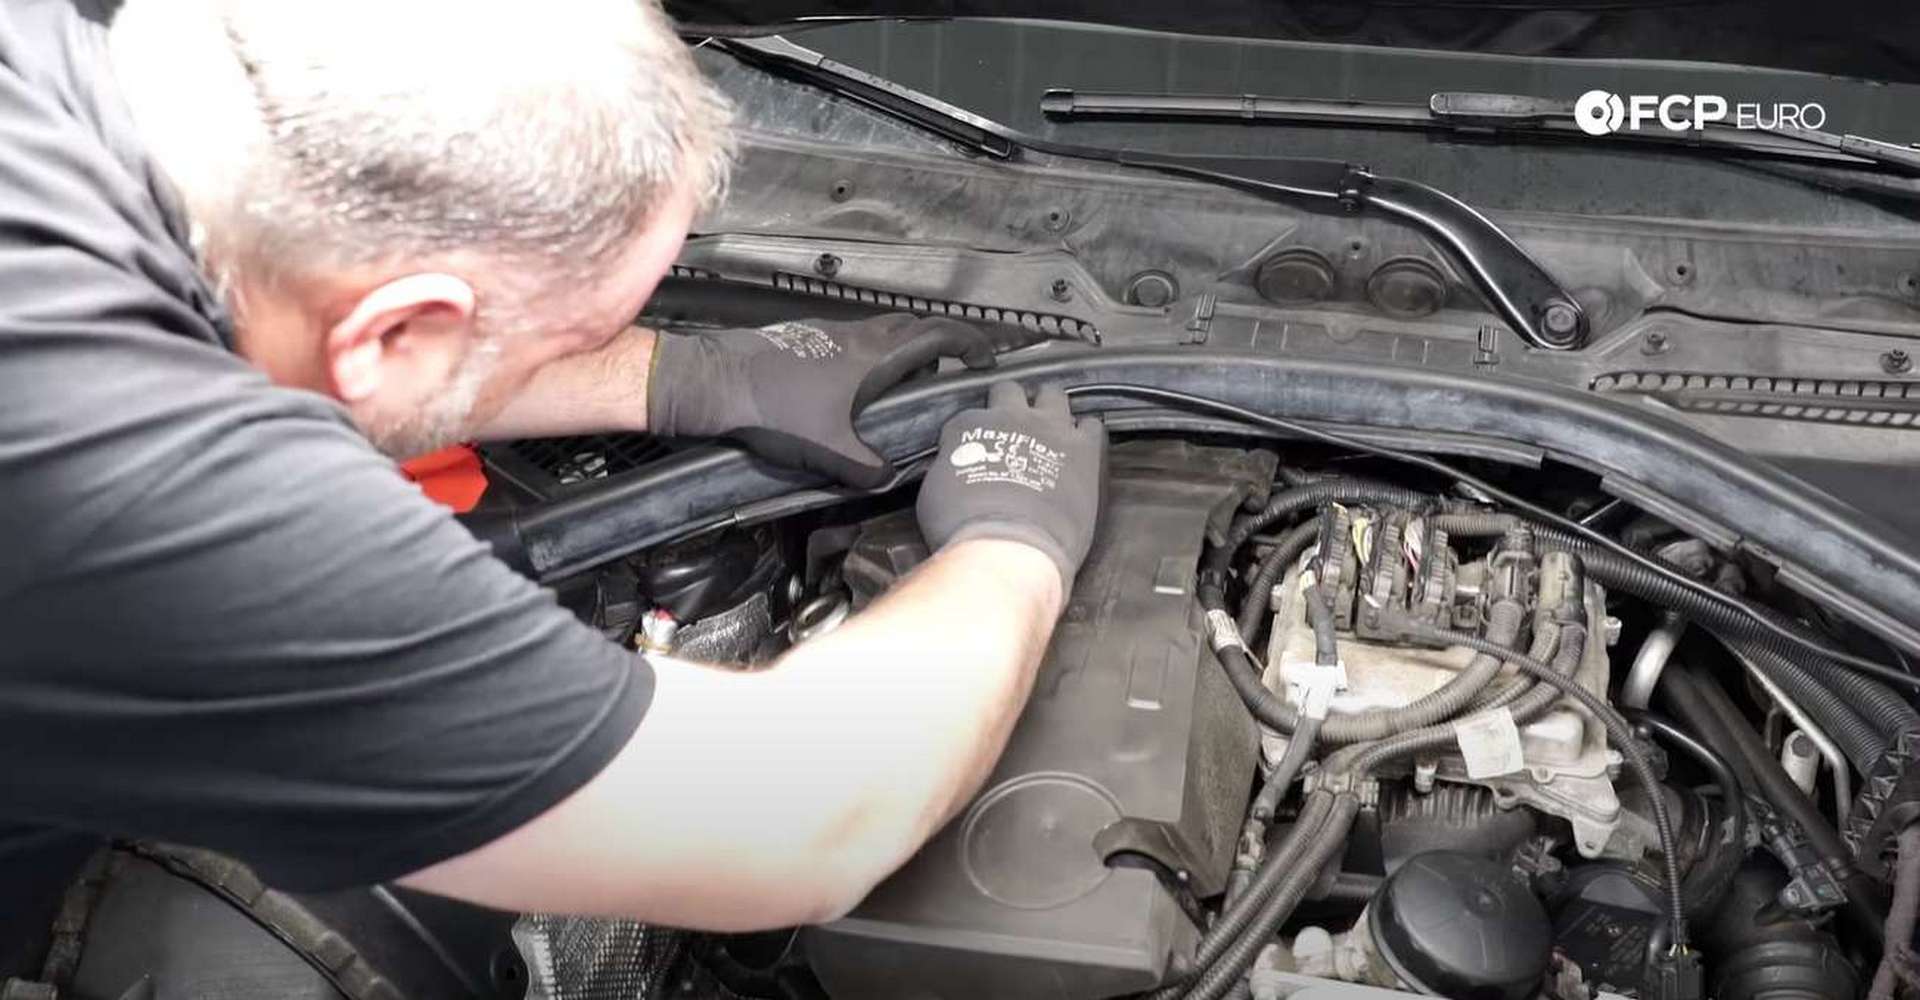
Step 2: Disconnect the wiring from the cylinder head
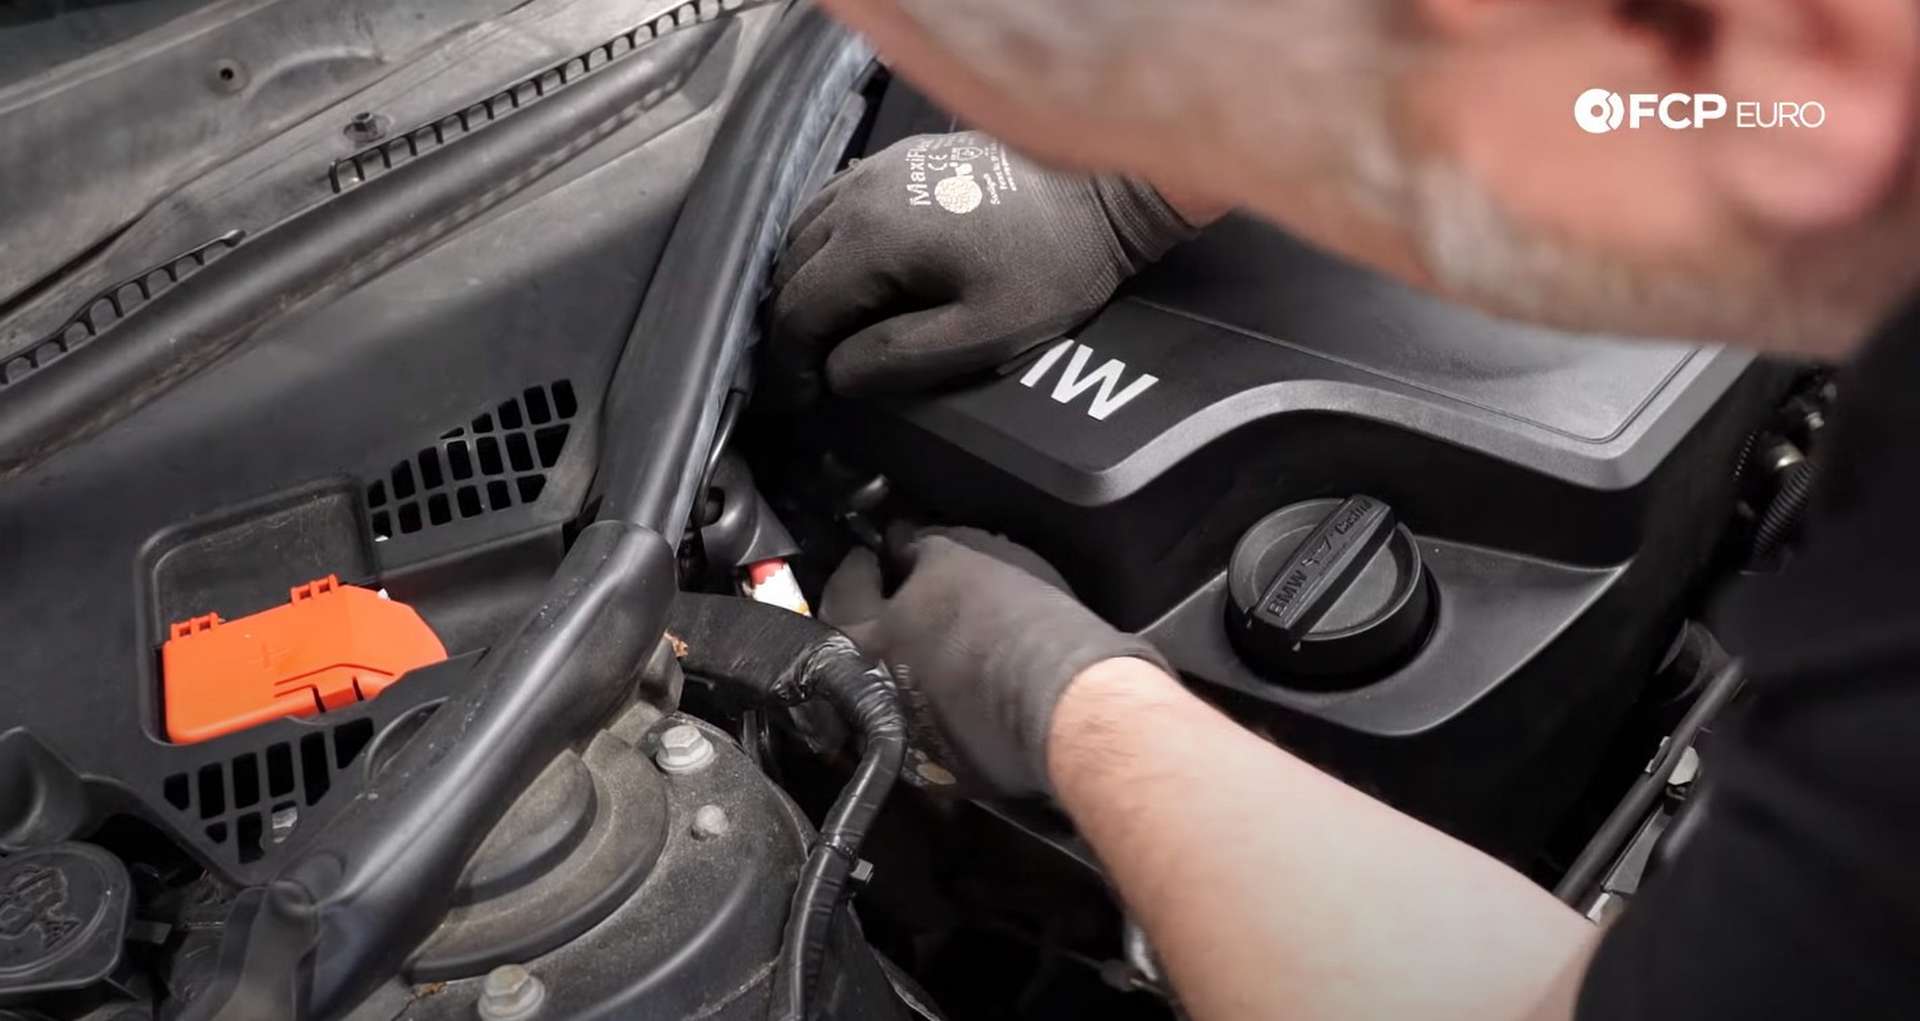
Each cylinder has an ignition coil, a fuel injector, and a ground wire. Lift the locks on the ignition coils and unplug the harness from each of them. Then, pull up on the coils to remove them from the cylinder head.

Use an 8mm socket to remove the nuts that secure the two ground wires to the valve cover.
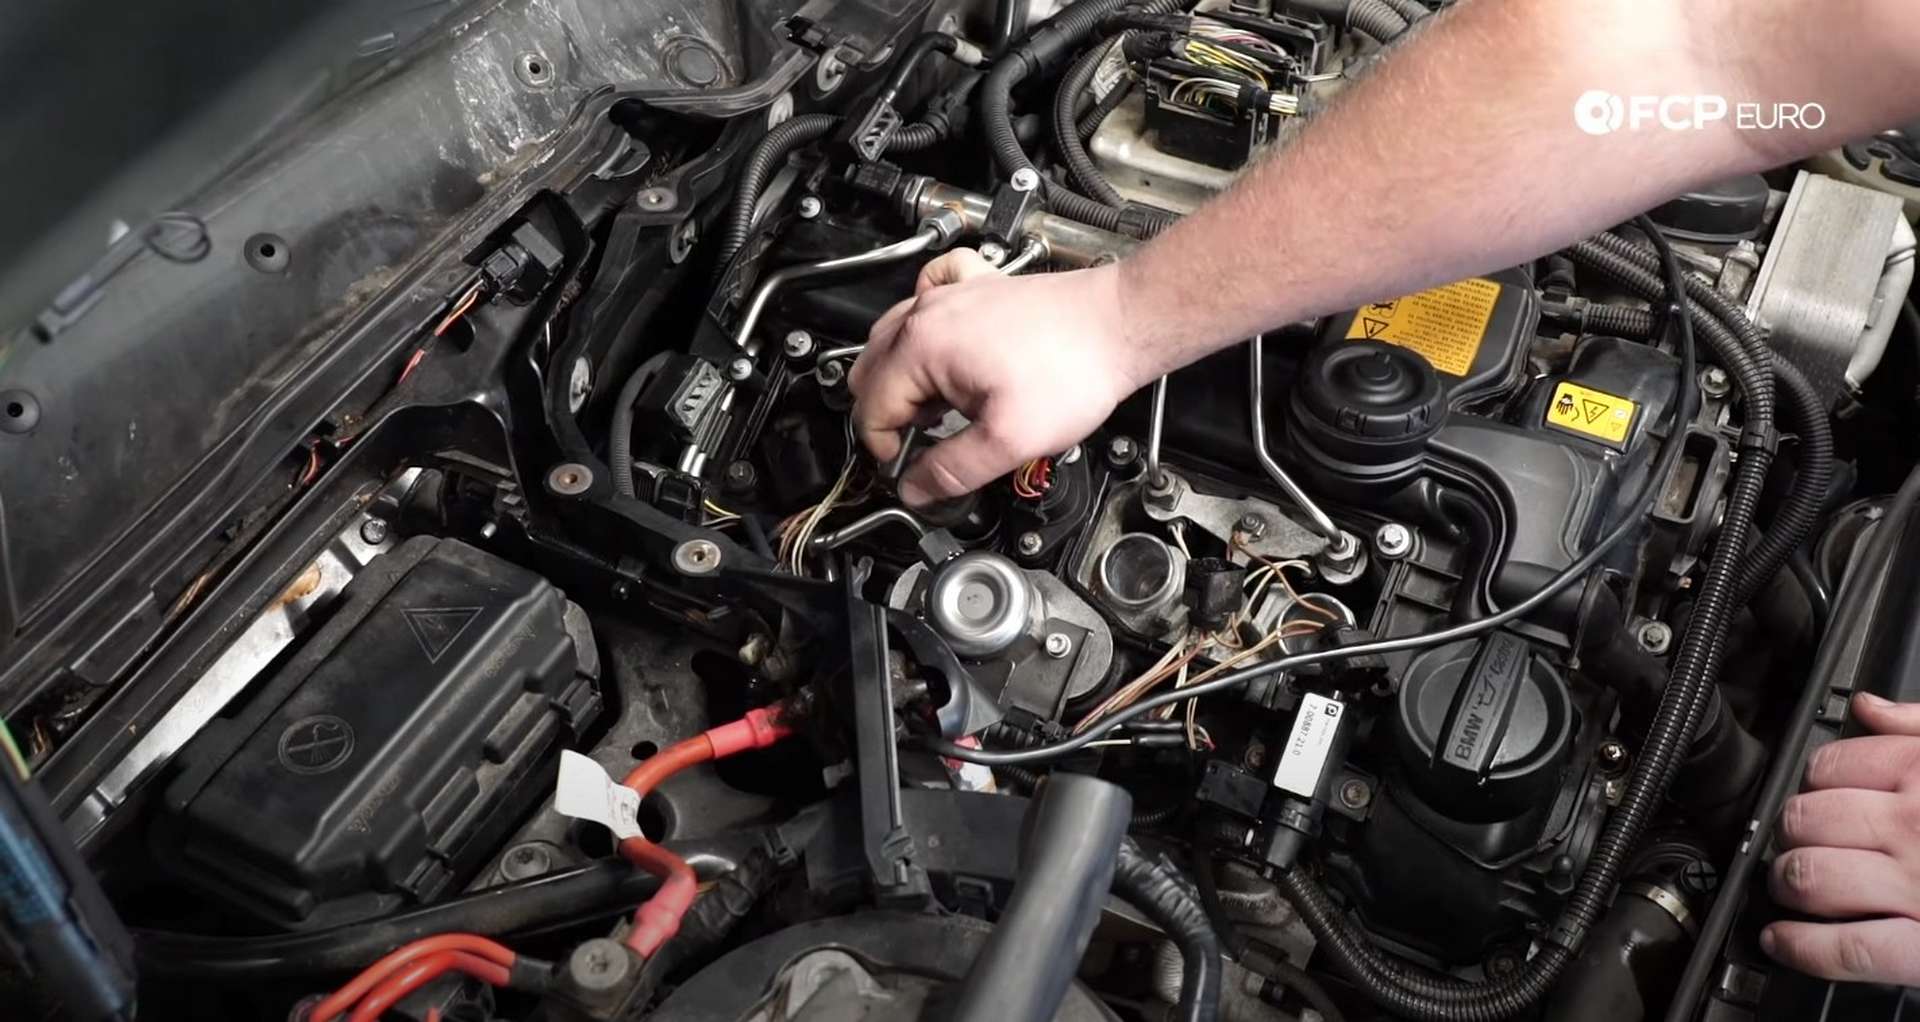
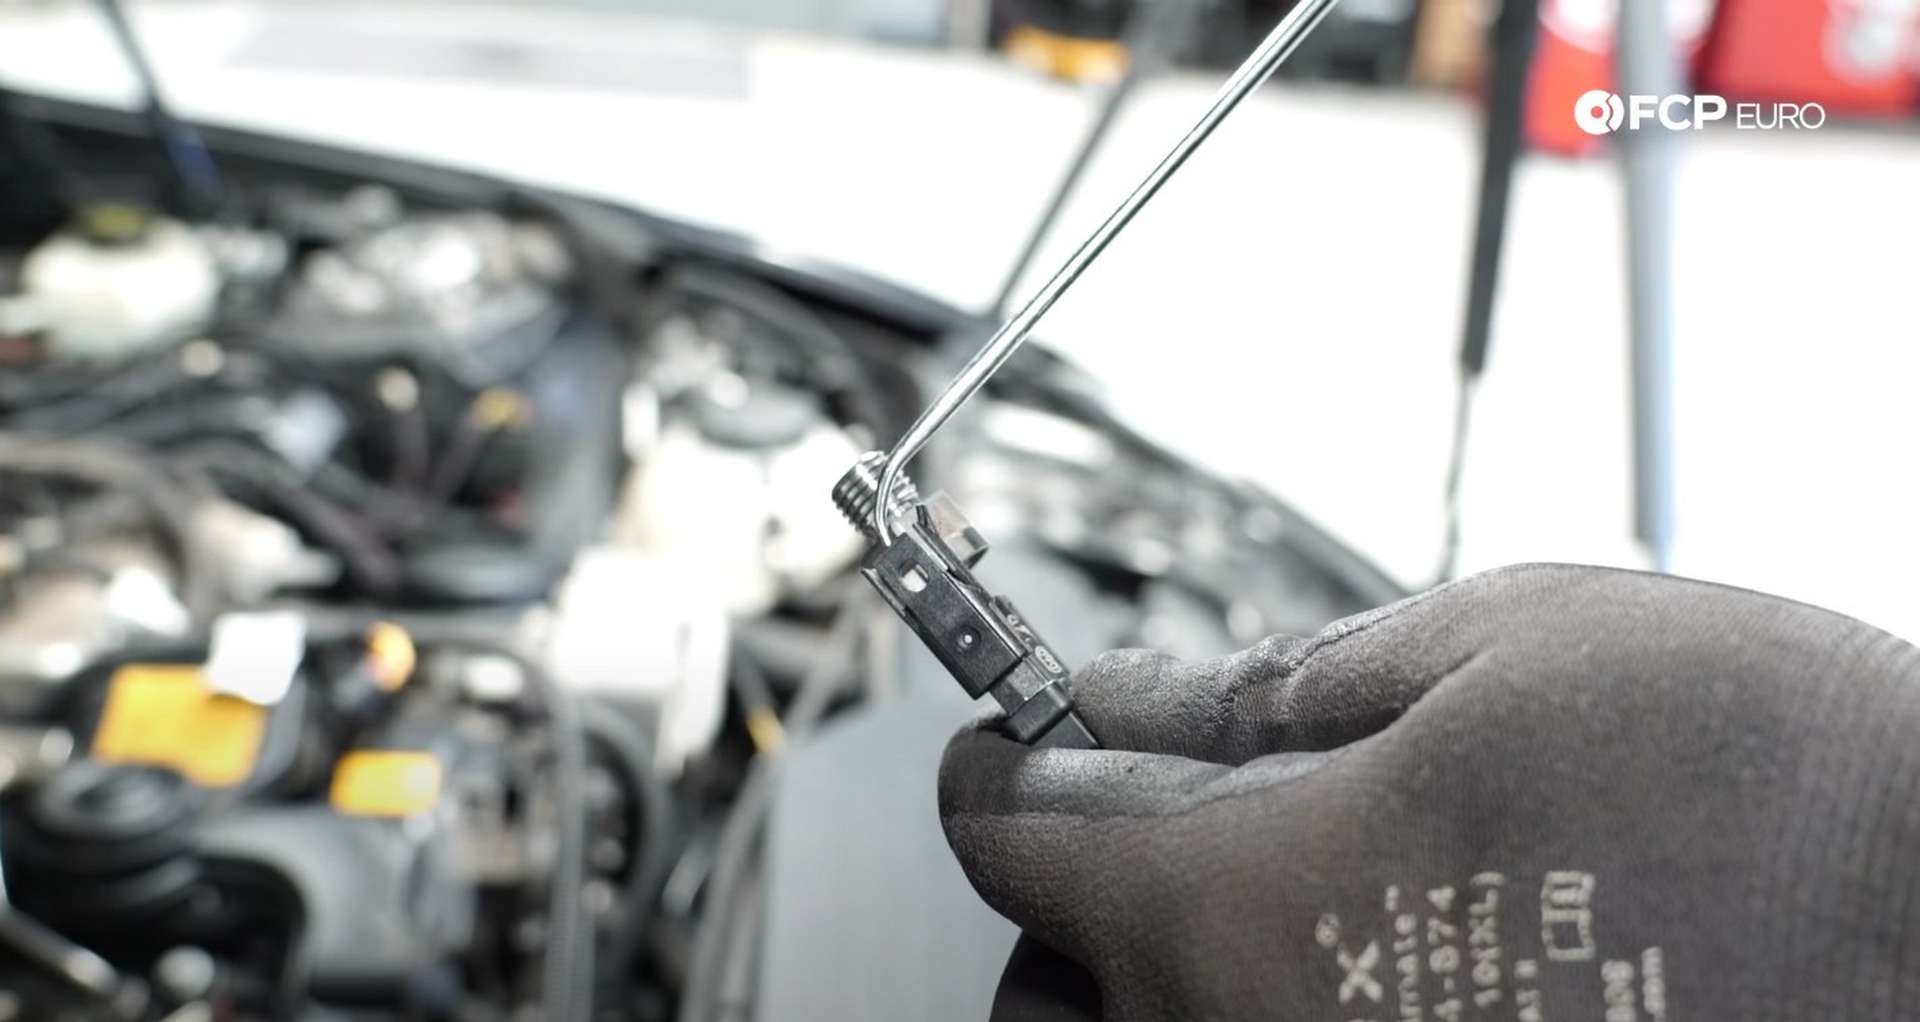
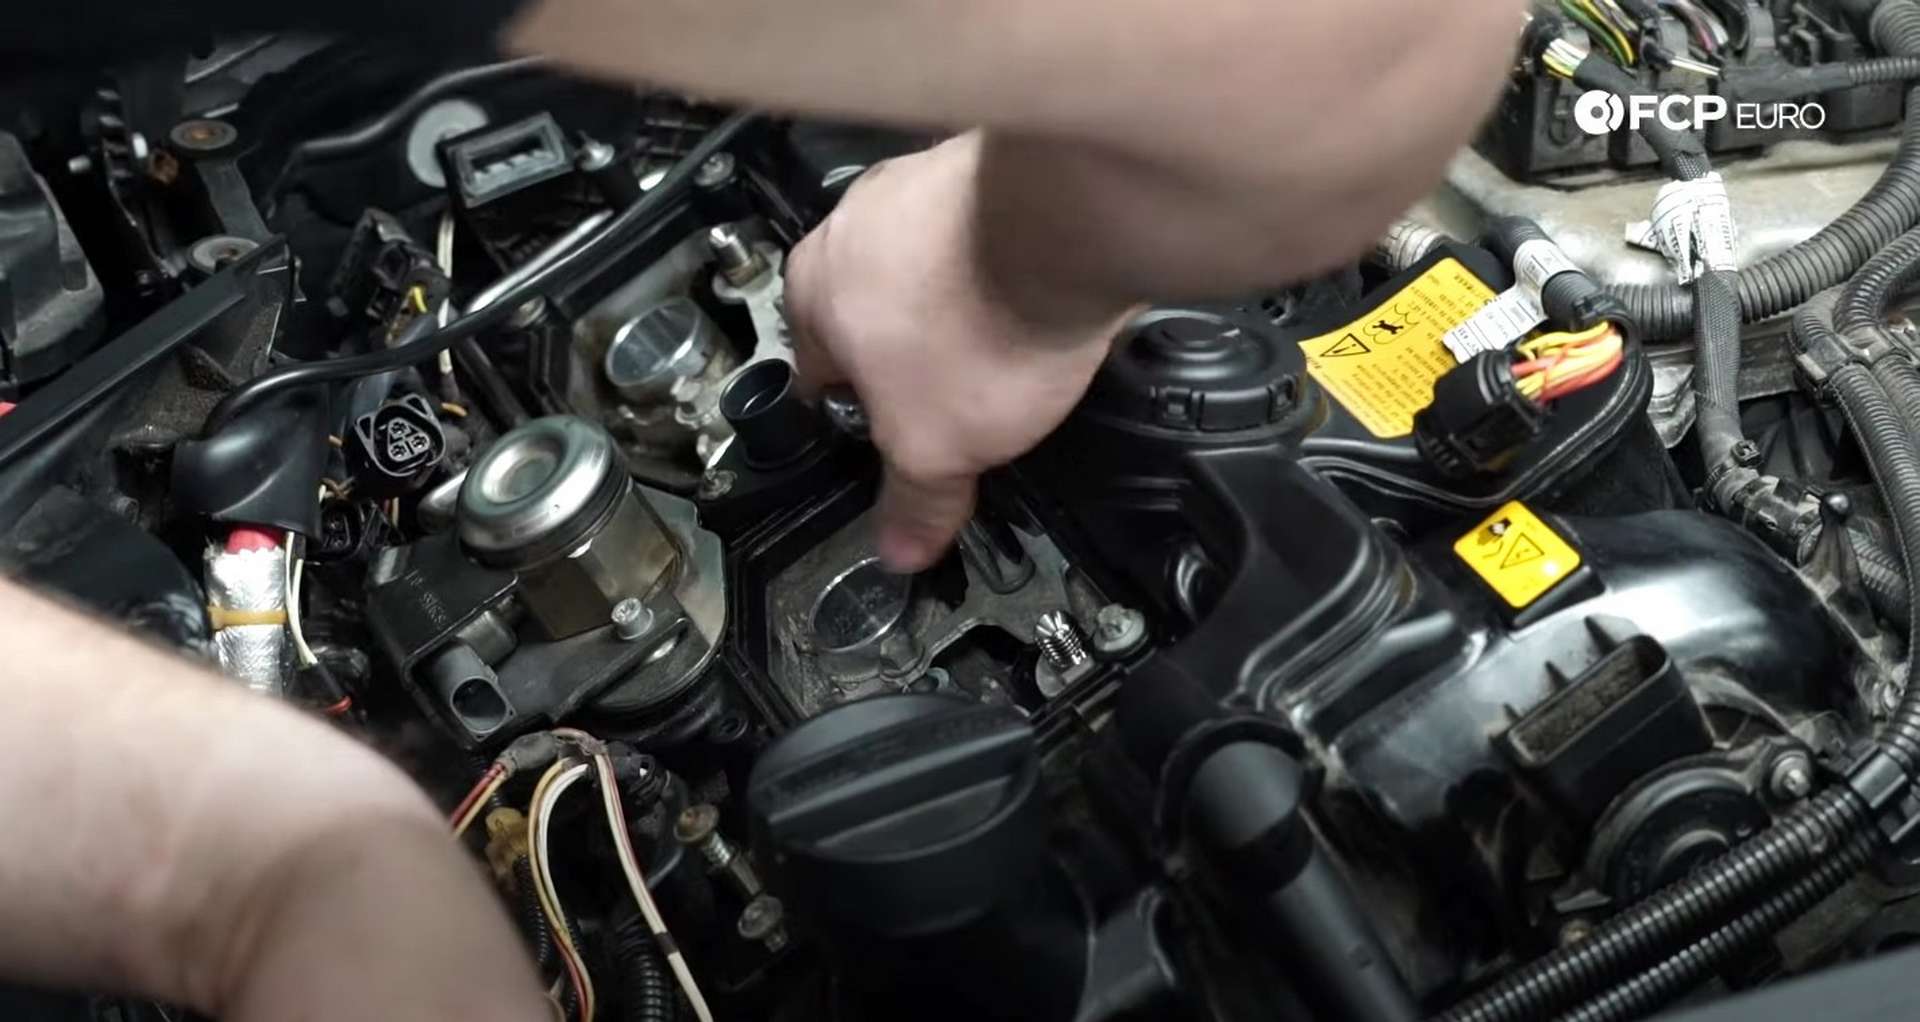
After that, disconnect the VANOS plug, the large round connector in the middle of the valve cover. Push in on its two tabs and pull up. Then, use a flat-blade screwdriver to open the clip securing its wiring to the valve cover, and fold the plug and harness away from the engine.
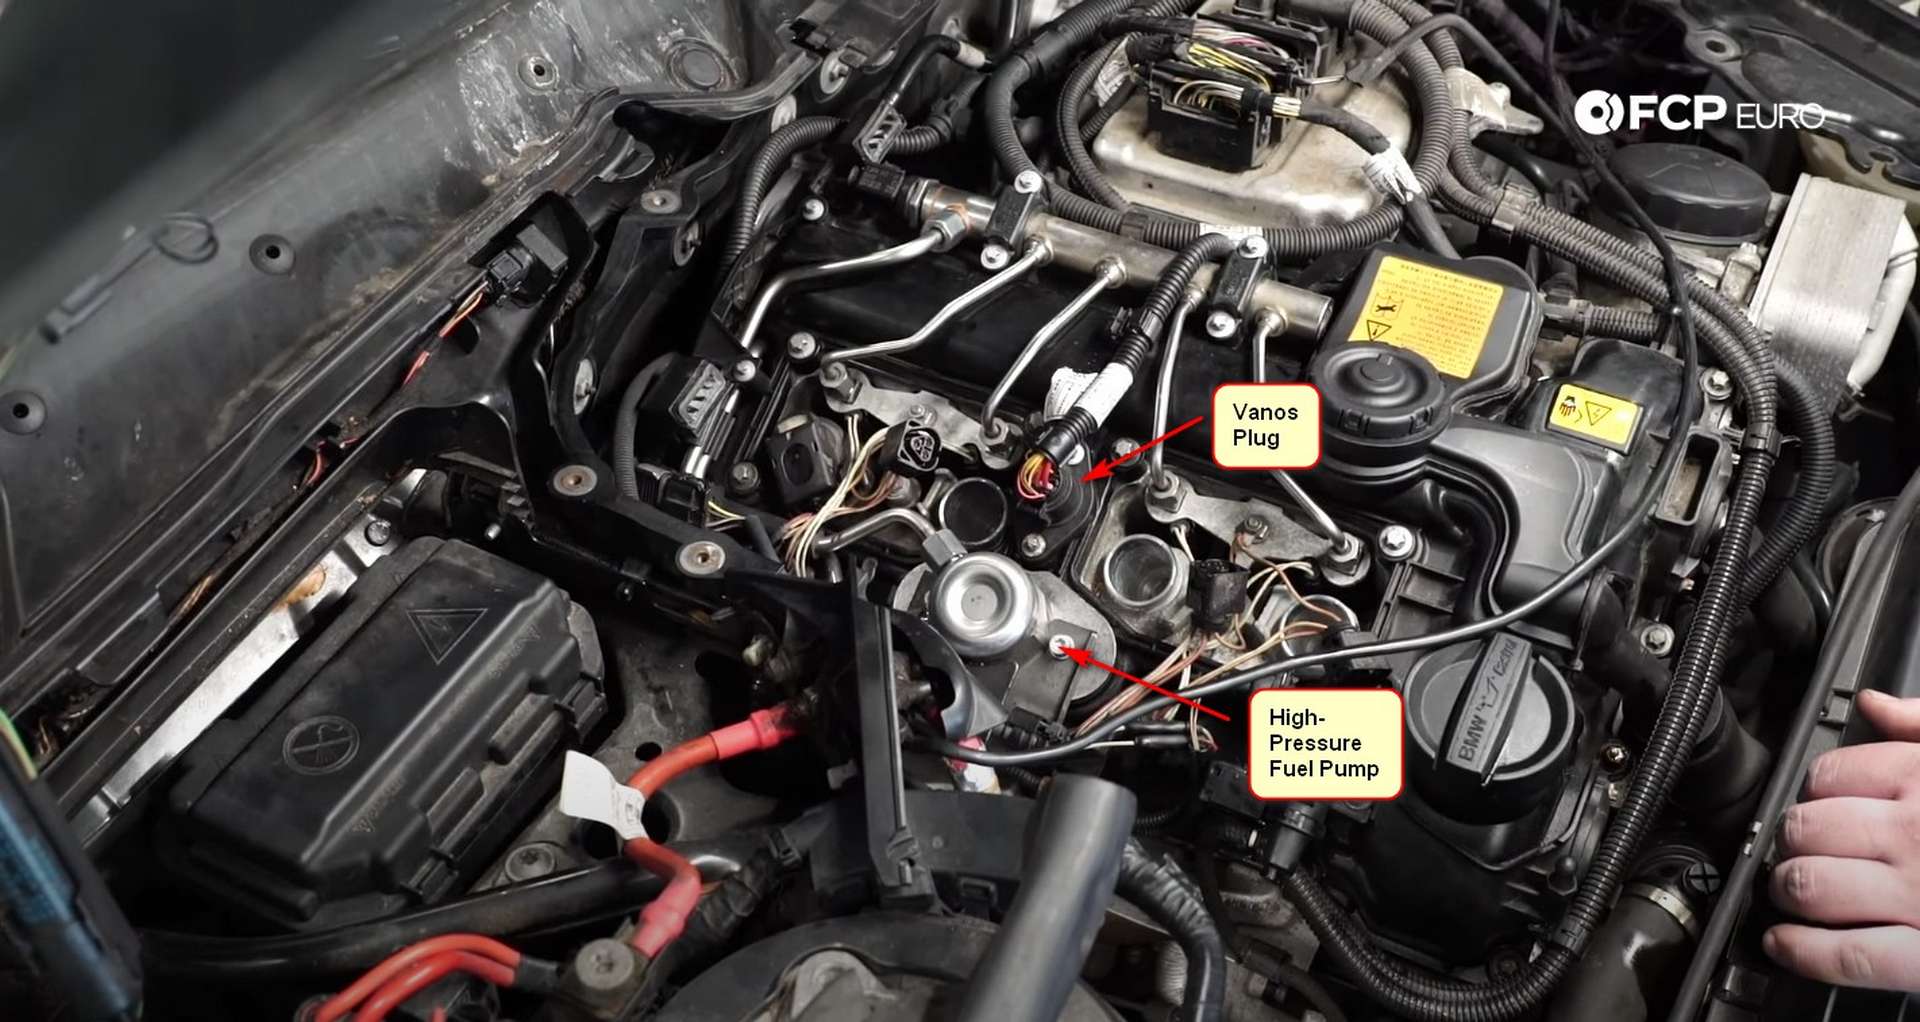
Just beneath the VANOS plug is the high-pressure fuel pump. Disconnect it from the wiring harness too.
Lastly, disconnect the fuel injectors. Space is tight here, so it's difficult to show exactly how to do it. You need to get a pick or a flathead screwdriver and pry back on the injector where the wiring harness plug connects.
Prying on the injector will release the locking tab on the harness connector and allow you to pull it out.
Step 3: Remove the fuel injectors
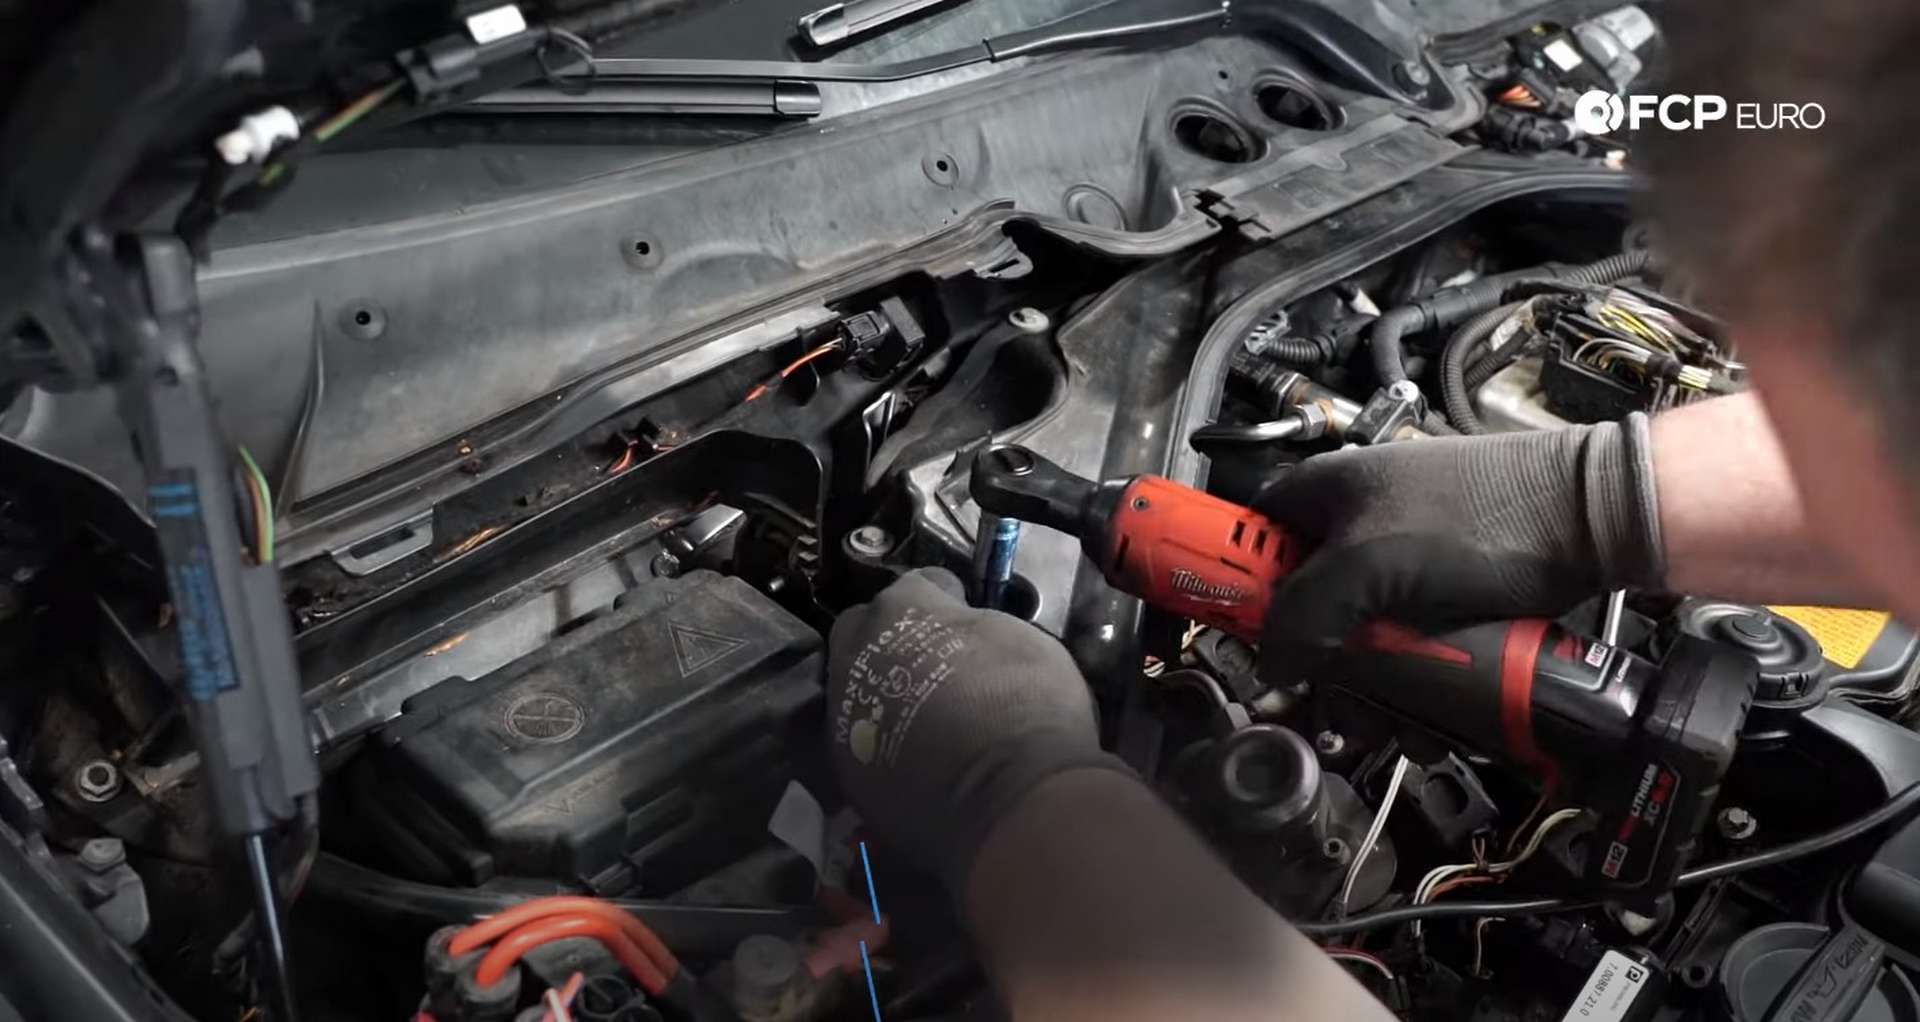
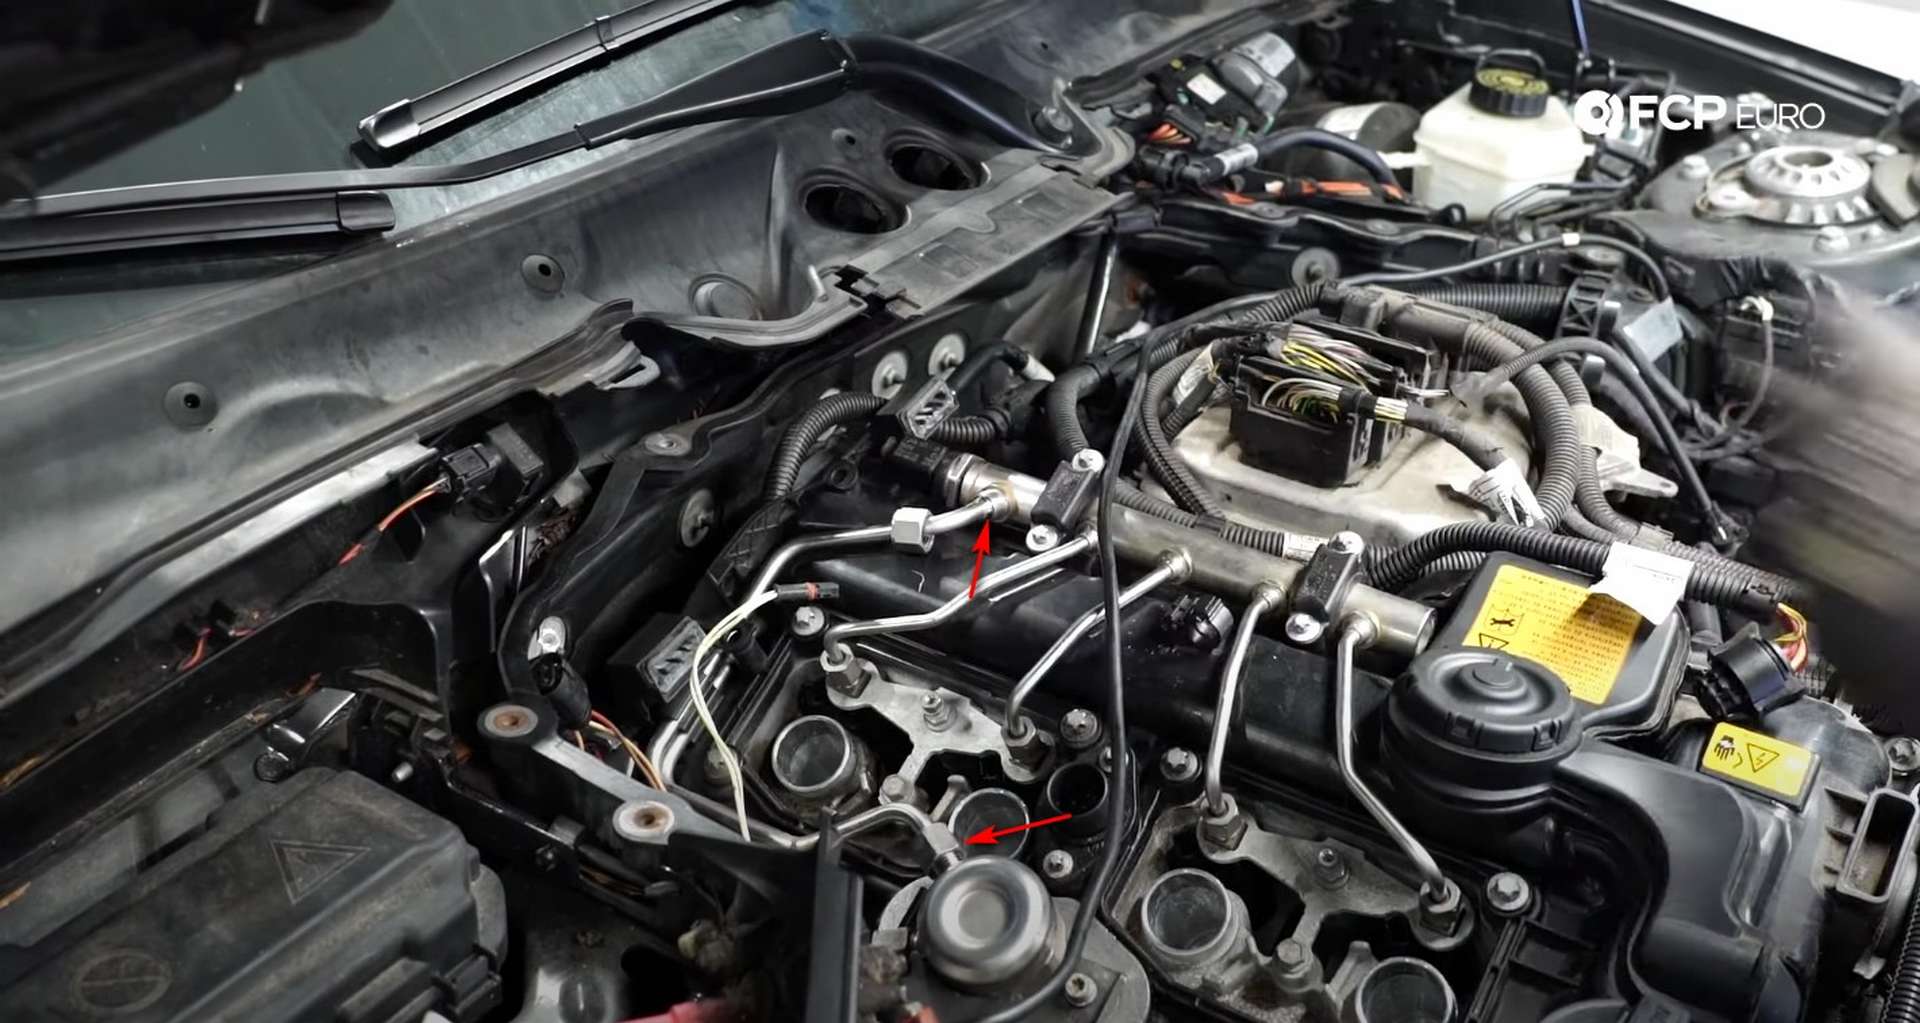
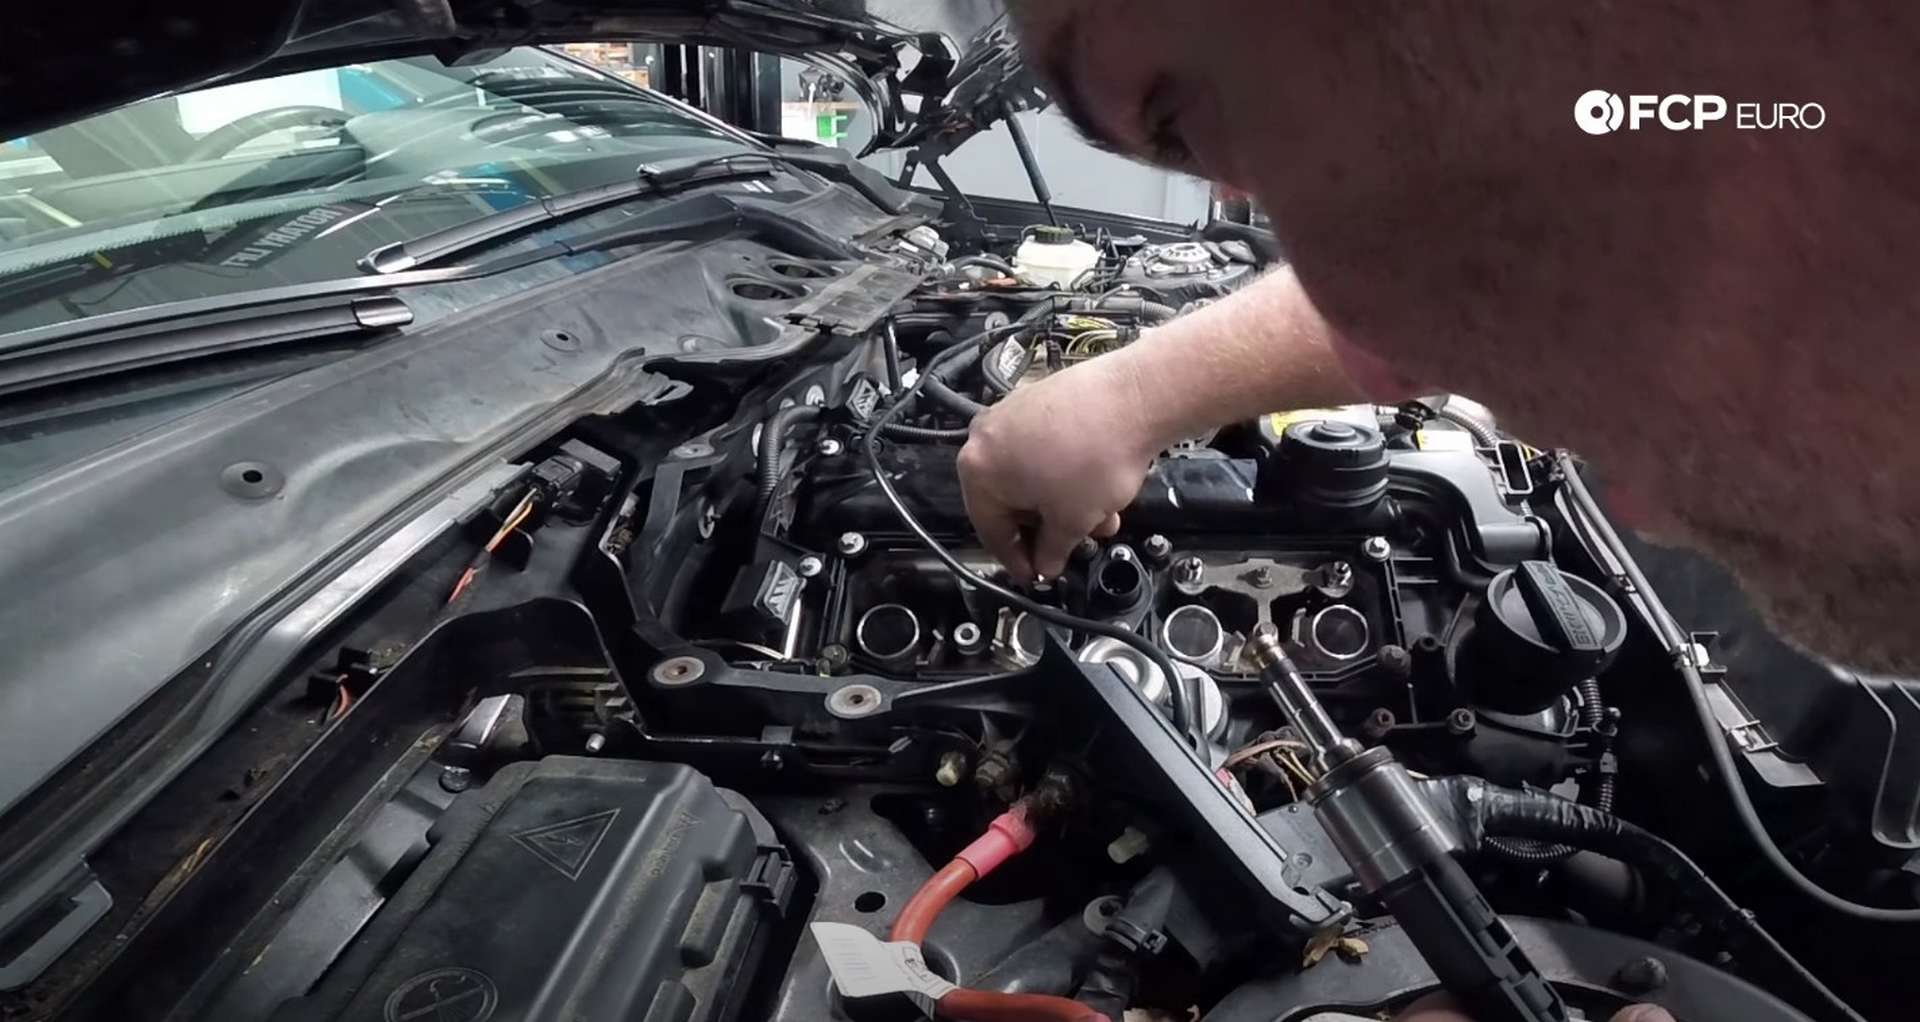
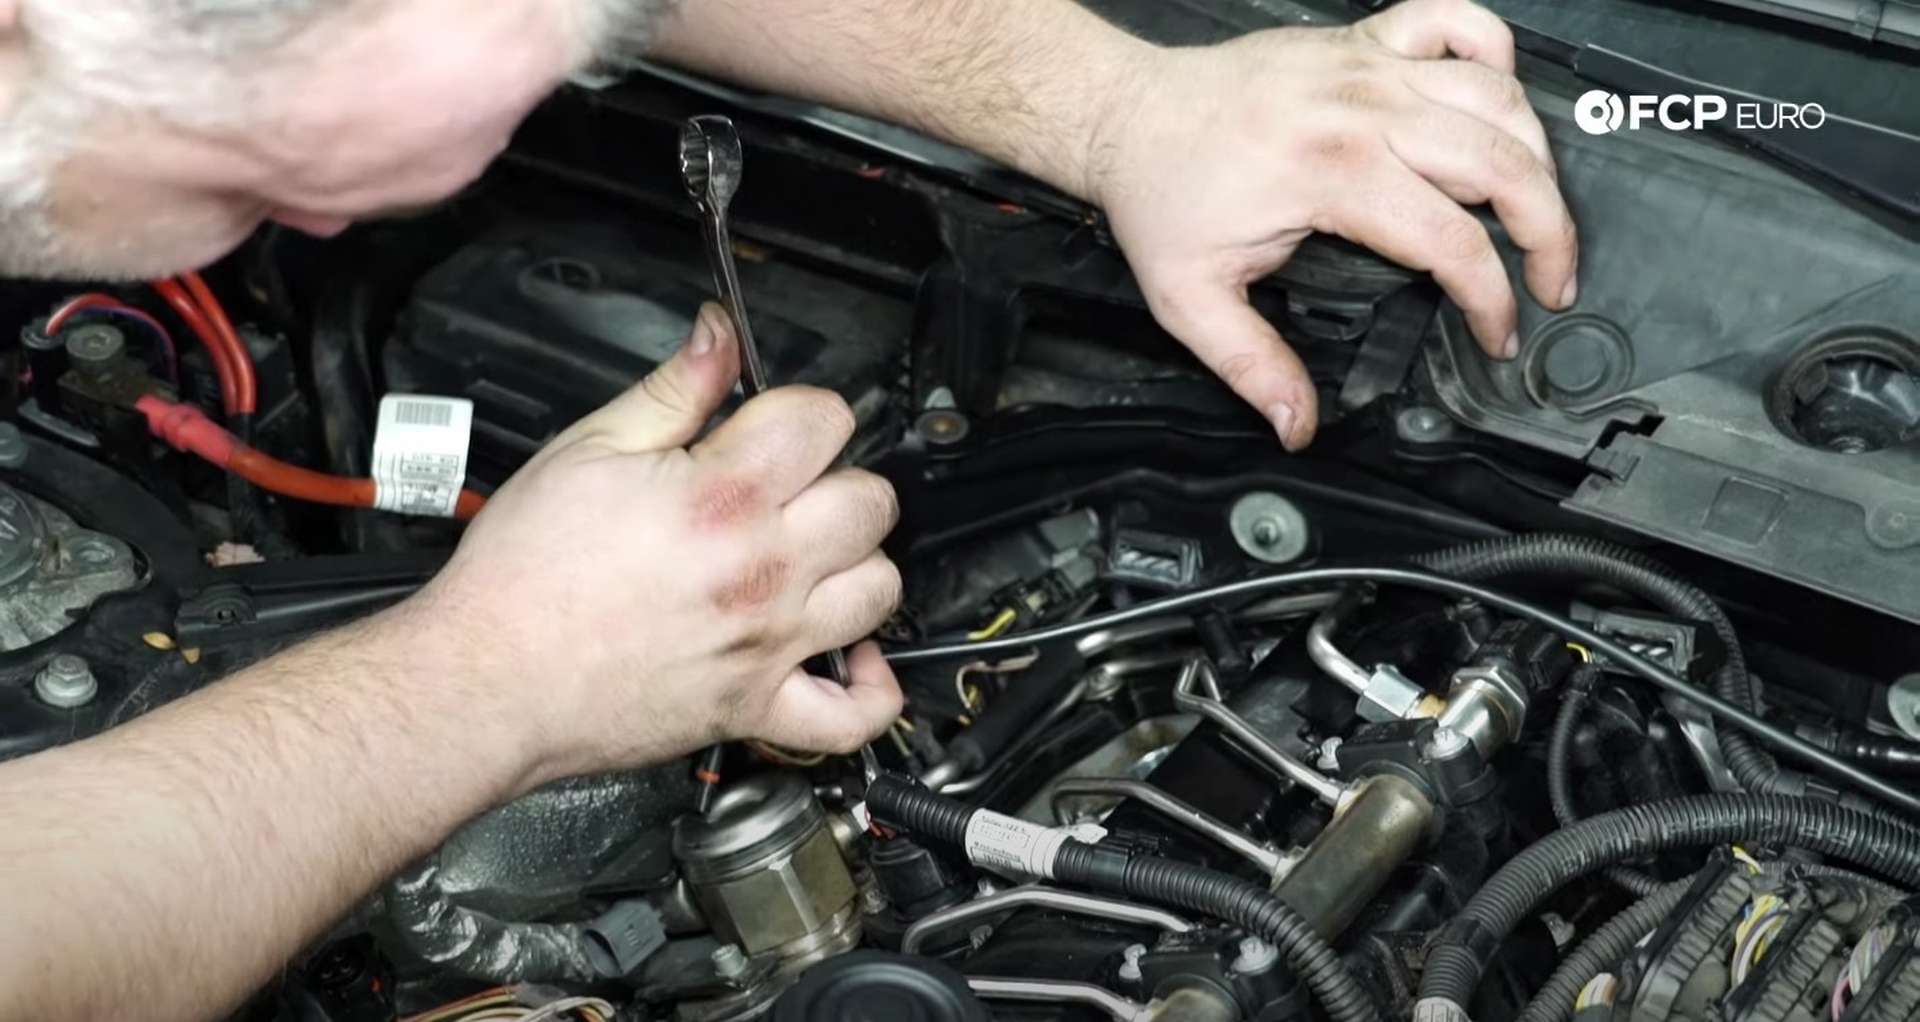
Before disconnecting the fuel lines, you have to move a bracket off the back of the valve cover. Use an E6 socket to remove the bolts before pushing the bracket back and out of the way.

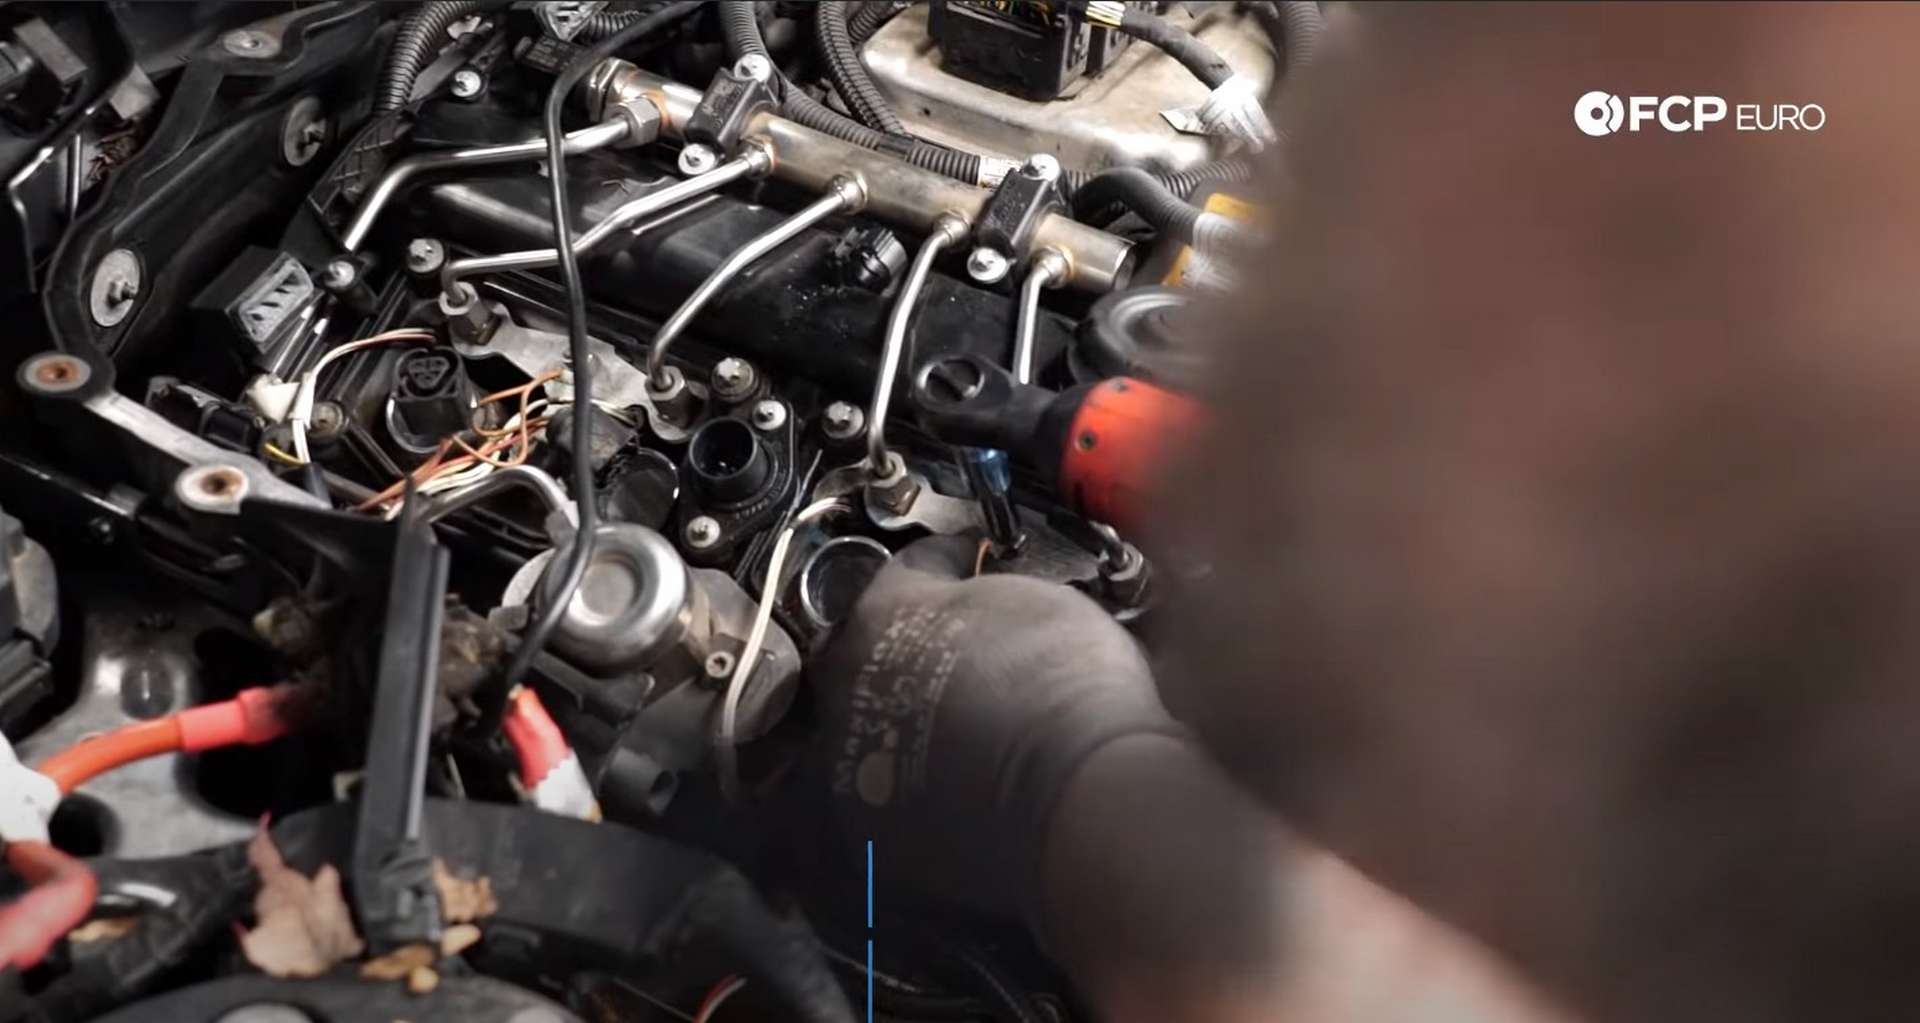
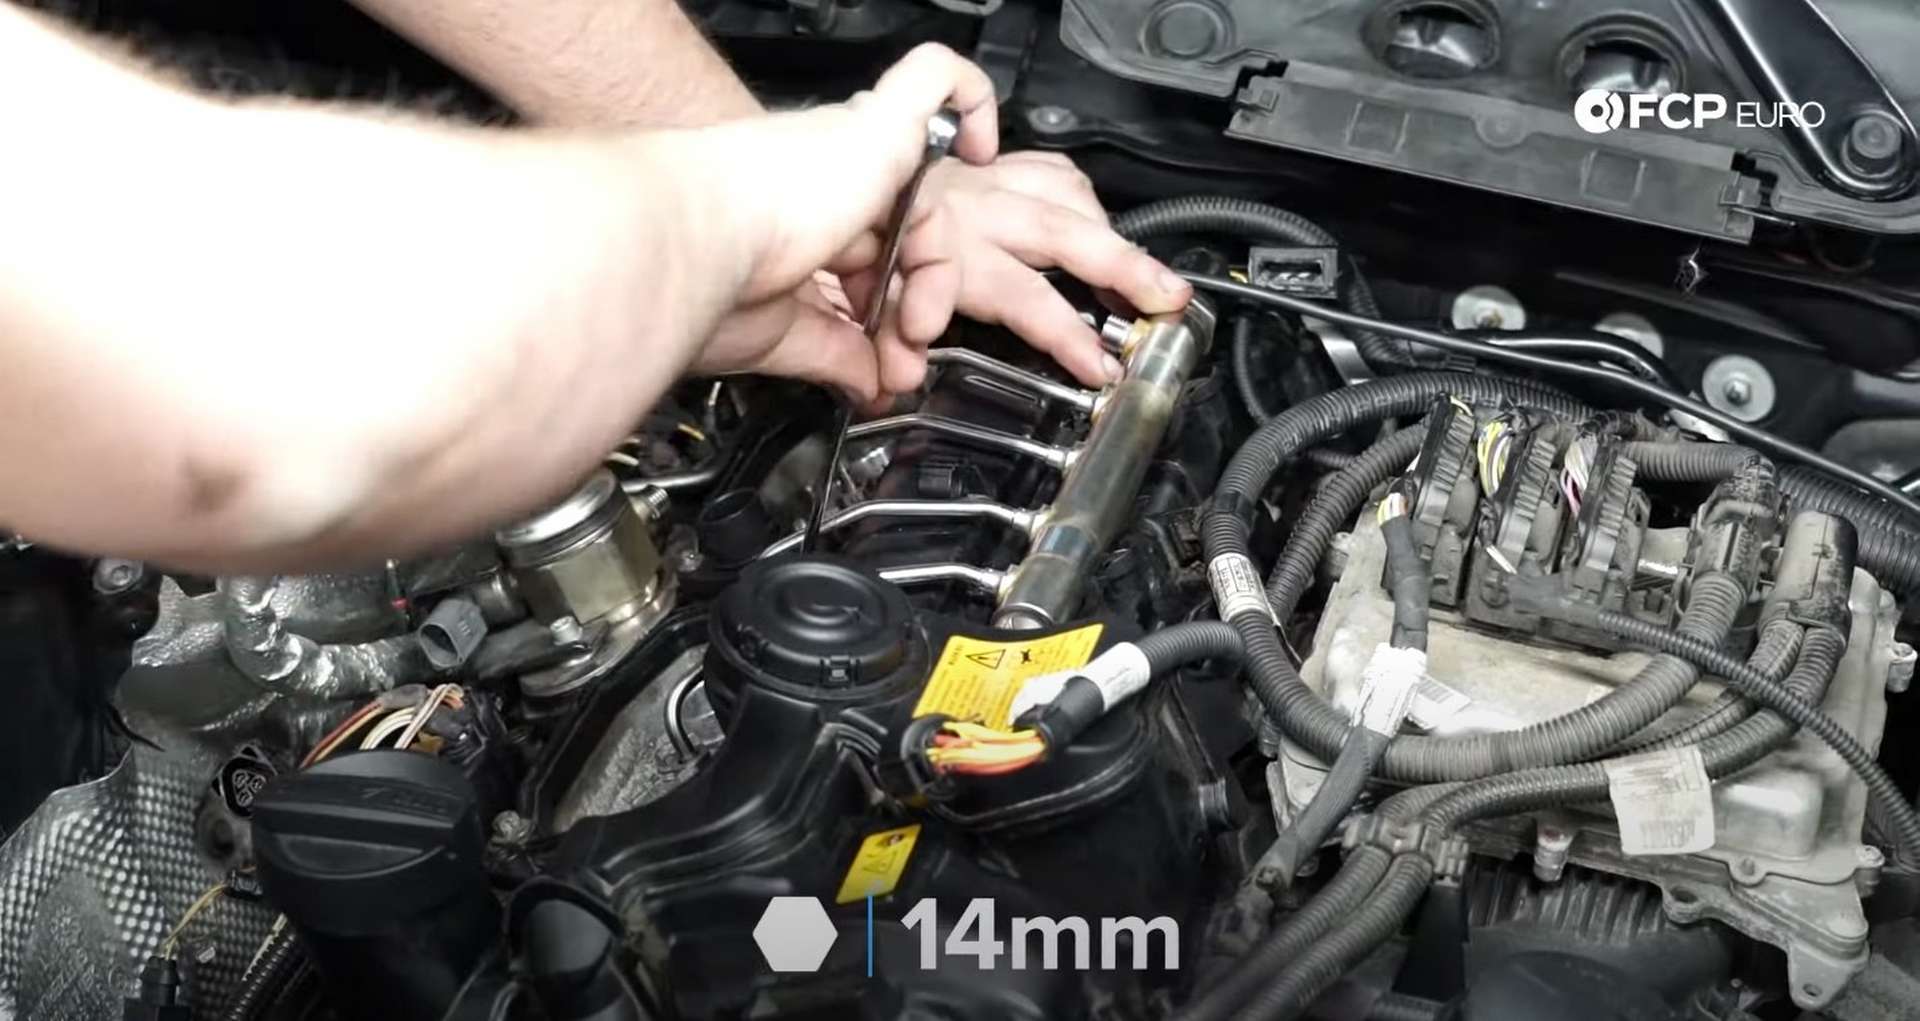
Then, use a 17mm wrench, disconnect the high-pressure feed line from the pump to the rail. Grab a rag or six as there is fuel in these lines, and it is under pressure. Then follow that line back to the rail and disconnect it there, too, using the same 17mm wrench.
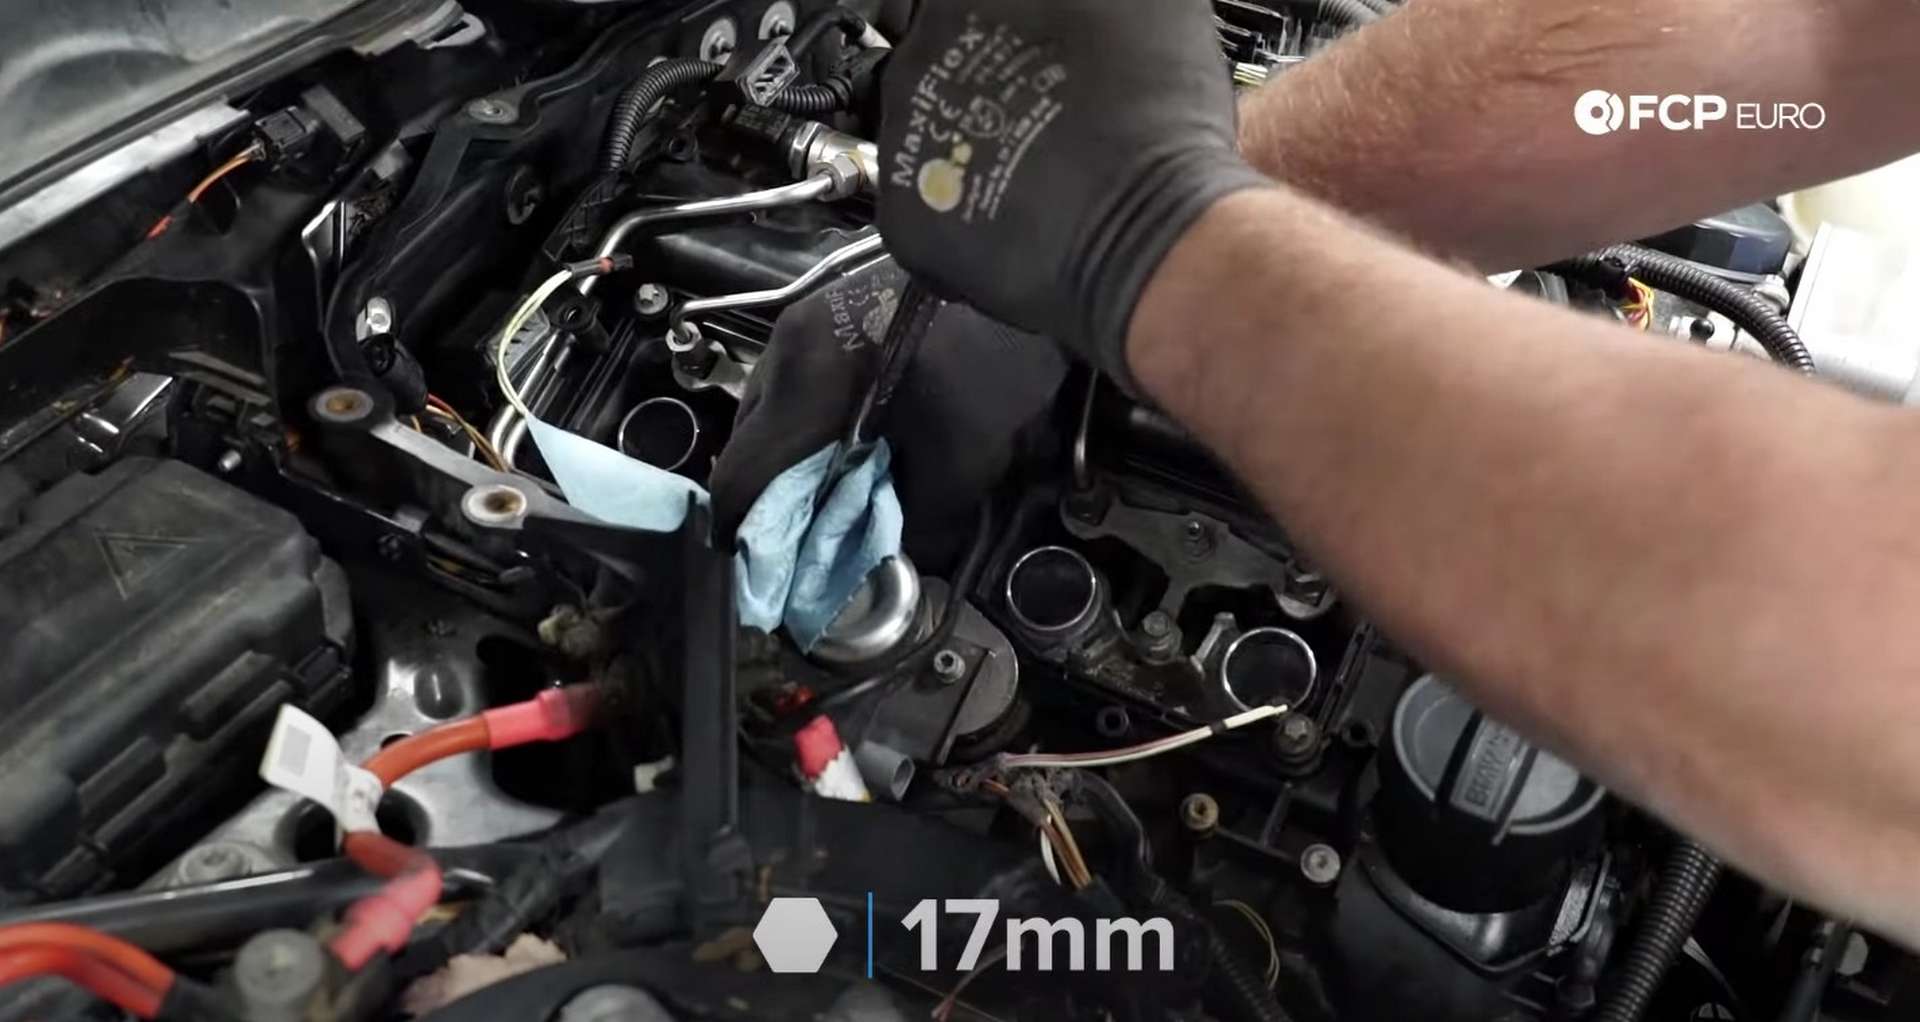
Remove the high-pressure line from the engine. After that, disconnect the low-pressure line that sits below the high-pressure line with a 17mm wrench. Next, loosen the fuel lines from the injectors with a 14mm wrench. Have even more rags ready for the fuel that will come out of the lines.
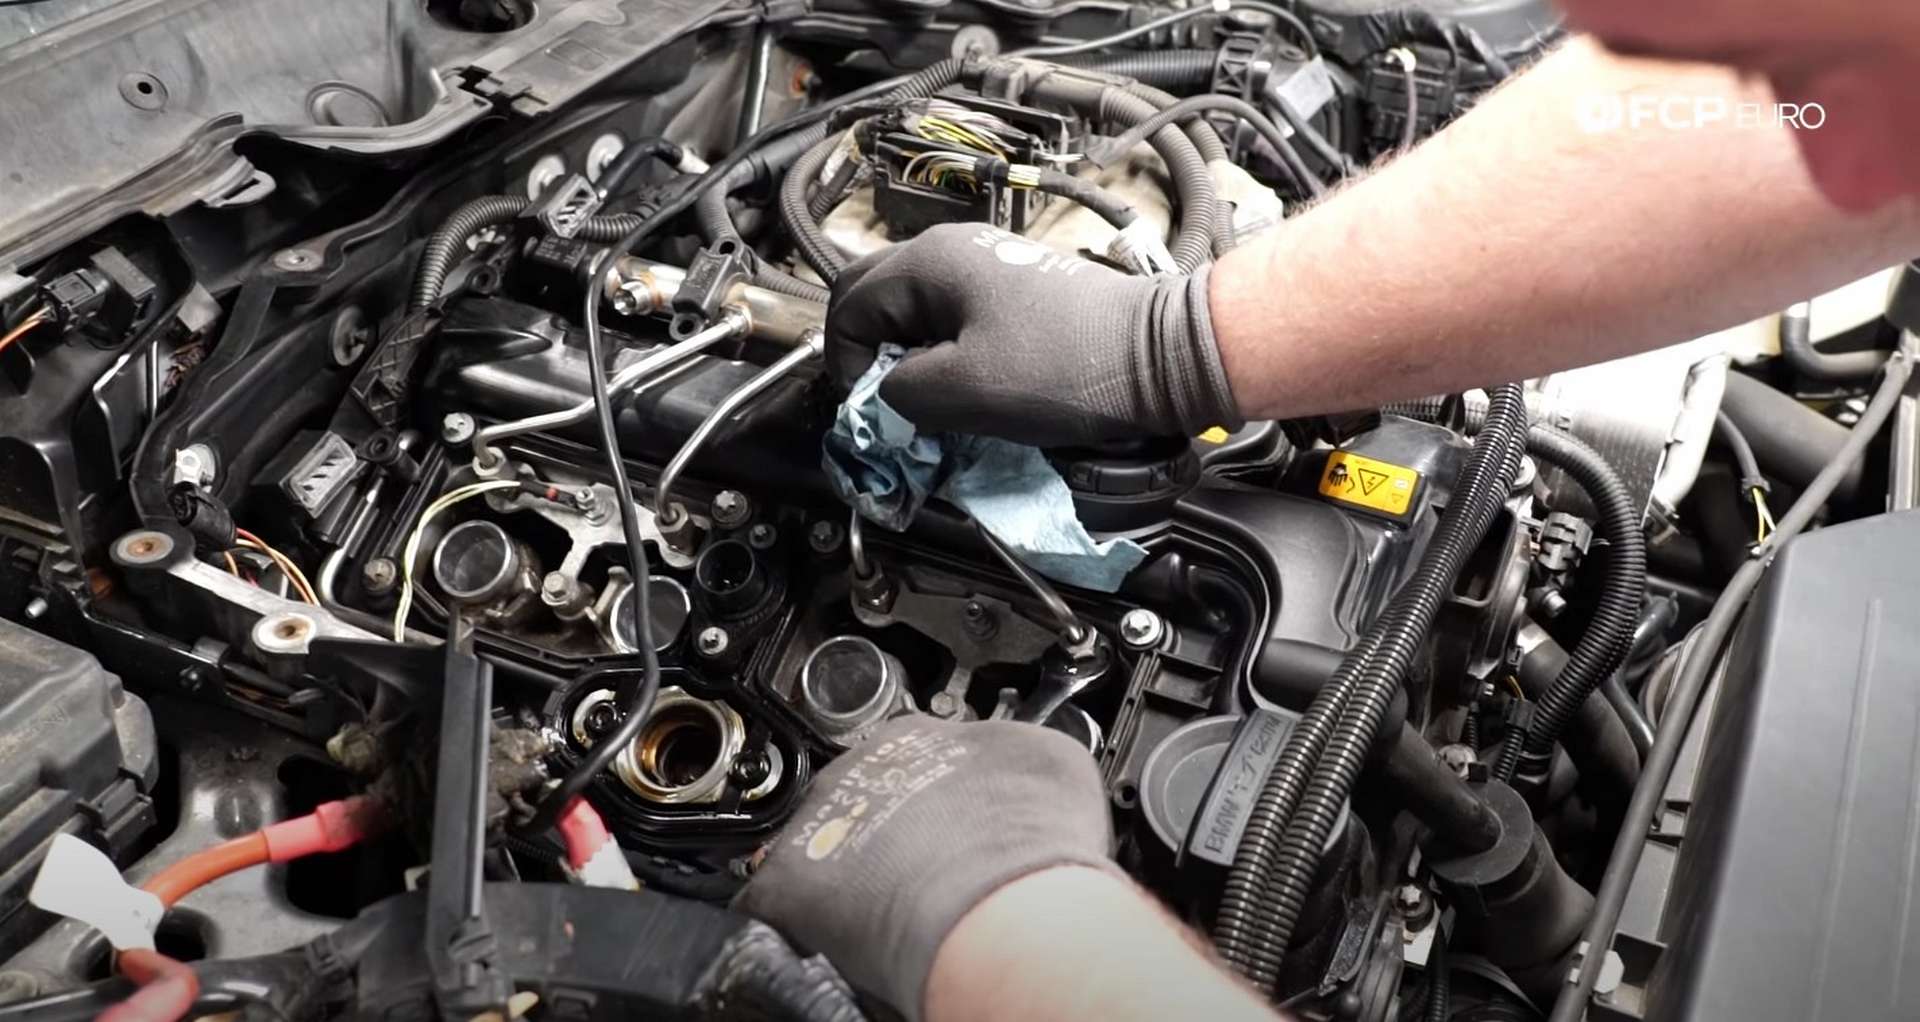
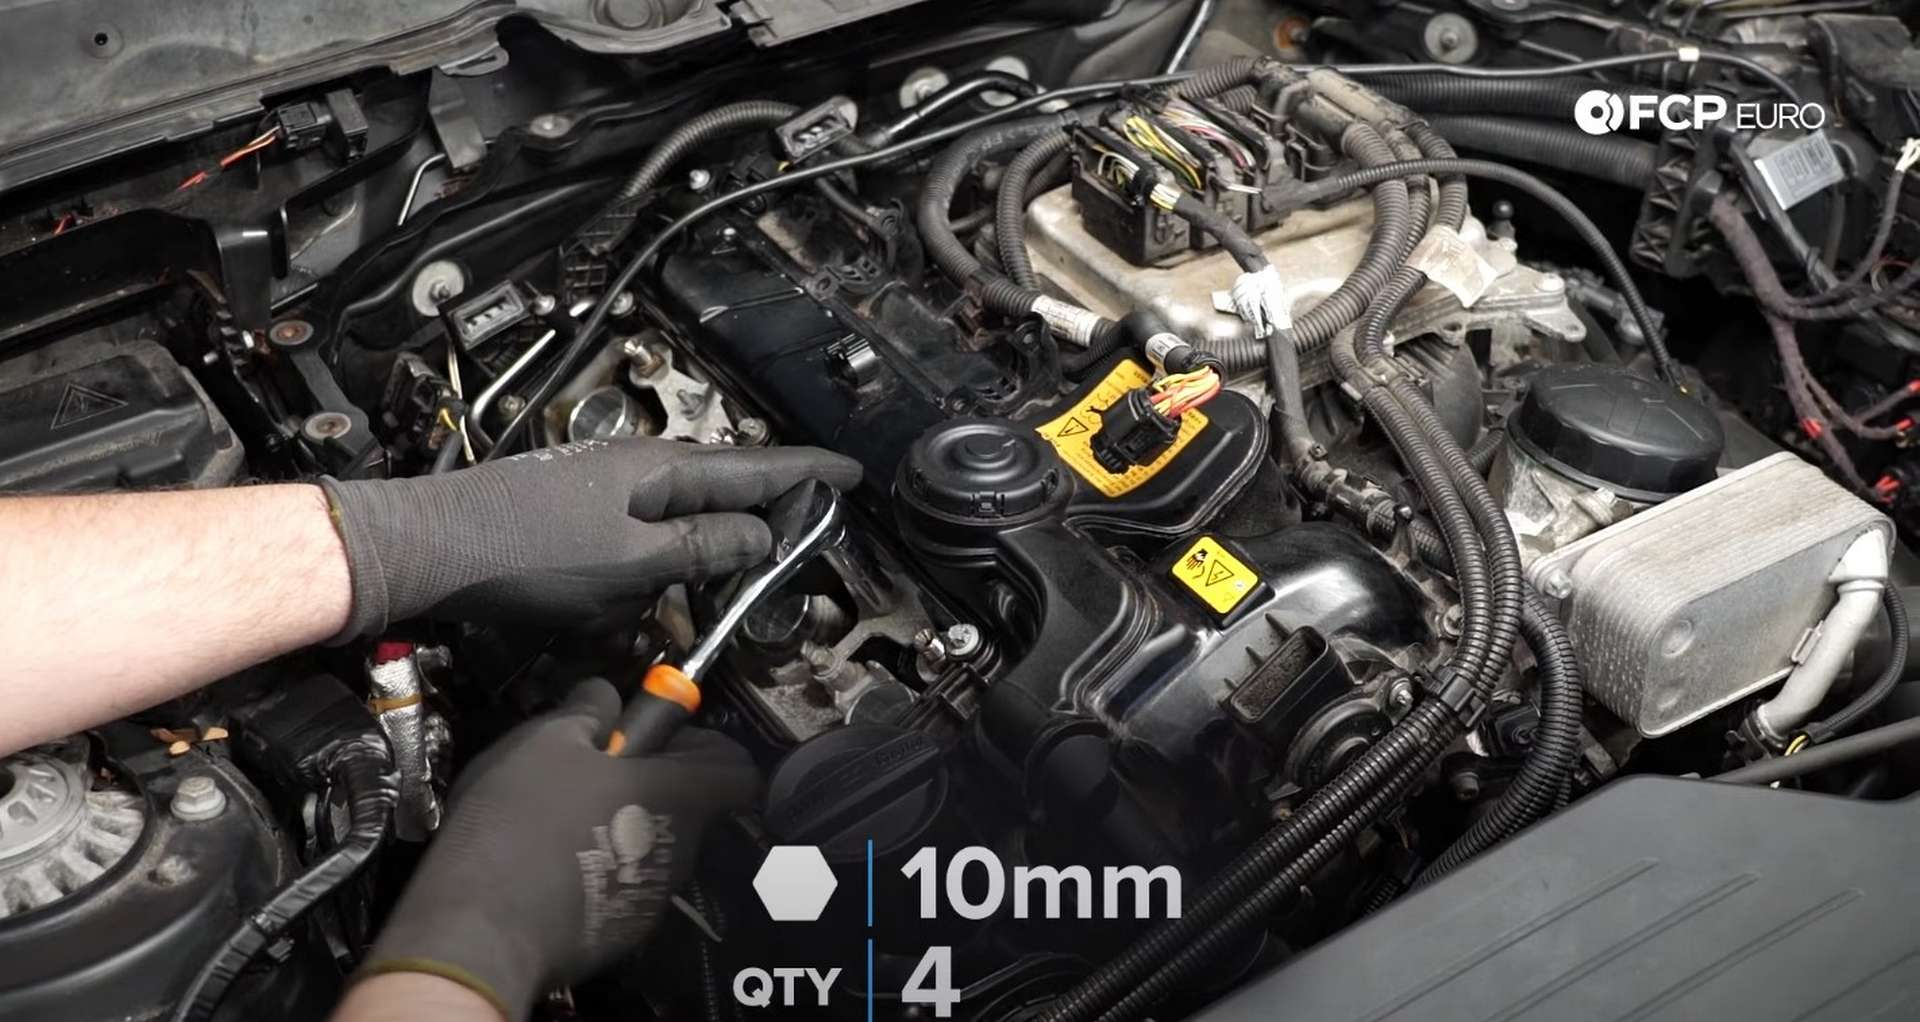
The fuel rail mounts to the valve cover via four E8 fasteners. Remove them and move the rail out of the way. Next, use a 10mm socket to remove the bolts for the injector hold-downs.
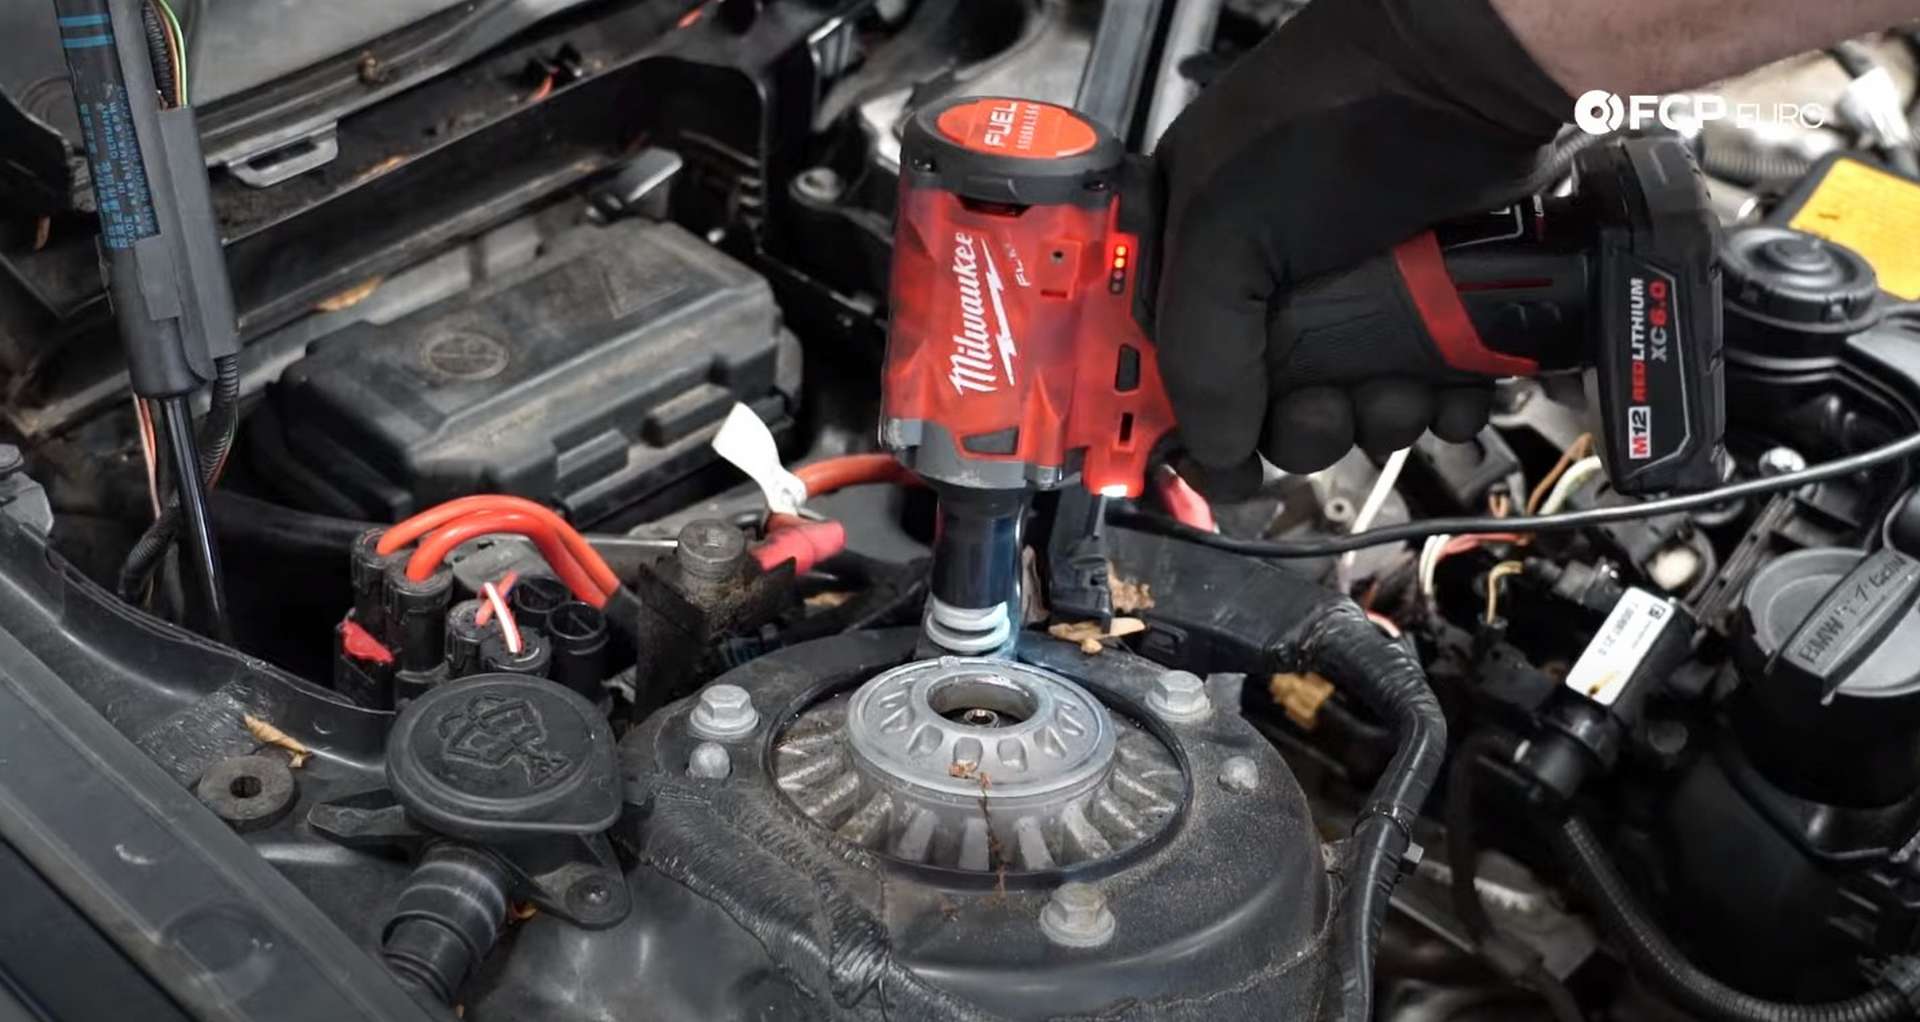
Now it's time to remove the injectors. Take the injector removal tool and place it onto the valve cover in the same orientation as the injector hold-downs.

Thread in the brass pieces through the blue girdle. As you thread them in, you'll need to get them to thread onto the top of the injectors. The brass pieces are reverse thread, too. Leave everything loose until the injectors are secured in the brass pieces.
Tighten the girdle to the valve cover before using a pair of adjustable pliers or an adjustable wrench to back them out. If you've done it correctly, the injectors will be pulled out by the brass pieces when you back them out.
Step 4: Install the new fuel injectors
There is a specific calibration number printed on the side of the injector that the engine computer uses to know how much fuel it needs to put through the injector at any time.
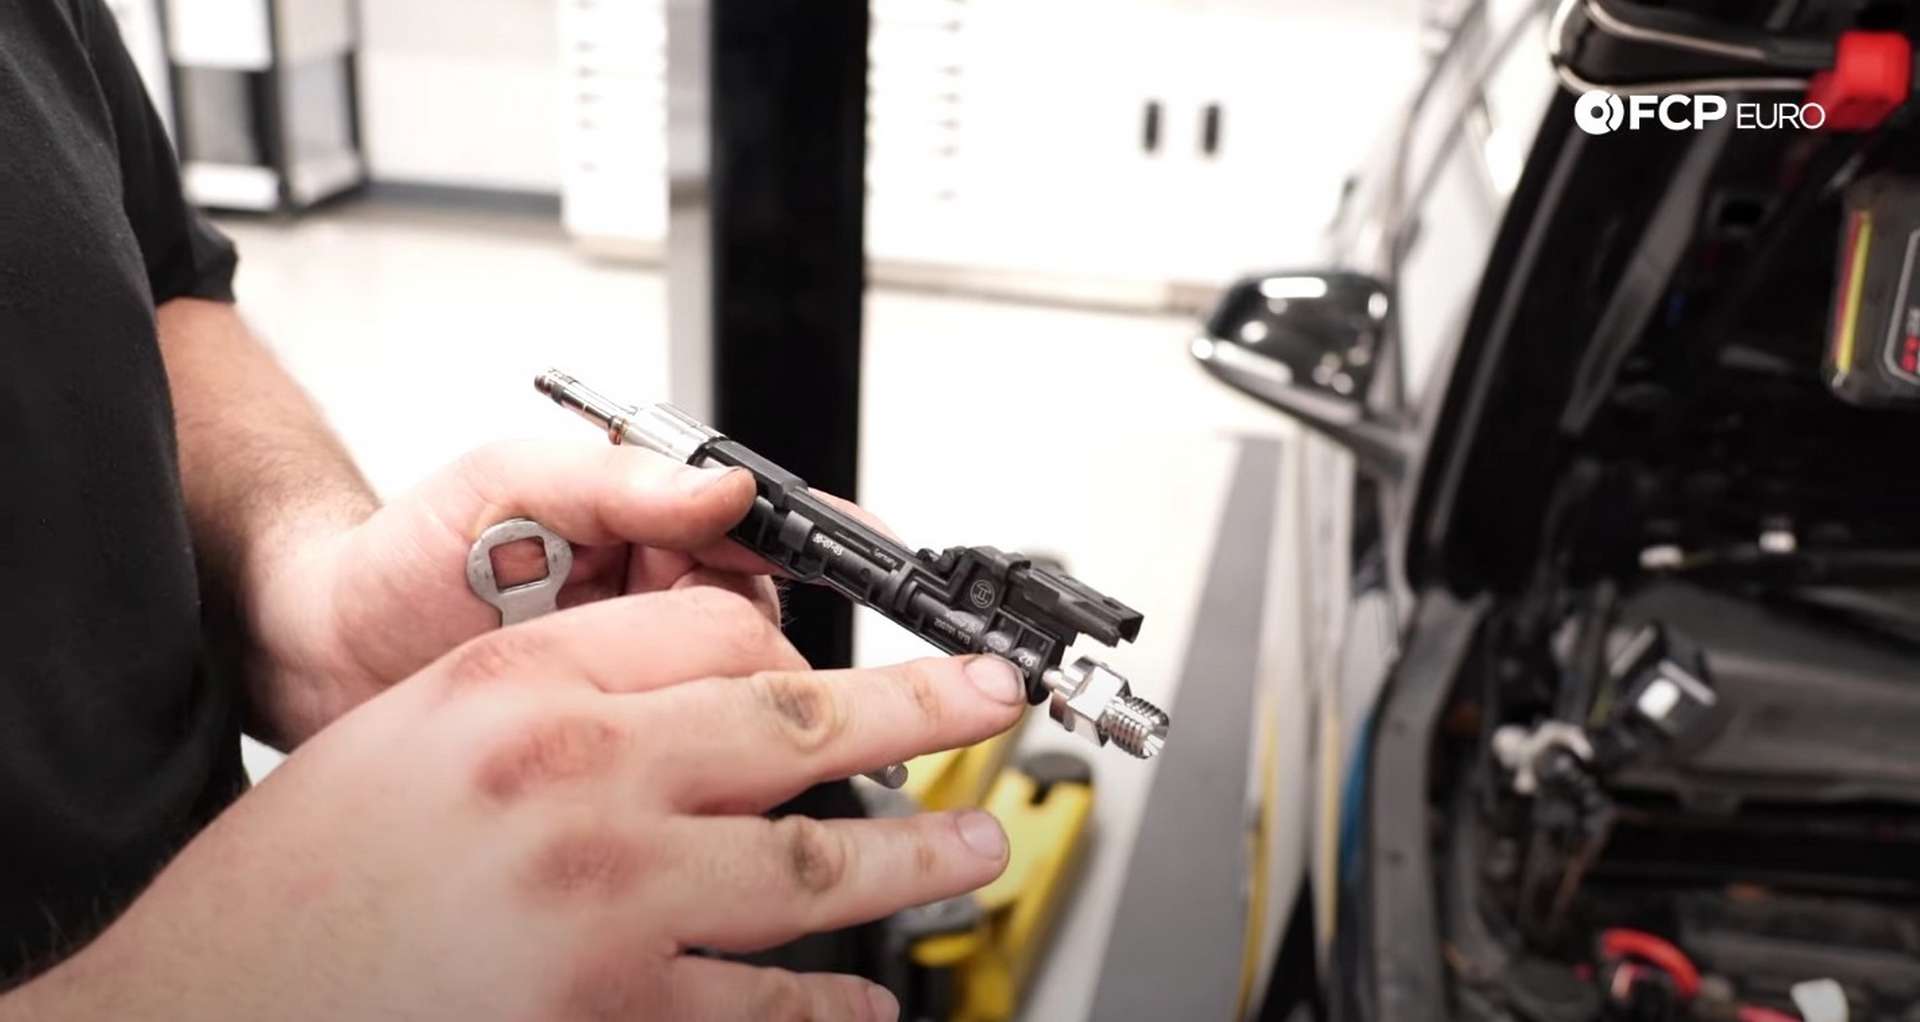
The numbers can be different for each injector, so write down all of the numbers and which cylinder you put them in. After that, install the decoupler rings onto the injectors. Slide the seam side up onto the injector and push them on until they snap-in. Then, place the injectors into the cylinder head.
Fit the injector hold-downs over the injectors and drive in the mounting bolts with a 10mm socket. Make sure to start the threads by hand, however. The injectors aren't fully seated in the head so go back and forth on the two bolts to slowly and evenly press in the injectors. Once they're in all the way, torque the hold-down bolts to 10Nm.
Next, pull the fuel rail back into position and thread the hardlines onto the injectors. Don't force any of the connections to the injectors. Damaged threads will lead to high-pressure fuel leaks. Engage the threads by hand first before using a 14mm socket to tighten the connections.
After that, resecure the fuel rail to the valve cover. Place the plastic caps into position and thread in its four bolts. Use an E8 socket to tighten the bolts. Next, reconnect the low-pressure fuel line to the pump and refit the high-pressure line to the pump and fuel rail. Use a 17mm wrench to tighten all three connections.
Lastly, refit the bracket that sits over the hard lines. Thread in the bolts by hand before using an E6 socket to tighten them.
Step 5: Reconnect the electricals and code the injectors
First up, flop the VANOS plug back over the valve cover, and plug it in. Then, follow that up by connecting the injector connectors and the high-pressure fuel pump.
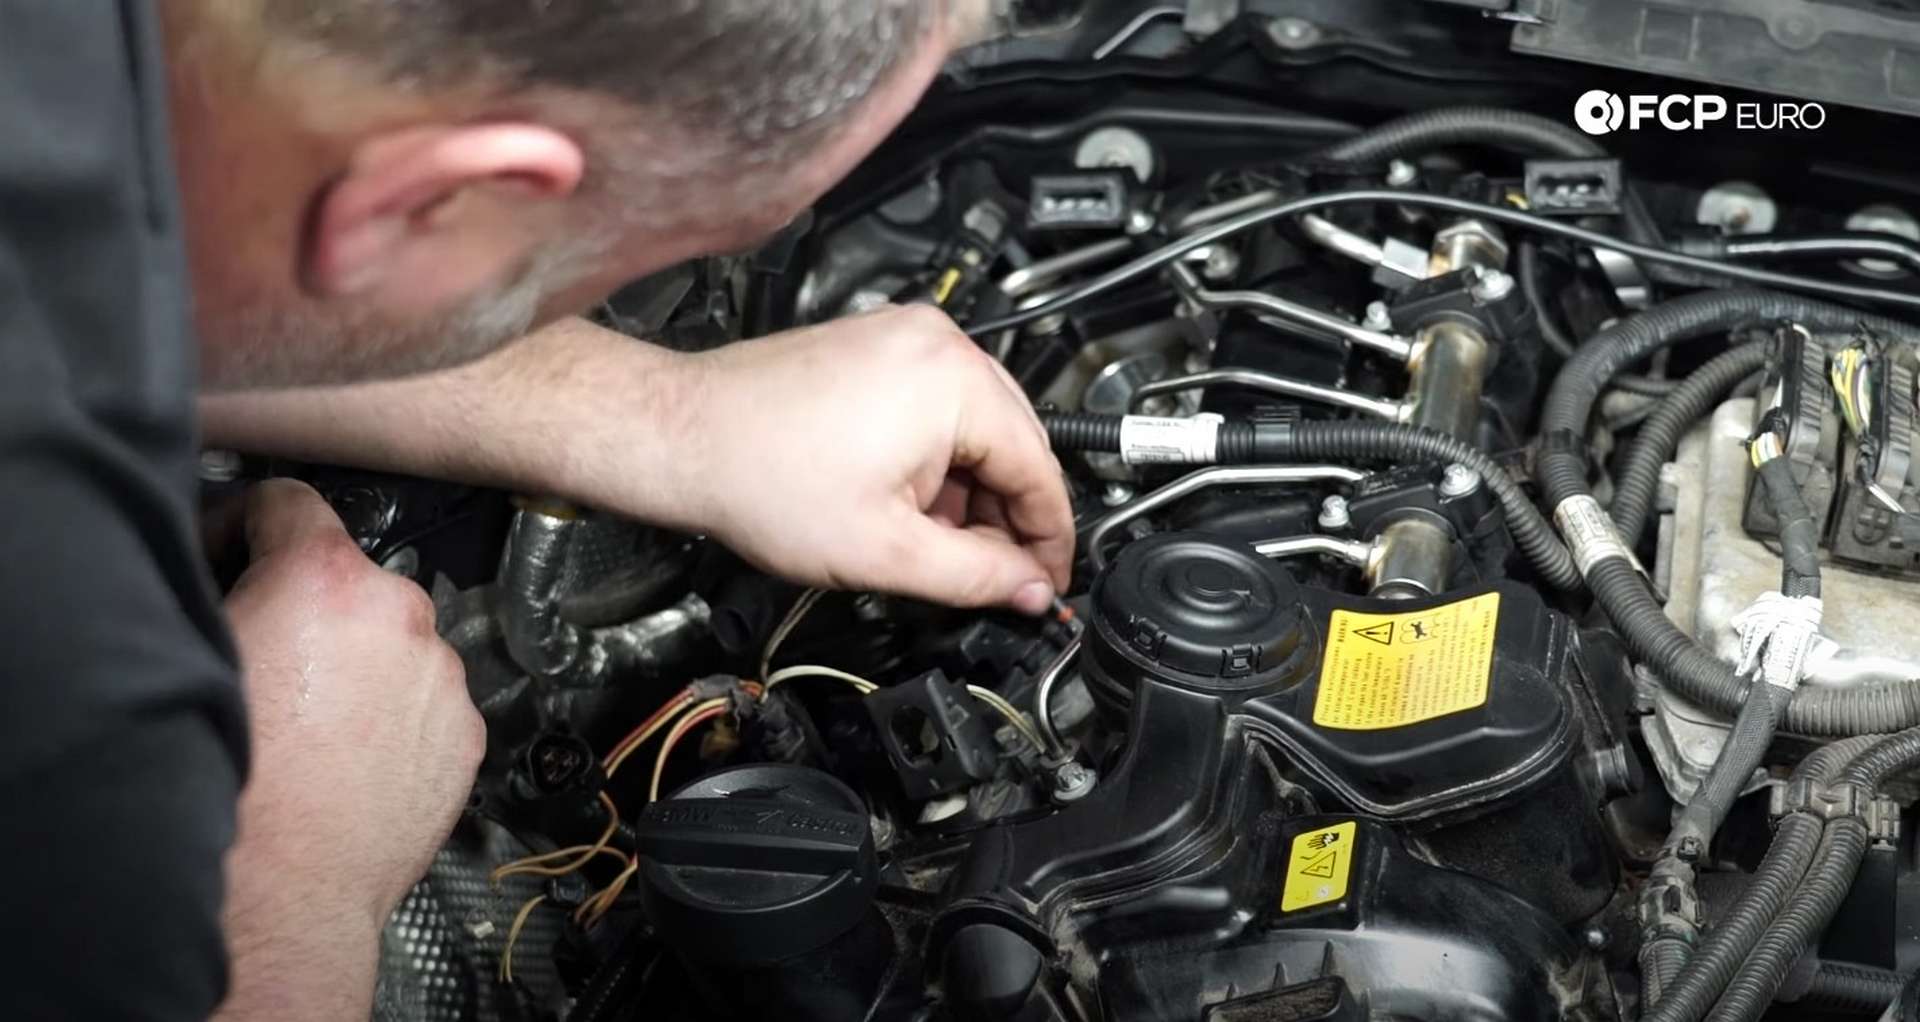
Next, refit the ignition coils to the spark plug tubes and plug them in. Slide the ground wires over their studs and thread on the nut used to secure them. Use an 8mm socket to tighten the nuts.
Now everything concerning the engine should be reconnected unless your vehicle is pre-2013, where the two vacuum lines that run to the engine cover are still disconnected. Place the engine cover over the engines just to reconnect the lines if your car requires it. Then head into the cabin and break out the scan tool.
The high-end scan tool required for this job, like the MX808 we use, can go into the engine computer and recode the injectors. Turn the ignition on and plug in the scan tool. Select the "service" option, and then select the "injectors" option.

After that, select "BMW" and let the tool read the car's computer to get its VIN. Once it has the VIN, it'll bring up several parameters about the vehicle. Select "yes" and let the tool communicate with the engine computer. When it's done reading, select "Hot function" and then "Injection quantity compensation."

The tool will reread the computer and give you the previous codes for each of the old injectors. For the next two prompts, select "continue" and then "no." Now you'll have four options, and you need to choose the option "F4: Enter new adjustment values."
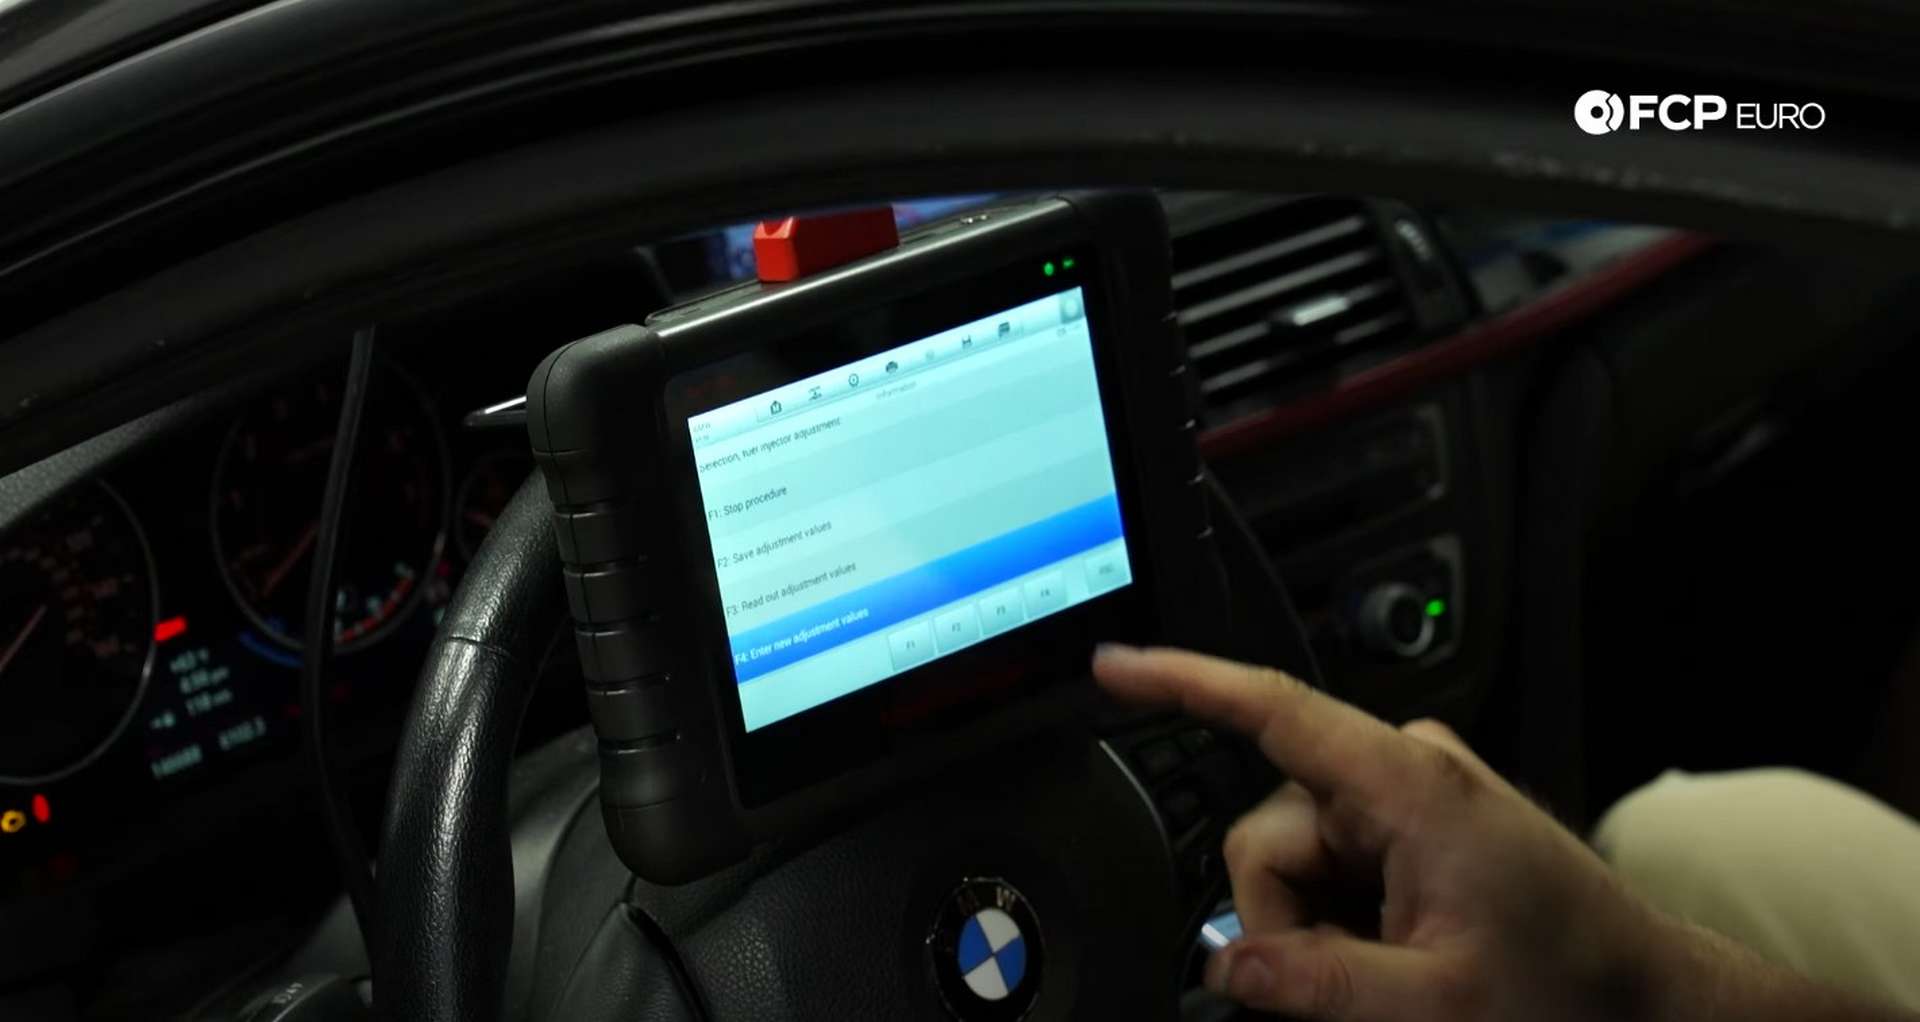
From here, enter which cylinder you're adjusting and then what the injector code for that cylinder is. Once you've entered the injector codes, save the new values and then start the vehicle.
Quickly get to the engine bay to check for any possible fuel leaks from all of the fittings. Shut the car down and fix any leaks that are present. If there aren't any leaks, continue to reassemble the engine bay.
Step 6: Refit the engine bay plastics
First up, refit the noise insulation pad back to the valve cover. Slide it under the two tabs at the back for the engine cover, and then press the rest into place.
Then, refit the lower cowl piece. Thread in its seven fasteners by hand before using a 10mm socket to tighten them.
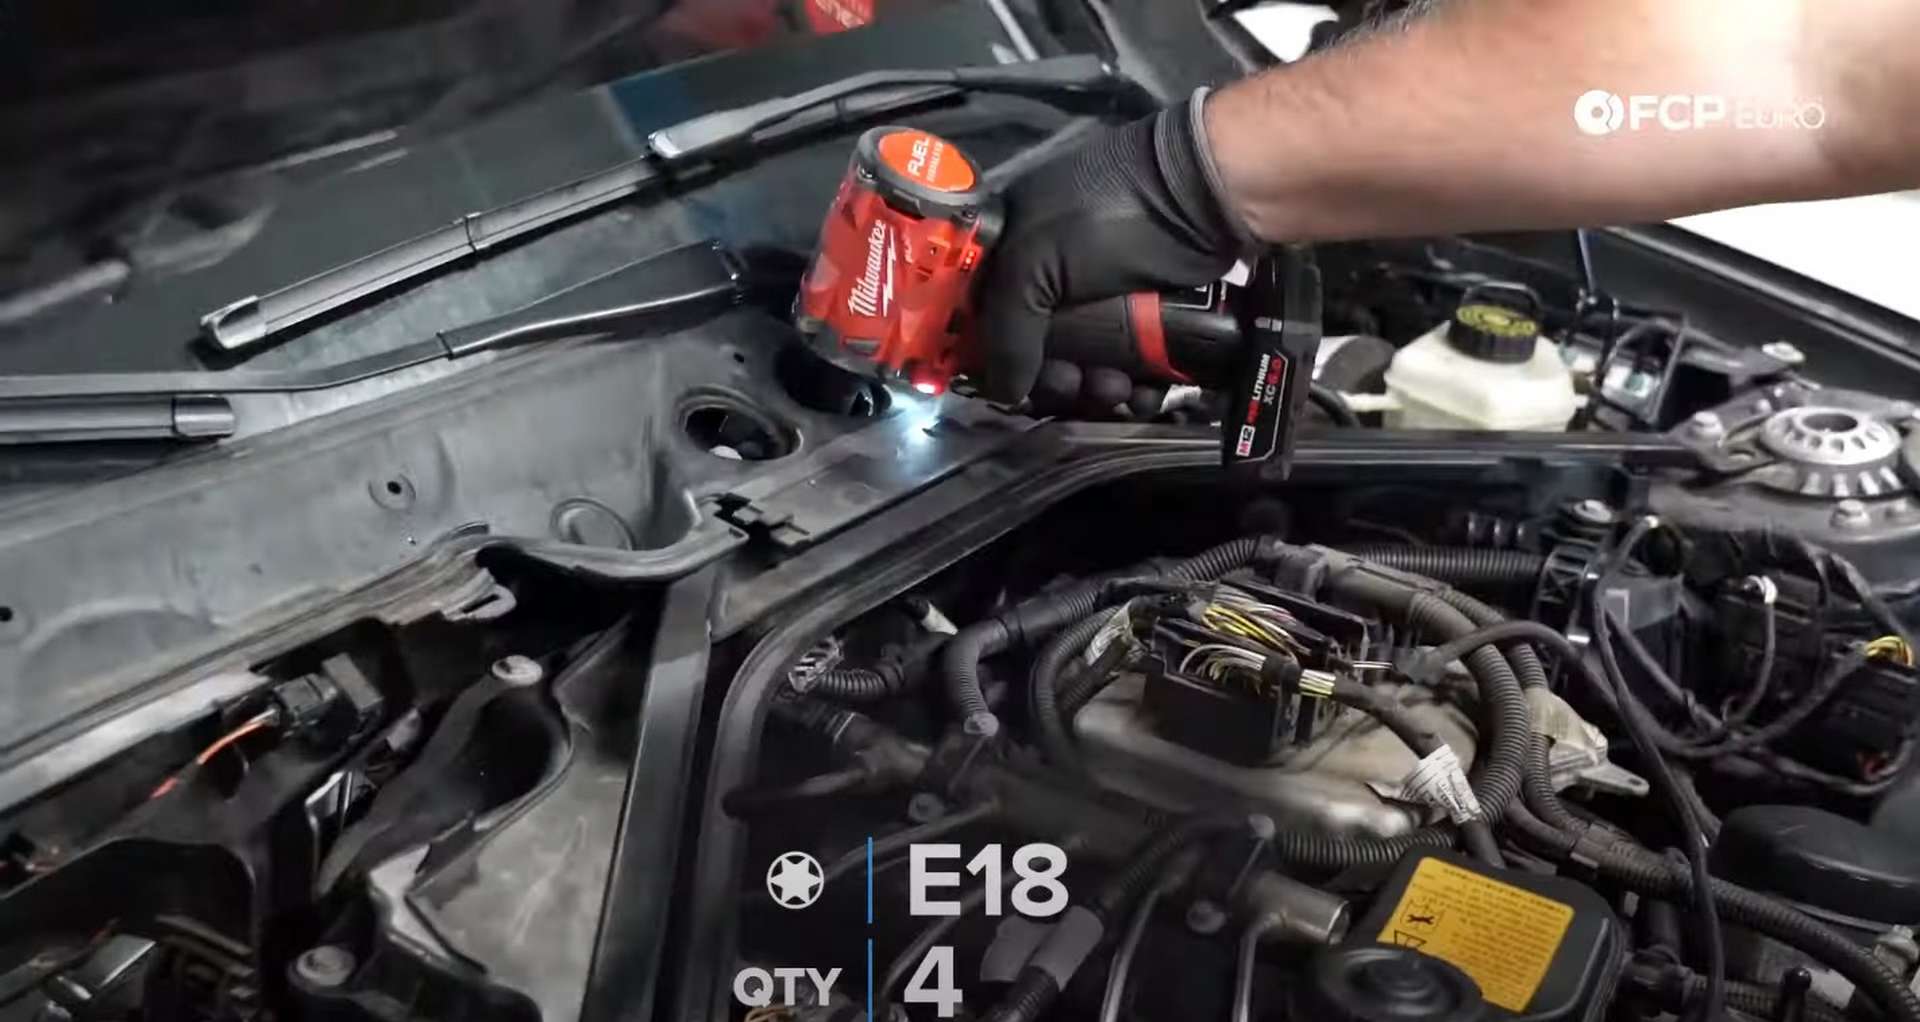
After that, install the strut tower brace. Line it up and loosely thread in all of the bolts by hand to ensure you've lined it up properly. Then, use an E18 socket to drive in and torque the bolts to 56Nm, plus 90° of rotation.
Next, reinstall the two upper cowl pieces. Slide them into place and use a 10mm socket to turn the three locks and secure the pieces to the car. Then refit the plastic rivets on their outer edges.
Now you can refit the hood seal to the strut brace and run the cable through it. Then, refit the rubber strut covers and secure them with their plastic rivets.
Lastly, refit the engine cover. Reconnect the vacuum lines to the cover if your engine requires it.
BMW F30 Fuel Injector Torque Specs:
- BMW Fuel injector Hold-Downs = 10Nm or 7.4 ft-lbs, of torque
- BMW Strut Brace Bolts = 56Nm or 41.3 ft-lbs, of torque
Replacing the injectors isn't the easiest job to do on your own. But given the right tools, you can have your BMW back to full health in no time. If you're interested in more DIYs for your BMW, you can visit bmw.fcpeuro.com and subscribe to our YouTube channel.


