- 04/10/2019
- 5 Min Read
- By: Gareth Foley
How To Install Pressed In Bearings and Wheel Hubs On Your BMW E36/E46

Press-in bearings can be an absolute pain to deal with, but it doesn't have to be if you have the right tools. In this guide, I show you how to deal with pressed-in wheel bearings and hubs on my BMW using the CTA Wheel Hub and Bearing Removal/Installation Tool.
Press-in wheel bearings and wheel hubs can be one of the more intimidating suspension jobs. However, I've found that they're only intimidating and a pain when you don't have the right tools or parts on hand. I've seen a lot of videos of people using hammers to bang wheel bearings out, and it makes me cringe. The only reason I feel that way about it is because it makes a somewhat involved task much more difficult. I understand not wanting to spend money on tools you're not going to use often. But in most instances, you can rent the tools from a local auto parts store, which is better than spending four times the time and the effort on the job.
Personally, I'll spend the money on the tools. If a tool can allow me to do a job in one hour as opposed to four, it's worth the investment to me. Also, I have a general interest in tools which helps in terms of justifying and accepting the high cost of some specialty tools. It seems that I always find myself working on the same cars so it's nice to know if a friend or family member needs a hand with something, I can help them and get them back on the road.
In this guide, I use the CTA 8650 tool, which is a wheel hub and wheel bearing press kit. It works well and made quick work of the wheel hub and wheel bearings in the E36 M3 trailing arms that I'll be installing on my track car soon. Follow along and I'll show you the basics of what you want to pay attention to get this job done relatively painlessly.
Tools needed to complete this repair:
- Socket Set
- Wrench Set
- Ratchets
- Axle Nut Socket
- Wheel Bearing Press Tool
- Snap Ring Pliers
- Pick Set
- Wire Wheel/Wire brush
Parts needed to complete this repair:
- Wheel Bearing
- Wheel Hub (optional but good to have on hand)
- Wheel Bearing Circlip
- Axle Nut
Other items you'll want on hand for this repair:
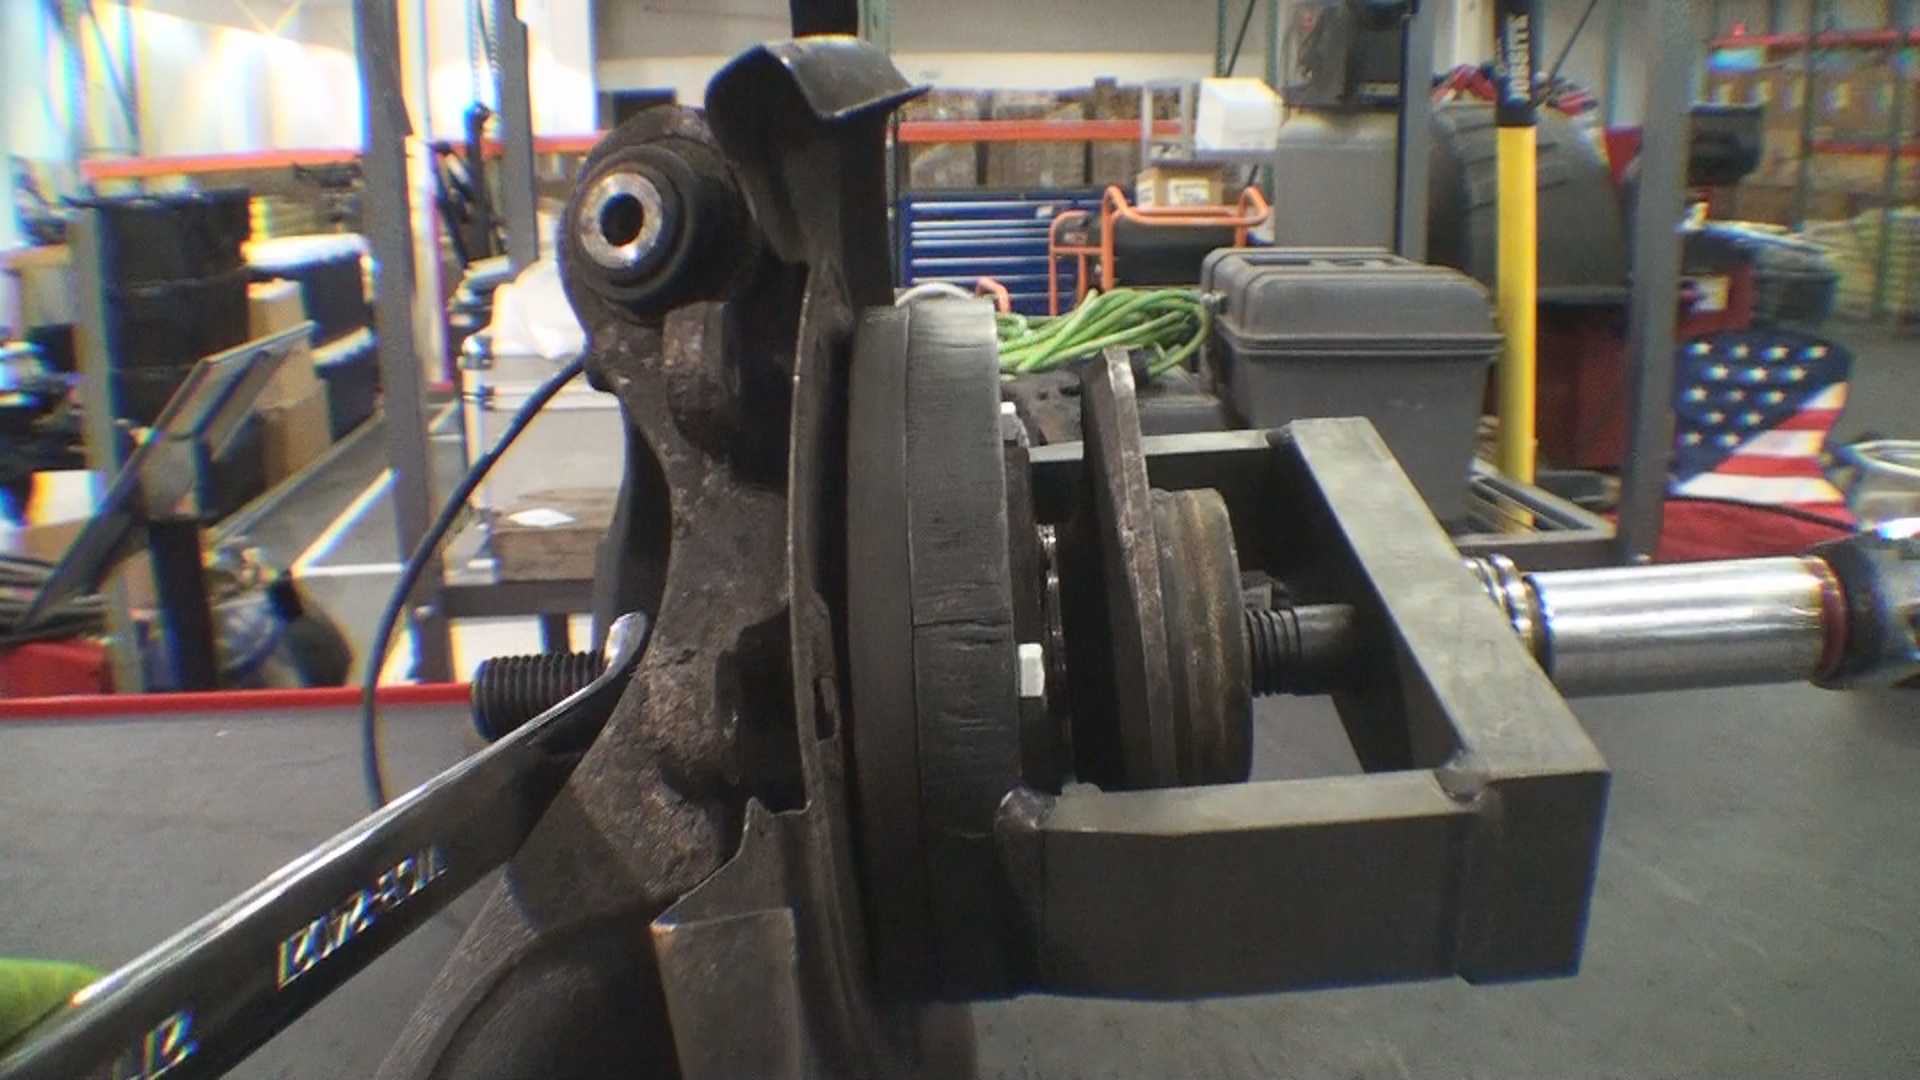
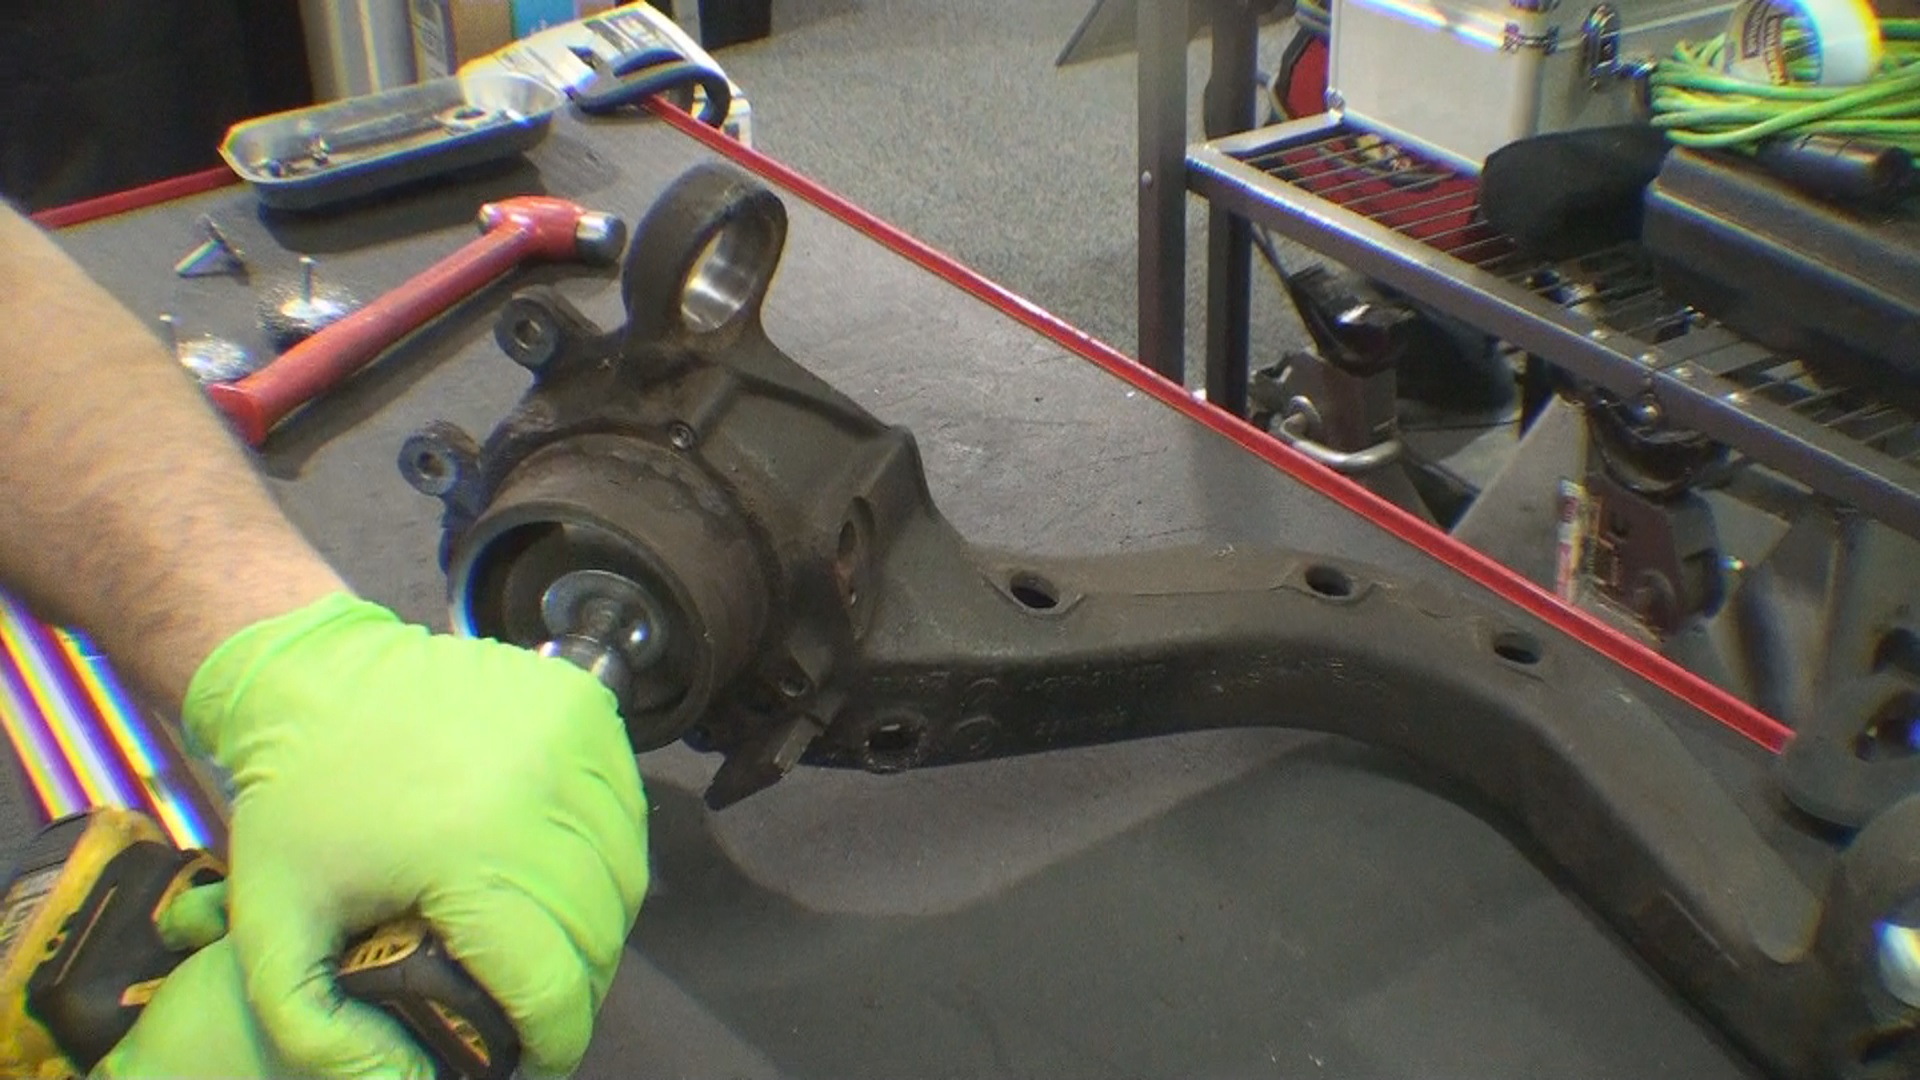
Step 1: Remove the axle shaft from the wheel hub or remove the knuckle from the vehicle
This step is going to be entirely up to you. Sometimes it's easier to remove the knuckle and work on a bench and sometimes it's easier to work with it still on the vehicle. I'm working on my E36 M3 trailing arms off of the vehicle as I'm doing a complete rear end refresh and have found it easiest to work on it in parts as opposed to a whole assembly. The hardest part about this is potentially the removal of the axle shaft assembly from the wheel hub. Make sure you have a specialty press or gear puller on hand in case the axle shaft is stuck in place.
Step 2: Determine cup sizes for pulling wheel hub out of wheel bearing
Anytime you are pressing something you want to make sure that you are using a cup with the same or close to the same diameter of what it is you are pressing. In this case, it needs to be the same size as the inner diameter of the wheel hub (the part pressed into the wheel bearing) as it will be pushing the wheel hub out of the bearing and needs to pass through the inner race. Some wheel bearing press kits don't have all the right size adapters for this so make sure you know the OD of the wheel hub before picking up the tool. If you're in a jam you can stack a series of washers of the correct outside diameter and inside diameter to fit the forcing screw of the press kit.
Alternatively, you can use a ten-pound slide hammer to remove the wheel hub as well. This solution is okay, but sometimes the hub comes out easily, sometimes it doesn't. The slide hammer can damage the wheel studs or the threads on the wheel hubs (if the vehicle uses lug bolts) so in my opinion, it's not the best solution. However, it's worth mentioning as it's a common practice.
Step 3: Set up the press tool to remove the wheel hub
A lot of wheel bearing press kits have an adapter for providing the clearance and leverage to pull out the wheel hub. In this case, CTA 8650, has a bracket assembly which provides leverage against the hub and allows you to pull the wheel hub out easily. Set up the required adapters, make sure the bracket assembly is sitting flush, and tighten everything down. At this point, you can use an impact gun if you'd like, but I usually do this by hand to make sure I can feel the hub being pulled out. You can put so much tension on the forcing screw to the point where things get damaged easily with an impact gun. Reality is the hub should pull out pretty easily. For the CTA specific tool, you will need a 27mm wrench and a 24mm socket.
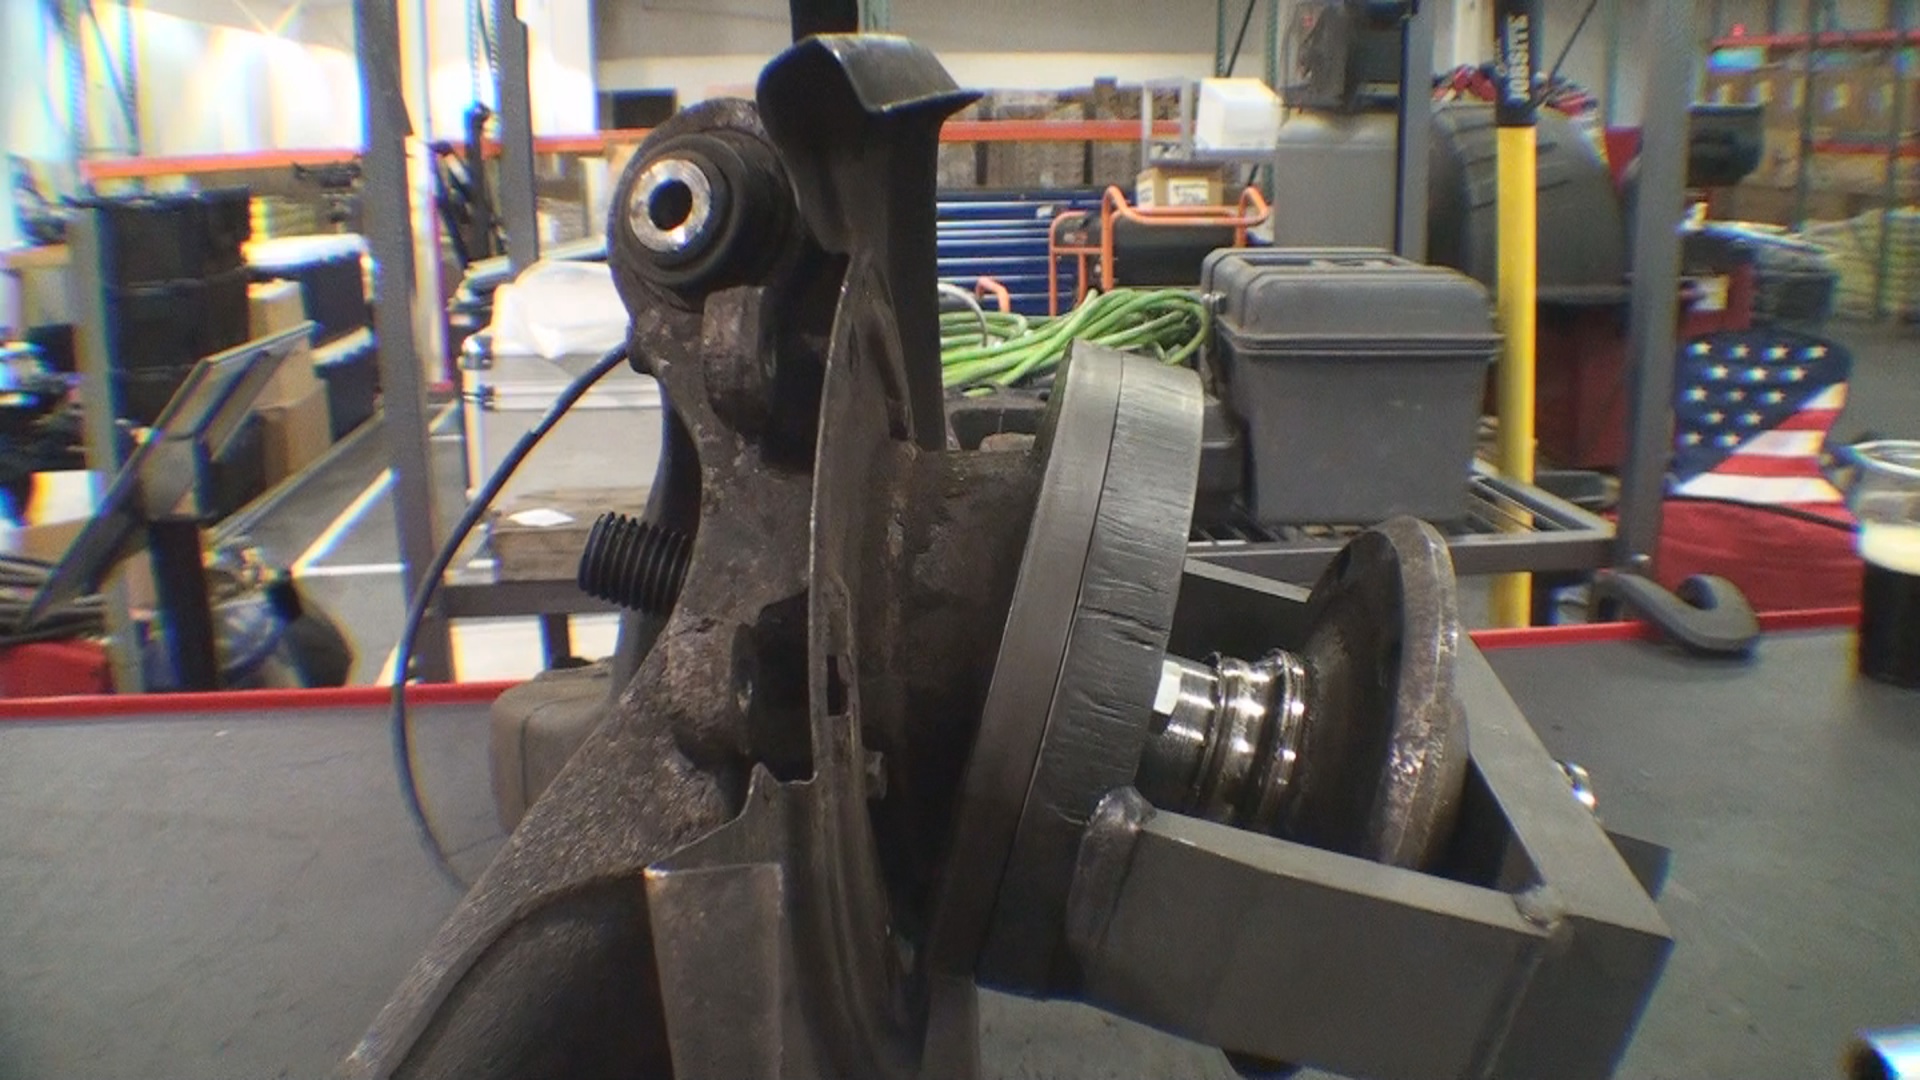
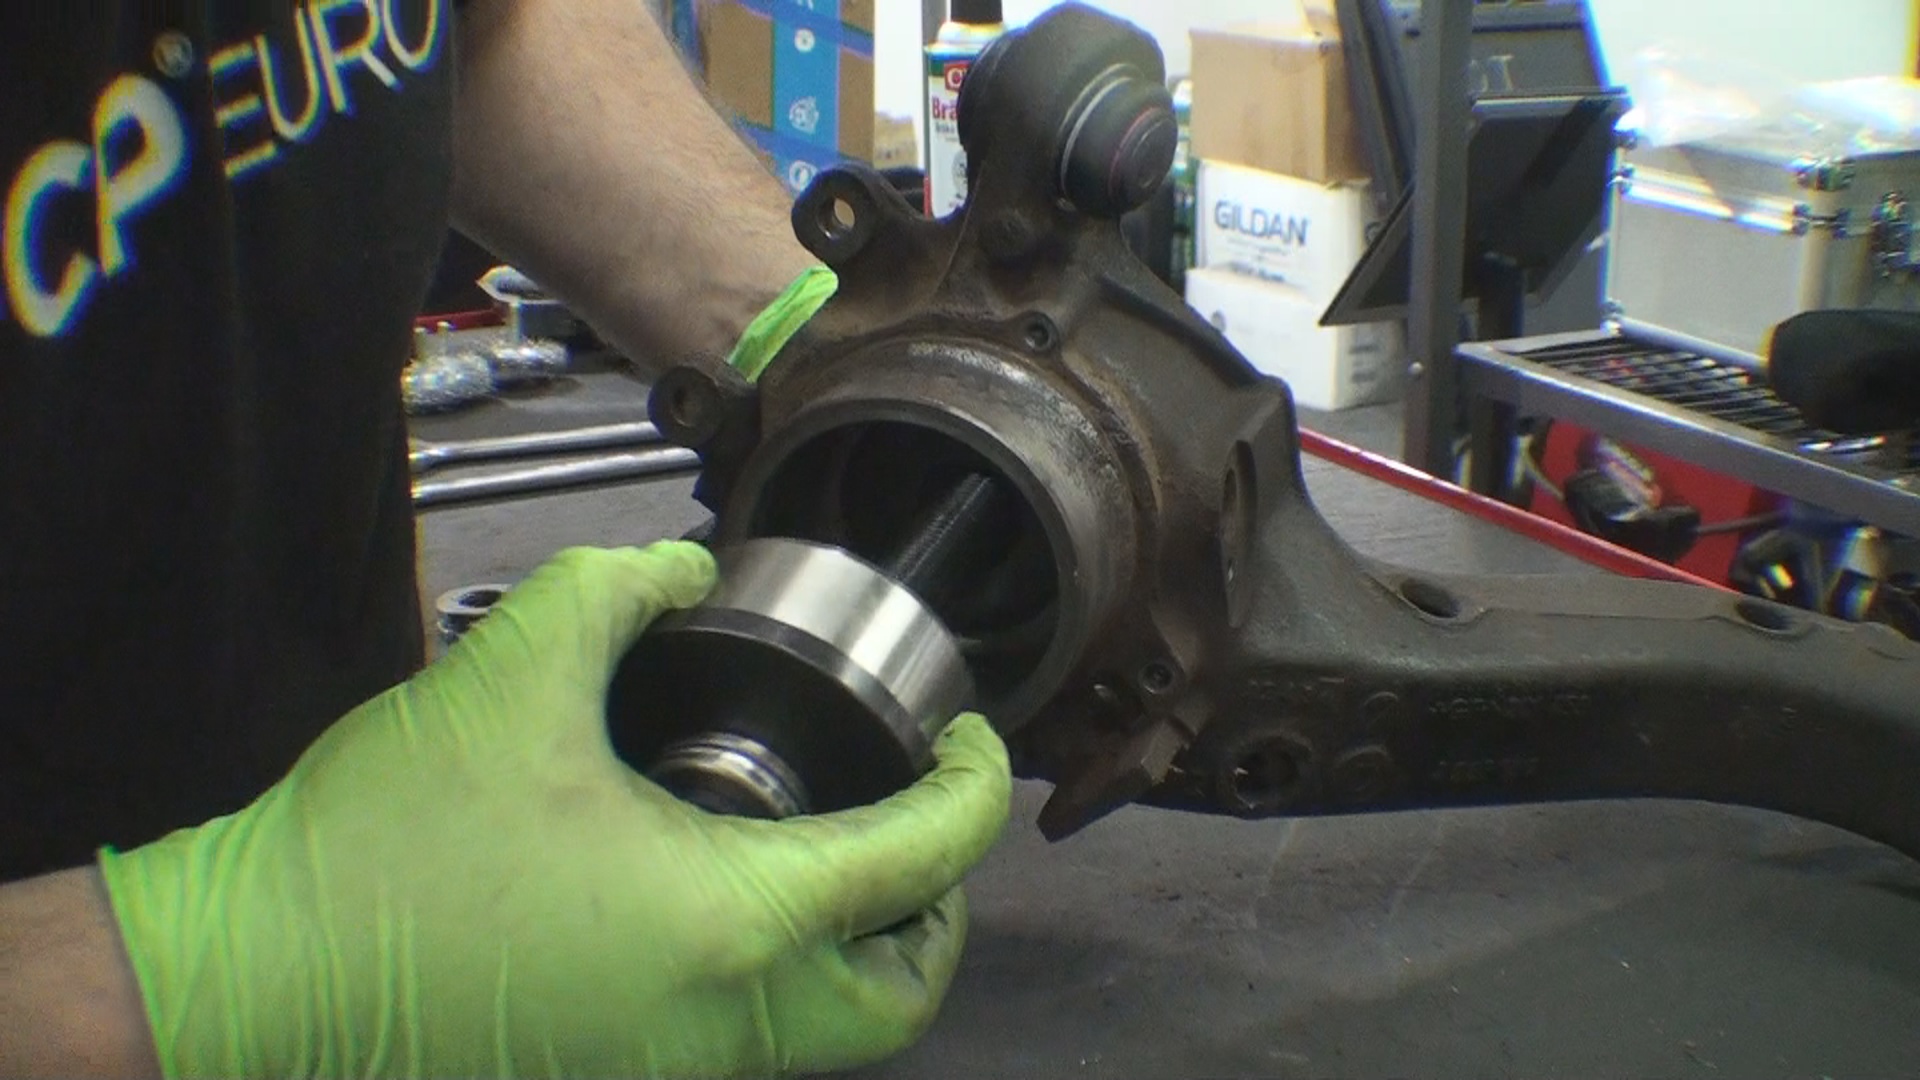
Step 4: Inspect the wheel hub
Chances are the wheel hub comes out with the outer, inner race of the wheel bearing still stuck to the hub. At this point, you will need to you a bearing race splitter, or a punch, or cut the race to remove it. Remember the race is hardened steel and can explode on you if you are hitting it so make sure you wear eye protection. You will want to inspect the condition of the wheel hub surface that presses into the inner race(s) of the wheel bearing. If there is heavy pitting or a notable lip, discard the wheel hub and replace it. This is why you always want a wheel hub on hand when you're doing this job because there is no way to know until it's removed.
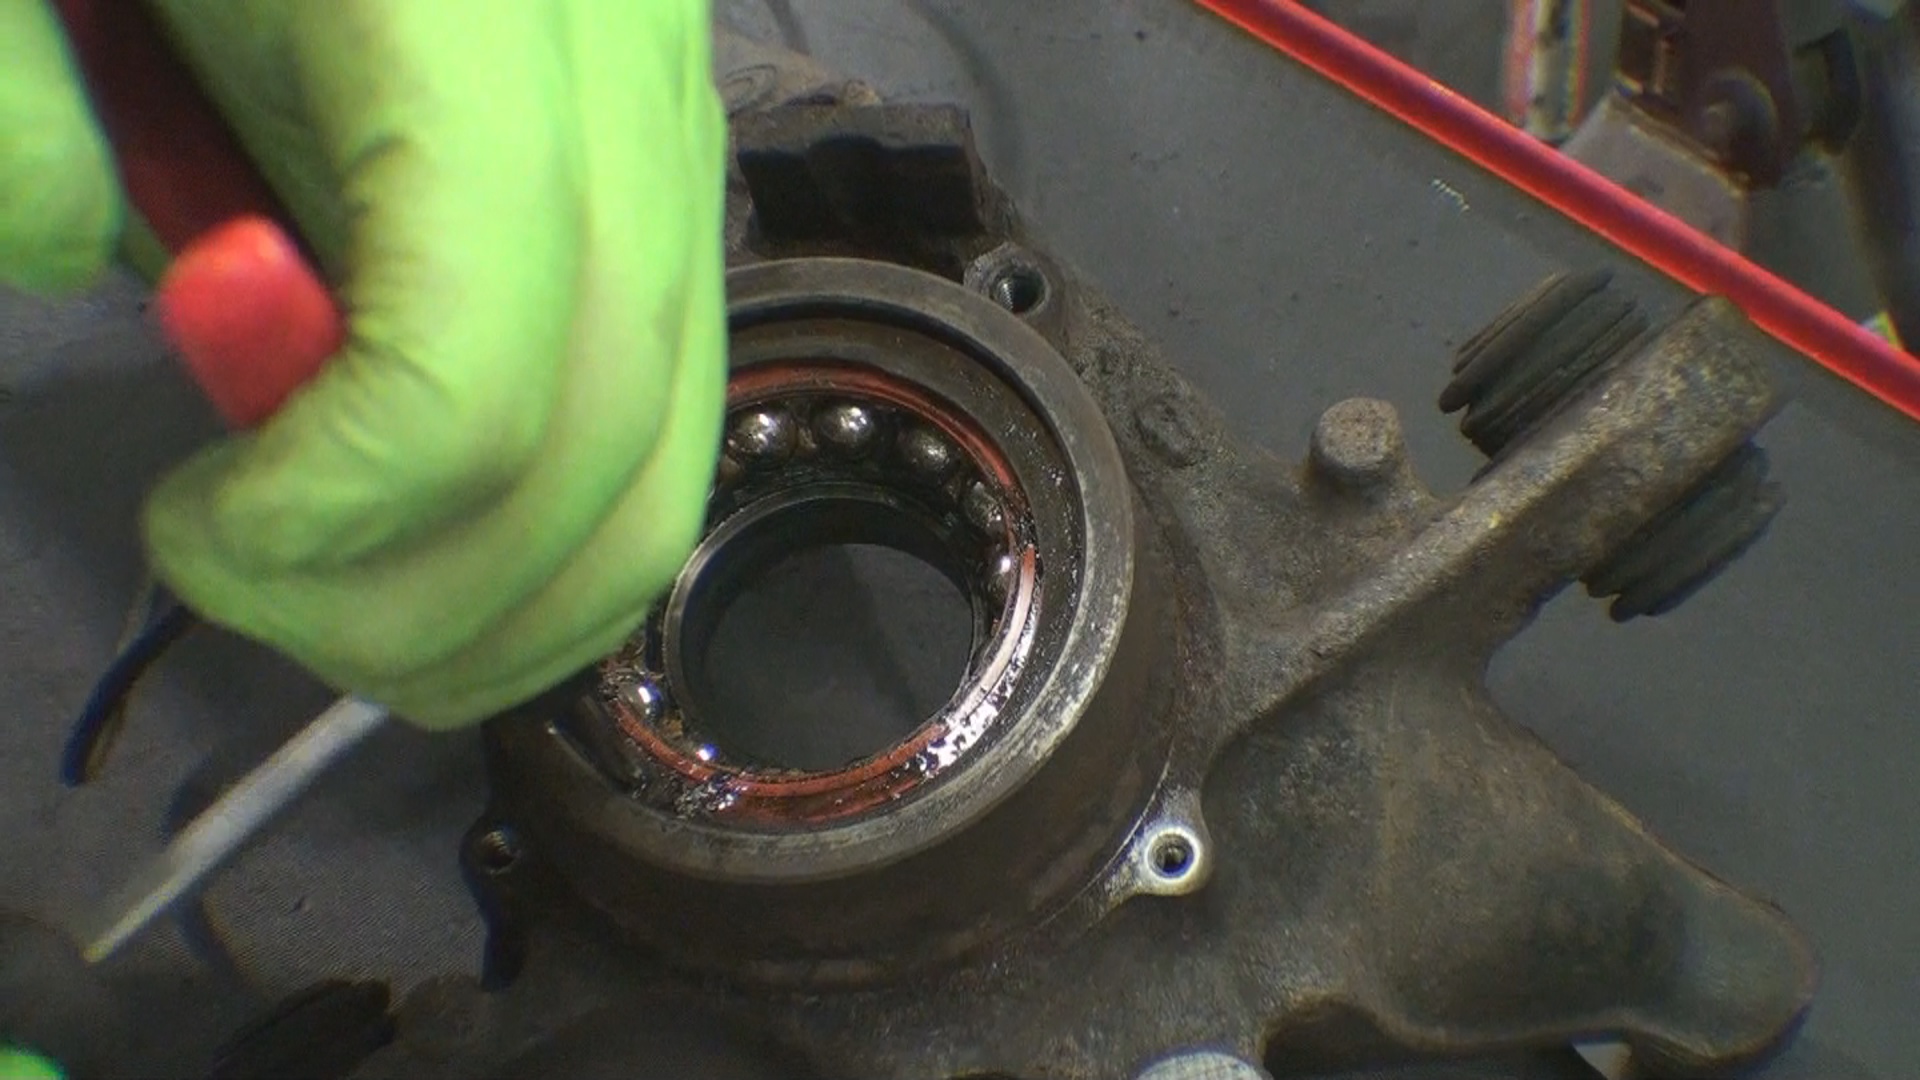
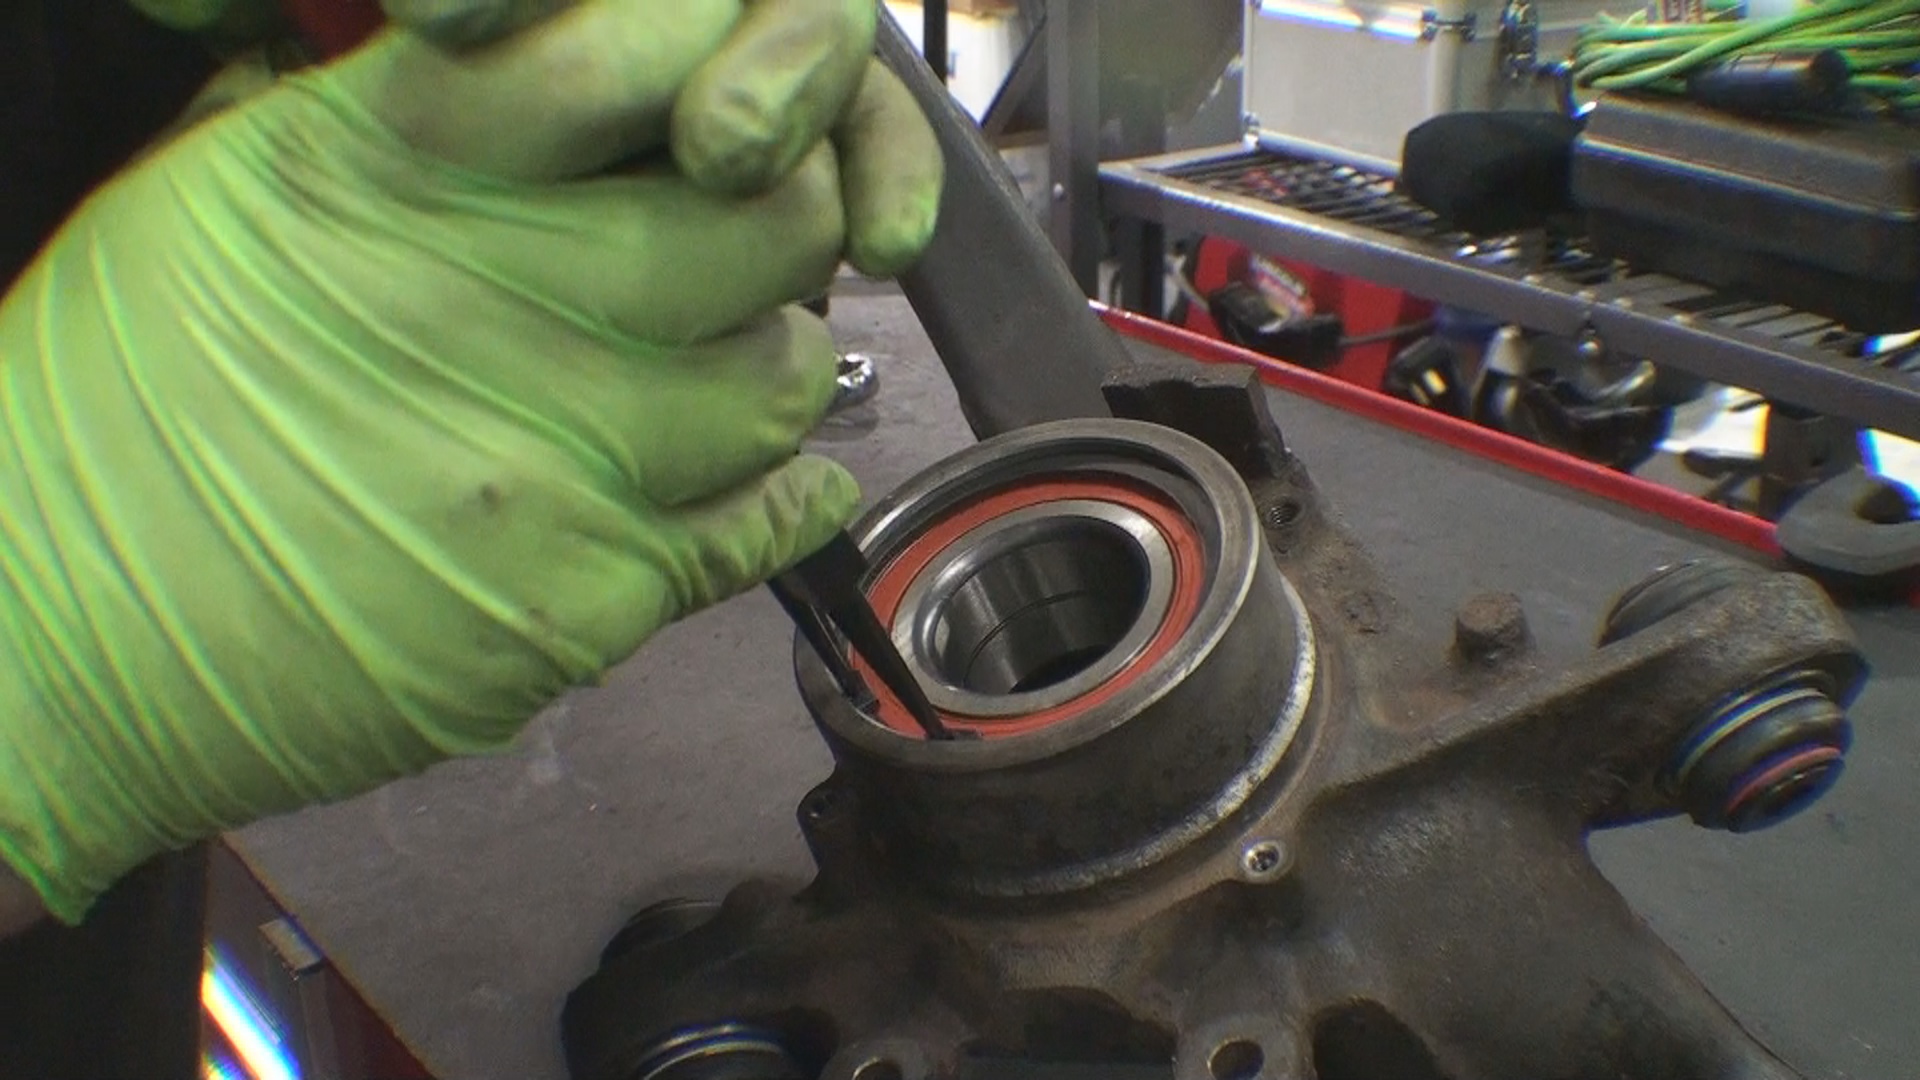
Step 5: Remove wheel bearing snap ring
This can go one of several ways. Sometimes the wheel bearing snap rings come out without fighting you, and other times not so much. In the case of a wheel bearing snap ring that is stuck in the groove, I have found that you can get them removed by using a penetrating lubricant and a cold chisel and hammer. The lubricant mix will help break up corrosion keeping the snap ring in place. I also use a cold chisel on the ears of the snap ring and hammer it until the snap ring starts to move freely. Now, you should be able to remove the snap ring easily. The reason to have a replacement snap ring on hand is for the procedure highlighted above. They can sometimes be in rough shape, and there is no reason to reinstall an old crusty snap ring when a fresh one can be installed, instead.
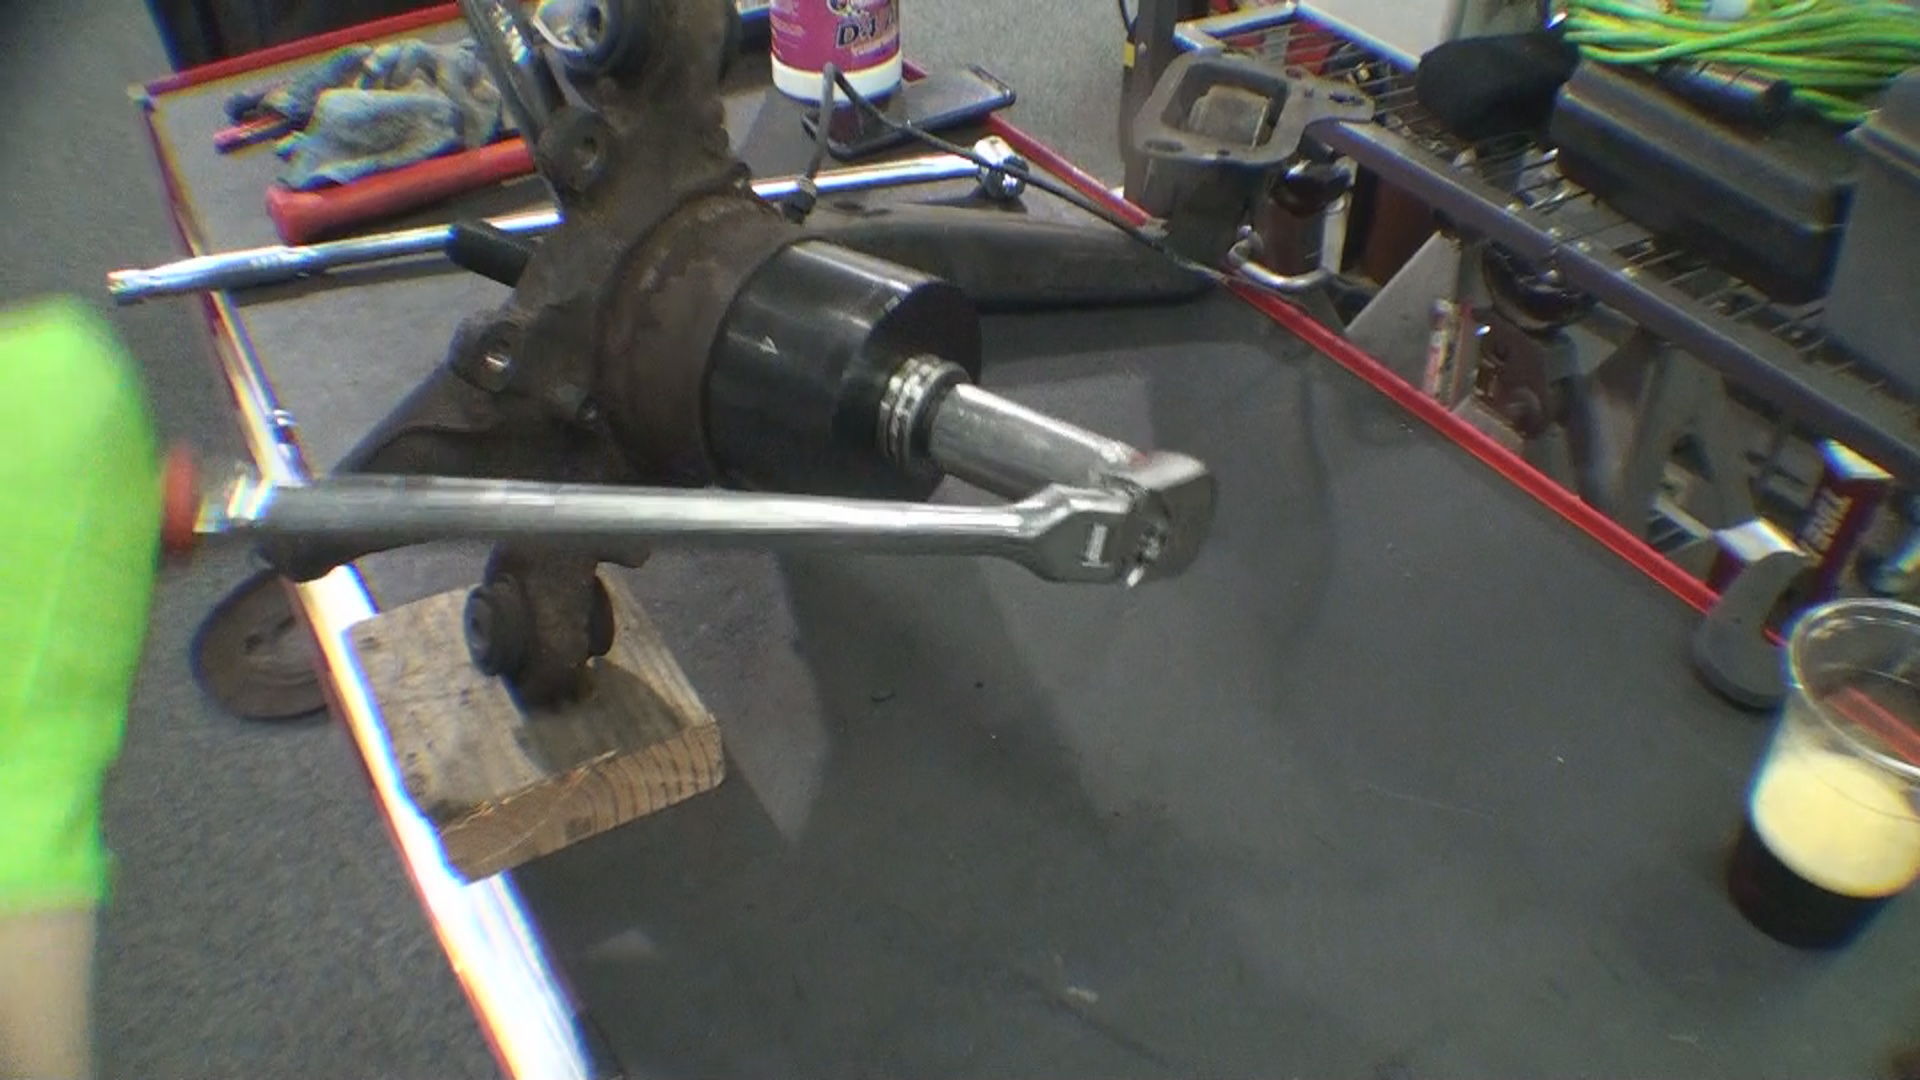
Step 6: Press out the wheel bearing
Find a cup that fits as much of the wheel bearing on the side you need to press from. Not all wheel bearings come out of the front of a wheel hub so make sure you know which direction you need to press the wheel bearing first. In the case of the E36, you can't push on the outer race of the wheel bearing; you you need to find the largest cup possible that will press against the back of the wheel bearing. Set your press adapter and begin to press the bearing out. I use a large flat piece against the outer surround first and push the bearing until it bottoms out. Then, I switch to a receiving cup that sits on the outer surround which allows to remove the wheel bearing completely.
Step 7: Clean the housing of any corrosion and clean the snap ring groove
To make pressing the new bearing as easy as possible, I use a wire brush on a drill to clean the bore out. I also use a wire brush and a pick to remove any corrosion or build up left over in the snap ring groove. This allows for an easy installation later.
Step 8: Determine which way the new bearing must be pressed in
There are different wheel bearings for different models. Some wheel bearings are tapered, which means they only press in one direction. Other bearings have a magnetic reluctor ring built in for the ABS. Before pressing in the new bearing, confirm which way the bearing must be pressed in.
Step 9: Press in the new wheel bearing
Find the adapters that are needed to press in the new wheel bearing. You'll want to press against the outer race of the wheel bearing when pressing in to prevent from damaging the new wheel bearing. If the press kit does not have the perfect size adapter for this, you can use the old wheel bearing and a larger press adapter to get the job done. You want to make sure the bearing presses in straight and without too much resistance. There will be some resistance, but it shouldn't jam at all as it's going in.
Step 10: Install the wheel bearing snap ring
Whatever you do, make sure you reinstall the snap ring before pressing in the wheel hub. The new snap ring should snap into the groove and seat flush against the outer race of the bearing while sitting flat in the snap ring groove. You can make sure the wheel bearing is seated by using a cold chisel and tapping the ears of the snap ring towards the groove.
Step 11: Install the wheel hub
To install the wheel hub, you'll want to support the inner race of the wheel bearing while pressing against the hub itself. Find an adapter that covers the inner race of the wheel bearing and an adapter that fits nicely over the wheel hub. Once everything is set up, press in the wheel hub again while making sure it's pressing in straight and smoothly. Keep going until it bottoms out and you can't turn the forcing screw.
Step 12: Install other components and torque to specifications
Depending on whether you removed the knuckle or not, the final assembly may differ. Make sure you follow manufacturer torque specs for control arms and any other components you removed. Install the axle shaft into the wheel hub and torque the new axle nut to spec (221 ft.-lb). Also make sure you stake or install a new cotter pin for the axle nut (depending on which style you have).
Overall, press-in wheel bearings are not an overwhelmingly difficult job (especially when you have the proper tools on hand). Quite frankly, if you factor in how much a shop would charge to replace one wheel bearing, you can instead invest the money into the tools to do the job and have them on hand to do the job in the future. If you're a beginner or avid DIYer/enthusiast my advice is to always have the right tool for the job to make life easier.
If you want to read about the rest of my build, you can do so here. And, if you like my build, you might like some of the others that are regularly featured on our blog and our YouTube channel.