- 02/18/2021
- 3 Min Read
- By: Tony Robinett
How To Replace A BMW E36 Power Steering Fluid Reservoir & Hose

If you've driven any BMW, whether it be from the recent past to present models, chances are you've suffered from a leaky power steering system. For the BMW E36, the power steering reservoir hoses are the typical culprit, and since removal of the reservoir is required to remove the hoses; replacement of the reservoir is recommended.
Parts Required To Replace A BMW E36 Power Steering Reservoir:
- BMW E36 Power Steering Fluid Reservoir
- BMW E36 Power Steering Suction Hose
- 2 Quarts ATF Fluid
- Replacement crush washers for the banjo bolt fittings
- Saran plastic wrap to cover the belt and PS pulley
- 2 hose clamps
- Power Steering Suction Hose
Tools Required To Replace A BMW E36 Power Steering Fluid Reservoir:
Steps Required To Replace A BMW E36 Power Steering Fluid Reservoir:
Step 1: Make some work area
Whoever designed the power steering system had the brilliant idea of stuffing the reservoir nearly underneath the intake manifold. So, removal of a few parts is necessary if you even want to take a good look at the reservoir. Start by removing the intake box, followed by the MAF Sensor. If necessary remove the alternator cooling duct. This should give you sufficient room to work. Depending on your model E36, this process will be different for all.
Step 2: Remove the old power steering fluid
-
Support the front of the car on jack stands. Please refer to the owners manual for proper jacking etiquette.
-
Wrap the belt, power steering pulley, and close proximity areas with the plastic wrap to prevent fluid from contaminating the belt.
-
Remove the cap of the reservoir and suck the fluid out with a syringe or pump. You will not be re-using this fluid.
-
Place a drain pan underneath the power steering pump and remove the 22mm banjo bolt letting fluid drain out.
-
Turn the key in the ignition to unlock the steering wheel. But DO NOT turn the vehicle on. And rotate the wheel back and forth from lock position left to lock position right, do this a few times and it will push the old fluid out of the system. The reservoir should be empty and fluid should not be dripping from the fitting on the PS pump.
-
Reconnect the hose to the PS pump and be sure to put new crush washers on the Banjo Bolt fitting. The Banjo bolt is to be torqued to 30 ft-lb, but since space may be too limited for a torque wrench tighten until you feel the crush washers pinch. Try not to over tighten the fitting. At this point we will leave the system empty of fluid as we remove the reservoir.
Step 3: Remove the power steering fluid reservoir and hose
-
First remove the strap that holds the reservoir in place. The reservoir should be slightly free.
-
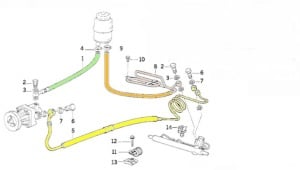
There should be two lines fitted to the bottom of the reservoir. Looking at the diagram, the larger hose (green) connects the reservoir to the pump, this is the suction hose. The smaller hose (orange) connects the reservoir to the return line. The hoses are secured onto the reservoir with the stock pinch clamps, if you use a flat blade screw driver the clamps can be removed with little effort.
-
When the reservoir is free, follow the suction hose down to its fitting. Remove the banjo bolt and install the new suction hose with new crush washers. Tighten to 30 ft-lb.
-
Install the new reservoir and reconnect the hoses to the bottom fittings. Use screw clamps to tighten hoses to reservoir.
Step 4: Replacing the ATF fluid
-
Add fluid to the reservoir until it reaches the Max fill line. Indicated by the green arrow in the picture. Bubbles may surface as you pour, this is expected because the fluid is displacing the air in the hoses.
-
Rotate the steering wheel slowly from lock to lock. The level of the fluid in the reservoir should drop as you do this, continually check and add fluid until the fluid level no longer drops. Be sure the reservoir level is now just under the max fill line. Be sure to not overfill.
-
Re-install the reservoir cap and hand tighten.
-
Now, start the engine and rotate the wheel from lock to lock, rotate speed should be 10 seconds or more from lock to lock. Do not hold the steering wheel at lock, immediately reverse direction as soon as you reach lock. Do this 10 times, then center the steering wheel and shut off the engine.
-
Remove the power steering reservoir cap and check the level, if it is below the minimum line add fluid until it is between the max fill line and the minimum fill line.
-
Look at the fluid, if it is a normal dark red color that is good. If the fluid has a bunch of small bubbles in it, there is still a little bit of air in the system. Repeat step 2 until the fluid level no longer drops. Even if you didn't get any small bubbles in your reservoir, it's a good idea to repeat step 2 just to be safe.
-
Once you get the fluid level to stay in between the Max and Minimum lines you are done. Replace the reservoir cap and tighten firmly by hand.
Replacing the fluid isn't something that you want to rush, having air trapped in the power steering lines can cause the system to not function properly. As with anything automotive repair you want to leave the vehicle in better shape than when you started. Not trade one non-functioning part for another.
With that you now have a leak free, brand new power steering fluid reservoir on your BMW E36. If you would like to read more BMW DIYs and guides, visit our BMW hub at bmw.fcpeuro.com. If you have any questions or comments, leave them in the comments section below.


