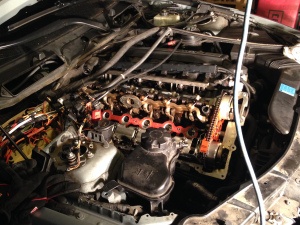
Now that the weather is warmer here in Connecticut, I'm beginning to attack some of the issues I've noticed with my BMW 325i. This week I'm addressing an extremely common issue found in BMW's magnesium valve cover N52 engines - Oil leaking at the valve cover gasket as a result of broken valve cover bolts.
Why Magnesium?
In an effort to save weight, BMW used magnesium extensively in the N52 and to prevent the galvanic corrosion common with steel fasteners, as well as deal with issues related to thermal cycling. Due to this, aluminum alloy bolts are required in various parts of the engine. The aluminum alloy bolts are single use and the heads of these fasteners are sometimes marked blue from the factory and are sold in sets as BMW part number 11120409288 for this repair.
The process is relatively straightforward with the most time consuming steps being valve cover and fuel injector harness removal. Working carefully, the cover can be removed in about one hour.
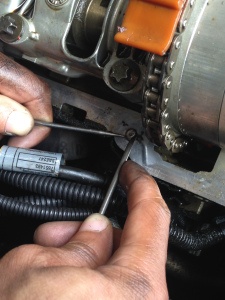
As a result of the bolts snapping, oil will leak directly into the bolt holes and prevent the bolts from seizing in the hole. This makes what would normally be a painful job surprisingly simple. I've provided a picture to illustrate how you can use two pick tools to rotate the broken stud out of the cylinder head and what the broken bolt looks like once it's been unscrewed.
If you are accustomed to the older M52/54/56 engine where the valve covers can be removed in 30 minutes or less, this is not that job. It is important to be prepared and patient with this one, and very helpful to have a Bentley manual or similiar to provide additional guidance.
The following tools are needed:
- Sockets 8mm, 10mm, 12mm, E8, E10, E12, E14, E16, Torx T45, Universal Joint
- Pick tools
- Torque wrench
The following parts are needed:
- Valve Cover Gasket Set
- Valvetronic motor gasket (camshaft adjuster)
- Eccentric sensor gasket
- Valve cover screw set
I like to start by disconnecting the battery ground. The battery is located in the trunk and accessed easily by removing a single panel.
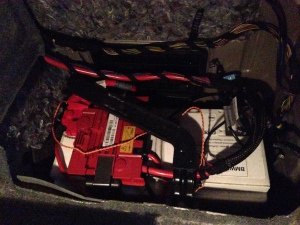
Disconnecting the battery will not affect paired phones, seat memory, radio presets, service data etc., however the trip computer and date & time will be wiped, and the window (Auto up) and sunroof will need to be reinitialized which is a very minor inconvenience.
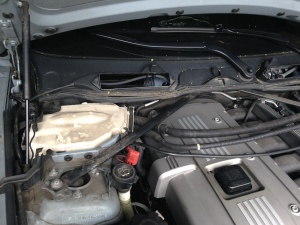
You must then remove the following before you can access the engine cover:
- The cabin filter assembly
- The covers for brake reservoir and ECM box
- The lower windshield cowl
- The strut tower bar (Optional for smaller jobs, mandatory here)
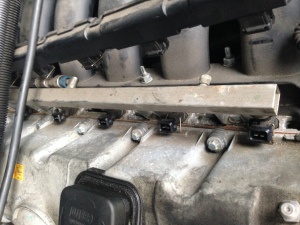
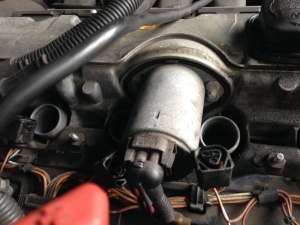
After removing the cover, you must remove the ignition coils which is a fantastic opportunity to check the condition of your spark plugs. Earlier in the year with 70k miles on my plugs I had extreme electrode wear on my cylinder 1 plug which warranted replacement. Now is also a good time to remove the upper hose from the expansion tank.
Then remove from the valve cover:
- The ignition coil/valvetronic harness
- Cosmetic cover retainer
- Valvetronic motor (Be careful)
- Eccentric sensor harness (Be extra careful)
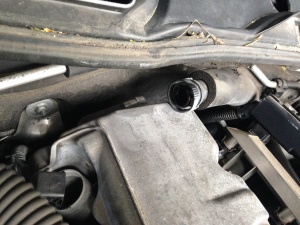
- The rear breather hose (Be even more extra careful)
The injector harness will snap up and out of place after removing the retaining clips.
The Valvetronic motor has three screws that retain it. The third one is down below.
The Eccentric sensor harness snaps into the head with two clips.
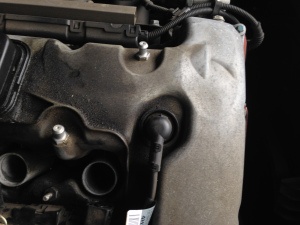
The rear breather hose connector can get brittle on older vehicles, I normally press the tabs in, firmly push the hose forward and then remove it.
After removing all of this equipment, remove the white ECM box cover and lift the harnesses out of the cover and away from the valve cover. The goal here is to get as much working room as possible to remove the valve cover.
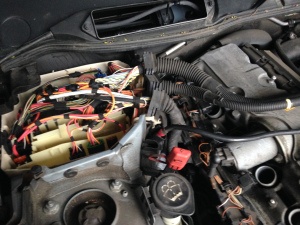
You can now remove the 19 bolts that retain the valve cover to the cylinder head. Removing the valve cover takes extreme patience as maneuvering around the Valvetronic assembly in such a tight space is a nightmare, but it can be done.
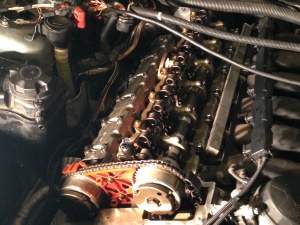
Carefully clean all the gasket mating surfaces and clean off any dust or debris that may have ended up in the head. Debris can plug oil galleries or end up in parts of the engine that may cause catastrophic failure, so take the time to inspect everything. The new valve cover gasket is extremely easy to install as two dowel pins locate it in the head. Take notice of how the two other gaskets press into the valve cover, so you don't install the valve cover and have to remove it again because the eccentric sensor harness won't plug in. Lastly, when torquing the bolts, follow the factory recommend torque value and procedure to the letter. These aluminum screws will snap easily and without warning if the procedures are not followed.
Once the car is back on the road, allow three or four driving cycles for the engine to adapt to the changes. The car felt fantastic the first time out, but I observed an idle speed that was higher than normal. The next morning it sorted itself out and the idle has been dead solid since. Prior to replacing the gaskets, it would idle hunt noticeably.