- 11/17/2020
- 9 Min Read
- By: Christian Schaefer
At Home Alignment - How To String Align Your Car

Your vehicle's alignment is critical to your suspension components' wear and the way the vehicle drives. The alignment is all of the measurements concerning how the wheels and tires are positioned on the car concerning the road ahead. The three major components are the camber angle, caster angle, and the toe. If anyone of these three measurements is out of specification, it will lead to excessive tire wear and a vehicle with improper handling characteristics.
What is the camber angle, and what are its effects?
In simplest terms, the camber angle is that at which the tire is standing on the road. Imagine looking at a car head-on. If the tire is standing straight up, there isn't any camber dialed into the car's suspension. If the top of the tire is leaning into the car, the suspension has negative camber, and if the top of the tire is leaning away from the car, it has positive camber.
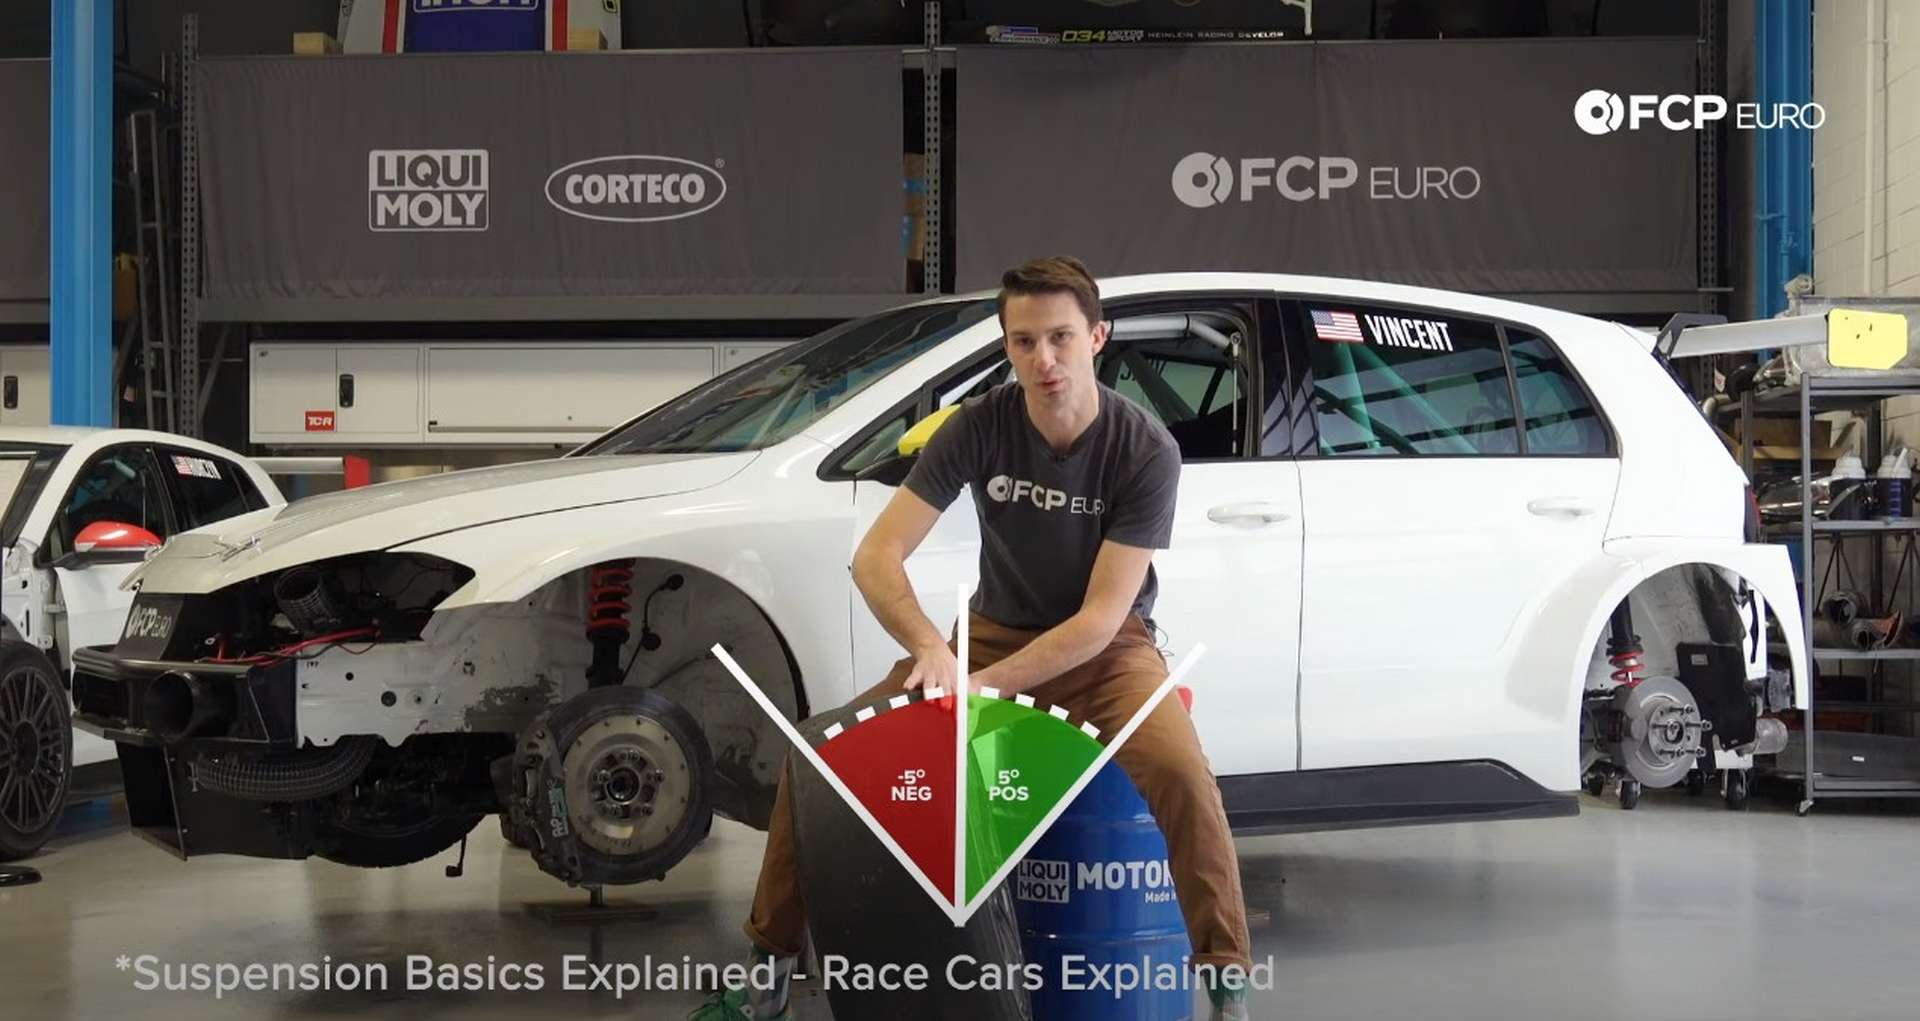
Without a doubt, you've seen at least one car around your neighborhood that is slammed to the ground with wheels at crazy inward angles. As interesting as they look, they depict what negative camber is, albeit too much. Modern suspensions on every vehicle sold today will have a slight amount of negative camber at the least. Passenger cars like sedans and SUVs will have somewhere near one-degree of negative camber on their front and rear wheels. Manufacturers add negative camber so that when a vehicle is turning, the outside tire sits more evenly on its tread rather than the tire's outside edge. Properly inflated tires will wear on the insides first, but only slightly.
Cars that are prepping for any sort of tarmac motorsports other than drag racing should have more than a degree of negative camber in the front. The front tires on circuit and auto-x cars have to put up with much for force than a passenger car. Alignment shops dial in more negative camber to keep the tire's contact patch at the greatest amount during tight and fast cornering. Negative rear camber depends on the type of motorsport. Circuit and Auto-x alignments will have more rear camber than stock for cornering purposes, but drift cars won't. A drift alignment setup puts the rear tires at zero camber to take advantage of all of the grip they can get.
Positive camber is never something you'll want in a passenger car. Tires aren't built for it, and neither are modern suspension systems. Excessive positive camber will ruin the outside of your tires and causes instability during cornering. If you see that you have positive camber, have the alignment checked immediately.
How do I get more camber?
Depending on your suspension, you may be able to add more camber with a few tools. Adjustable factory alignment settings can give you more camber in whichever direction you want to go but won't cut it when it comes to motorsport style alignments. Aftermarket parts make it easier to dial the camber in and raise the amount you can have.
Adjustable camber plates and control arms are your best ways to add negative camber. Many of these parts make the camber adjustment a priority and provide helpful markings when setting the alignment. Additionally, for significantly less money than the other two options, you can purchase aftermarket camber bolts. Depending on your make and model, you'll be able to swap your factory camber bolts with an aftermarket set to give you a wider range of camber adjustment.
Talk to an alignment shop before pulling the trigger on any of these aftermarket products. Too much negative camber will make the front end unstable in a straight line by reducing the tire's contact patch. The reduced contact patch will put all of the wear into a smaller section of the inside of the tire and cause it to wear significantly faster than your standard alignment would.
What is the caster angle, and what are its effects?
The caster angle is the angle at which the strut/shock assembly sits in relation to the wheel center's vertical axis. To imagine the caster angle, imagine the vehicle from the side. The wheel center's vertical axis is just a straight vertical line through the center of the wheel. The caster angle goes through the center of the wheel but leans forward or backward and is determined by how the shock assembly mounts in the car. If the top of the shock assembly leans towards the back of the car, you have a positive caster angle. If the top of the shock leans towards the front of the car, you have a negative caster angle.
A positive caster angle is what you need to have a proper driving and feeling car. Manufacturers design their passenger cars with between three and five degrees of positive caster, giving enough to feel the benefits. The primary benefits of the positive caster are improved straight-line stability and increased cornering ability. You'll most commonly feel the effects of positive caster while you let the steering wheel return to center after making a turn. Without positive caster, the steering wheel would remain at the position that you turned it to.
The effect that returns the steering wheel to the center also affects its straight-line stability. The more positive caster added, the quicker the wheel will snap back because the caster naturally wants the steering wheel at the center position—thus creating a heavier turn-in and more stability at high speeds. The caster also affects the negative camber. The wheels turn on the caster angle, which creates more negative camber on the outside wheel as the wheel turns. More positive caster allows you to get the negative camber you need in the corners without having it in a straight line.
How do I get more caster?
More aftermarket parts, of course! Unlike camber, the caster is rarely adjustable from the factory. Adjustable camber plates and replacement control arm bushings are the best ways to add positive caster. Increasing the caster angle is a popular thing to do and is done easiest from the top of the strut. Because of that, most aftermarket camber plates will have some added positive caster built-in by having the shock mounting point farther back on the plate.
Additionally, you can change the bushings on the control arm. Whether it's a change in the bushing design or on the bushing mount, many aftermarket lower control arm bushings are designed to add positive caster to the front wheels. The aftermarket bushings often use polyurethane instead of rubber, which gives the bushings less deflection. The lack of deflection helps the suspension stay at its set alignment specs while under load forces.
What is the toe angle, and what are its effects?
The toe angle is the direction the tires are pointed concerning the vehicle's centerline when viewed from above. Imagine a line running down the center of the car. The toe angle is the angle at which the front of the tire is pointing towards or away from that centerline. The range of change is significantly smaller when it comes to the toe angle, but its effects are greater than that of the camber and caster. Too much toe-in or toe-out will wreck tires quickly and put unnecessary strain on the suspension components.
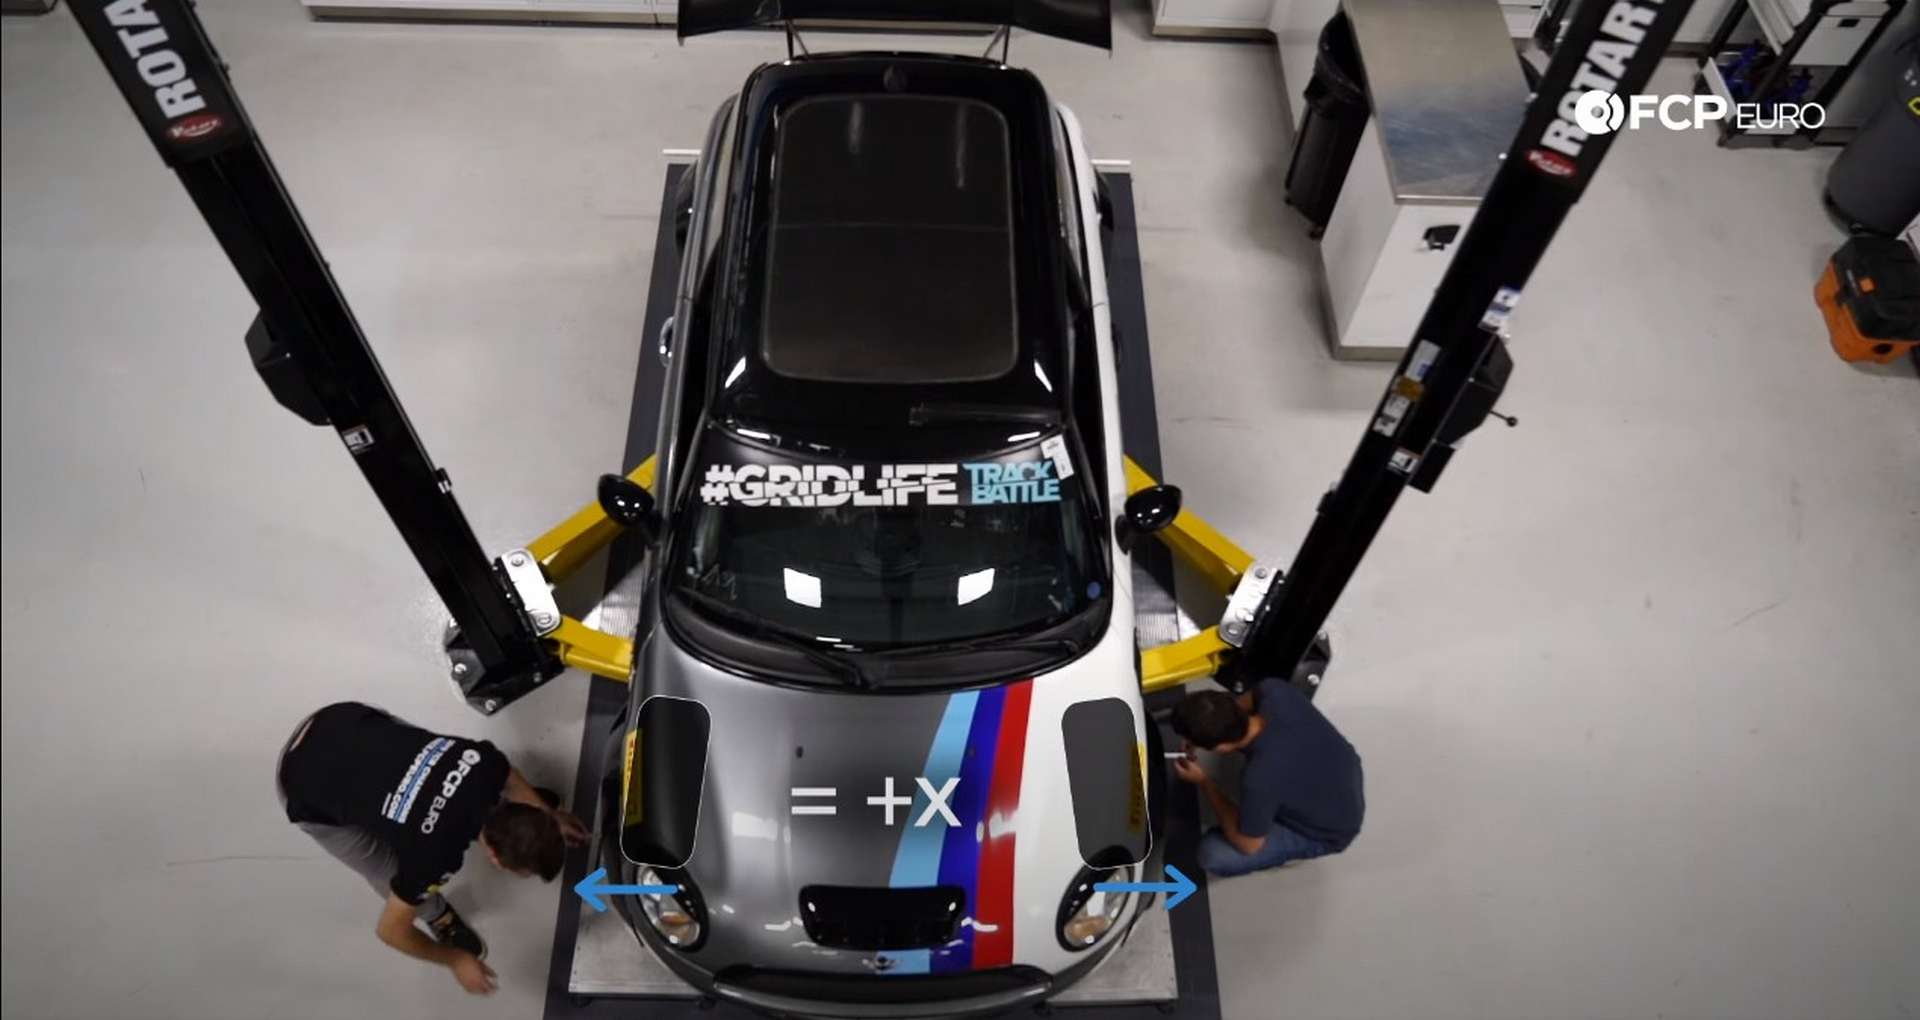
Factory toe settings for modern vehicles are around a tenth of a degree in or out for the front wheels. The rears commonly come with no toe. Toe is measure in degrees and minutes, inches, or millimeters. The toe angle will help during the vehicle's turn-in or help the straight-line stability depending on whether there is toe-in or toe-out. As you may have assumed, toe-in means that the front of the tires are pointing inward, and toe-out means the front of the tires are pointing outward.
Generally speaking, toe-in helps with reducing oversteer and improving straight-line stability. Toe-out will give a better turn-in response and reduced understeer. Too much of either is a problem. Excessive toe-in and toe-out will cause the tires to scrub along the ground as they roll. In essence, the scrubbing is similar to a tire being dragged sideways while rolling forward. With the toe settings way out of alignment, you'll be able to feel and hear the tires hopping as teh car moves.
What kind of toe setting you'll want is dependent on the drivetrain of your vehicle. Rear-wheel-drive vehicles will have their tires toed-in as they want to toe outward as they drive along naturally. Front-wheel-drive vehicles are set up with toe-out as their drive wheels want to pull themselves inward under power. Beyond that, you can use the toe alignment to make the car feel as turn-in happy as you'd like.
How do I get more toe?
Thankfully, no aftermarket parts are needed here. The toe angle is directly related to your steering rack, and the tie rod ends. During an alignment, the tierods are rotated to adjust the toe and set them at factory specs. With more or less rotation of the tierod, you can adjust the tie rod.
However, you can change bushings in the suspension to keep the toe at the aligned specification during the vehicle's use. The rubber bushings flex as the car drives, altering the alignment settings. Stiffer bushings decrease bushing deflection helping to keep the toe in check.
Can I perform an alignment myself?
Yes, yes, you can. Alignment shops use the latest Hunter alignment machines that use lasers and sensors to perfectly calibrate the alignment specs. You don't need that, but take advantage of it if you have access to one. Instead, you can use a tape measure and some string.
String alignments are a great way to learn a new skill and ensure that your vehicle has the proper alignment settings. I would suggest that you only look into a string alignment if you own a car that you use for motorsports in some capacity. You can do them in your driveway or the paddock at your local race track, and are used by many grassroots motorsports teams worldwide.
String alignments focus on the camber and toe settings. Although caster may be adjusted, it won't come into play in this DIY.
Tools & supplies required to perform a string alignment on your vehicle:
- PVC Pipe
- 4 Jack Stands
- Fishing Line
- Small Weights
- Level
- Angle Finder
- Ratchet Straps
- Ruler/Scale
- Tape Measure
Steps to perform a string alignment on your vehicle:
Step 1: Build the box
To align the car with string and rulers, you'll need to make a box around the car. First up, measure the width of the car, tire to tire, in inches. Then add seven inches per side to the width. Use that measurement to determine the length of the two PVC pipe pieces you will have to buy.

Once you have the pipe, you can make your cuts. The string will run parallel to the side of the car to give an accurate reading for the toe measurement. You'll need to cut grooves in the pipe simultaneously on each end to make sure that the string is straight. Take your original track width measurement and add three inches to either side of the car. Then, subtract that measurement from the overall width of the pipe. Cut in half whatever number you're left with, and measure that amount from each end of the pipe. That is where the groves will sit on the pipes.

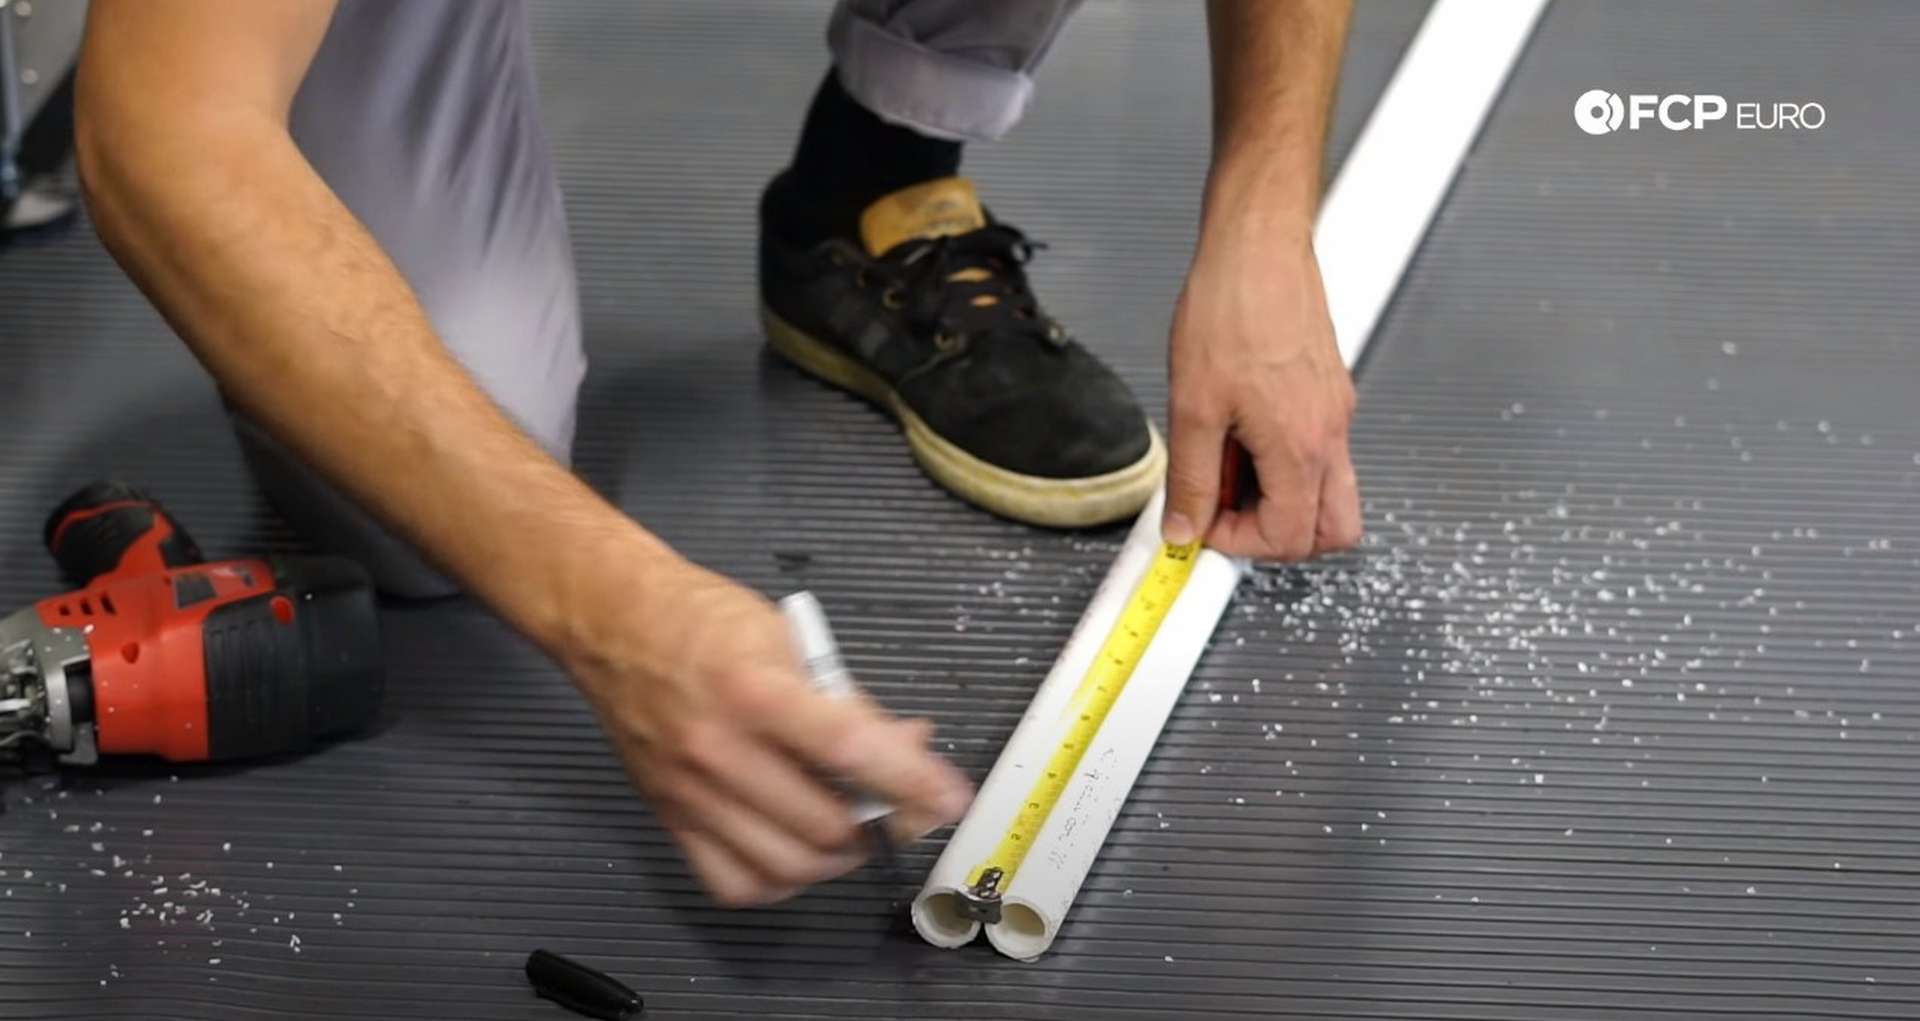
Cut grooves deep enough for the string or fishing line to sit. Measure thrice, cut once.
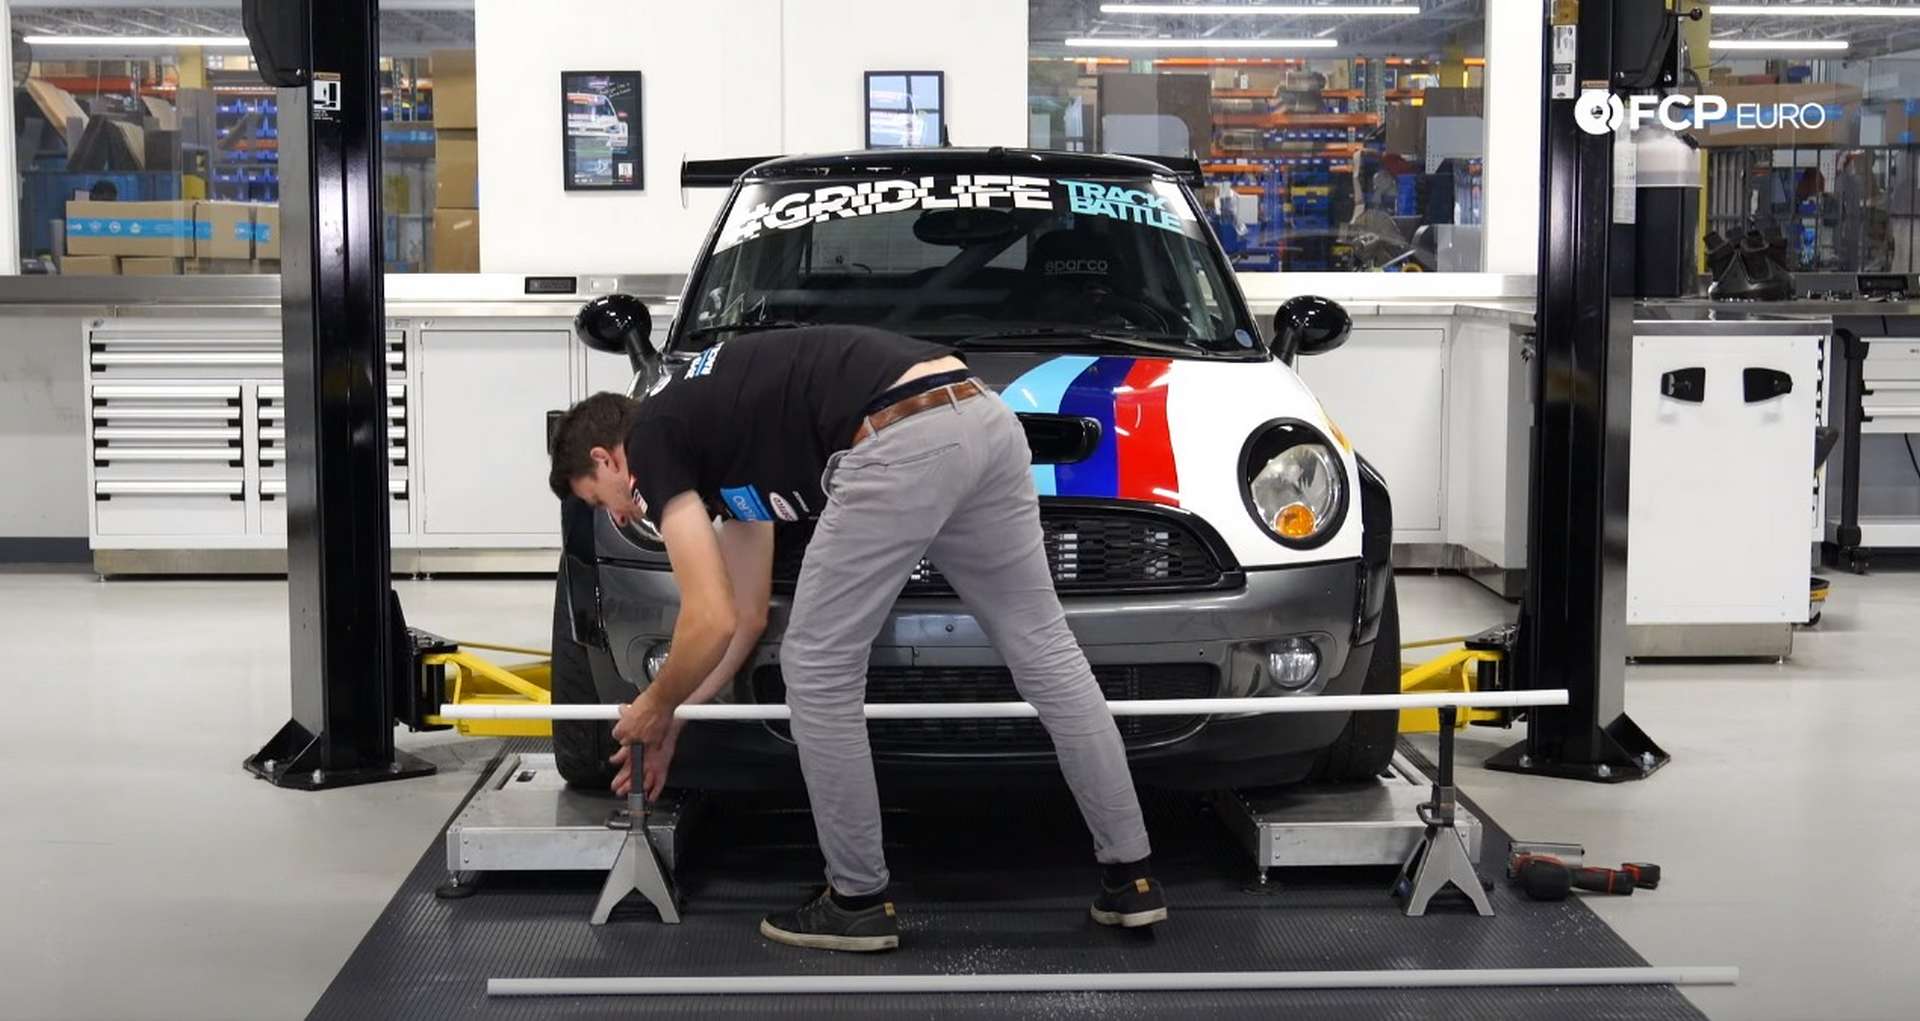
Next, set up the jack stands at each corner of the vehicle and place a pipe on top. Lift the jack stands equally until the pipe is approximately at the center of the wheel.
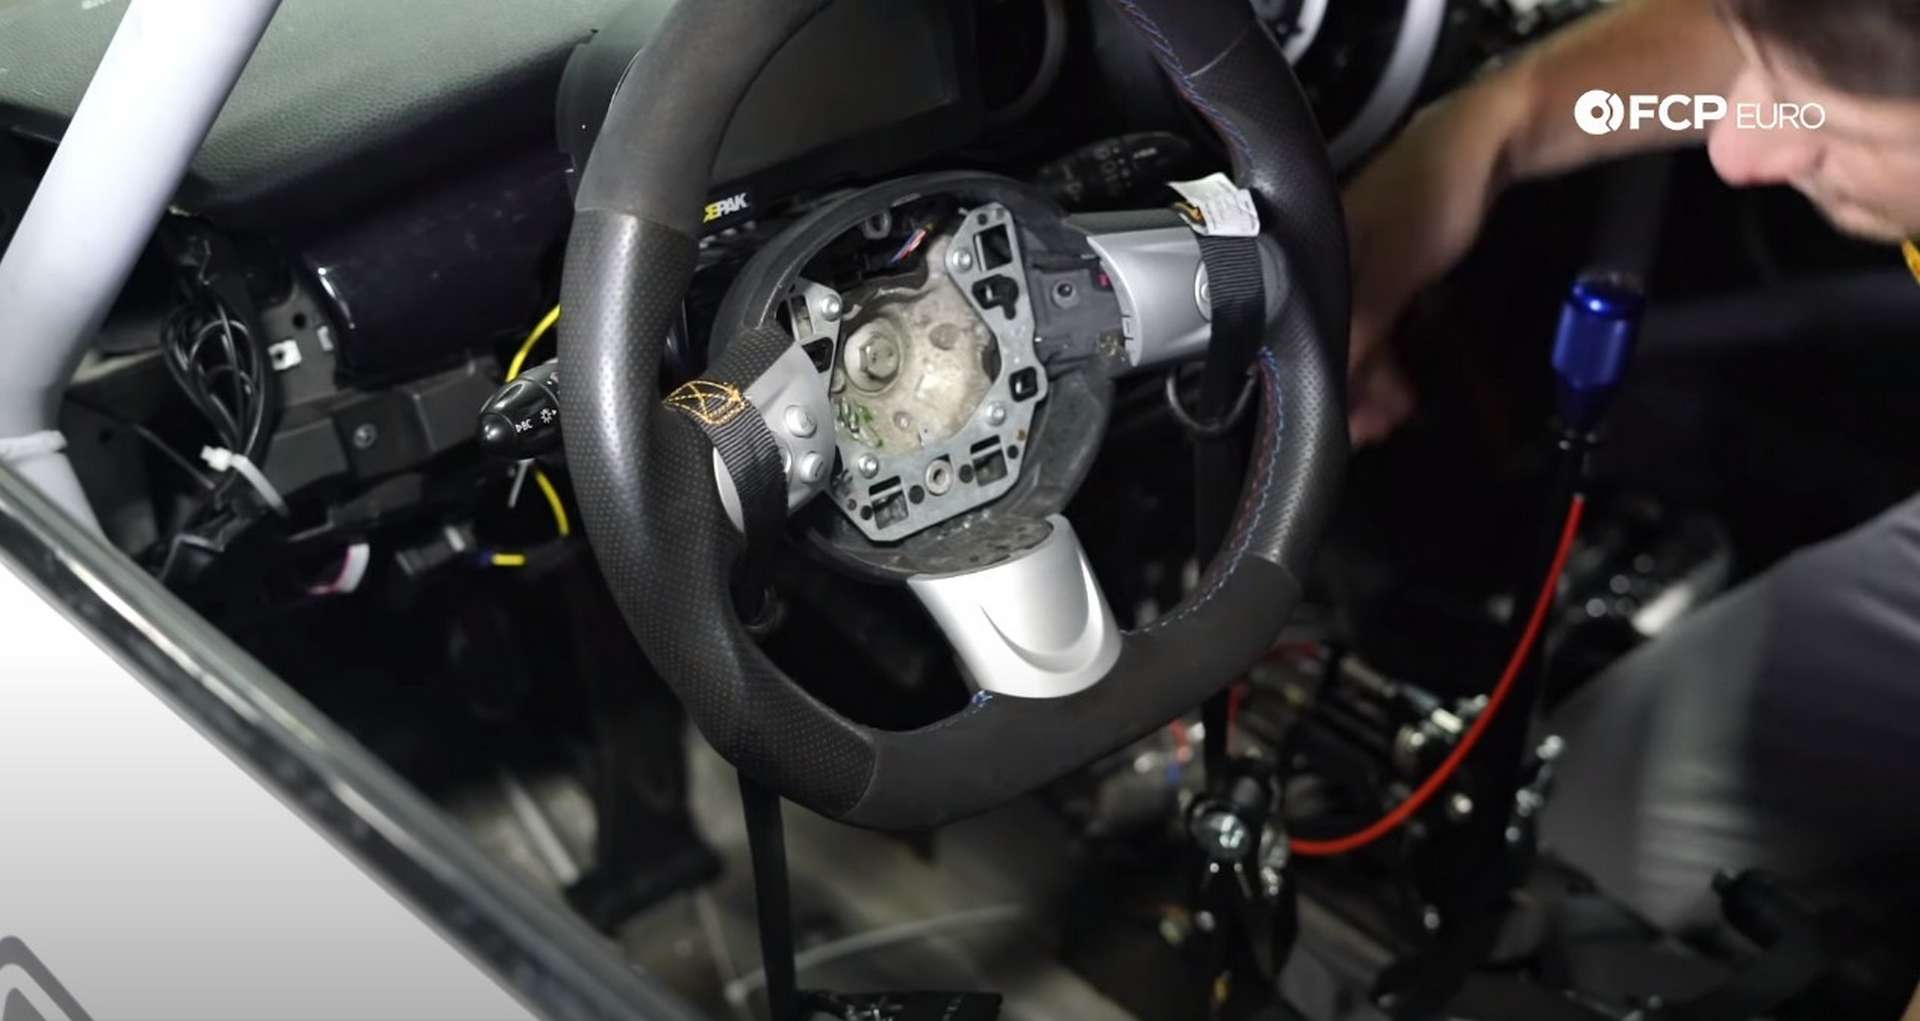
Step 2: Lockdown the steering wheel
While aligning the front suspension, the steering wheel cannot move. If it moves, the toe cannot be measured and adjusted correctly—Loop the ratchet straps around the steering wheel and the seat base.
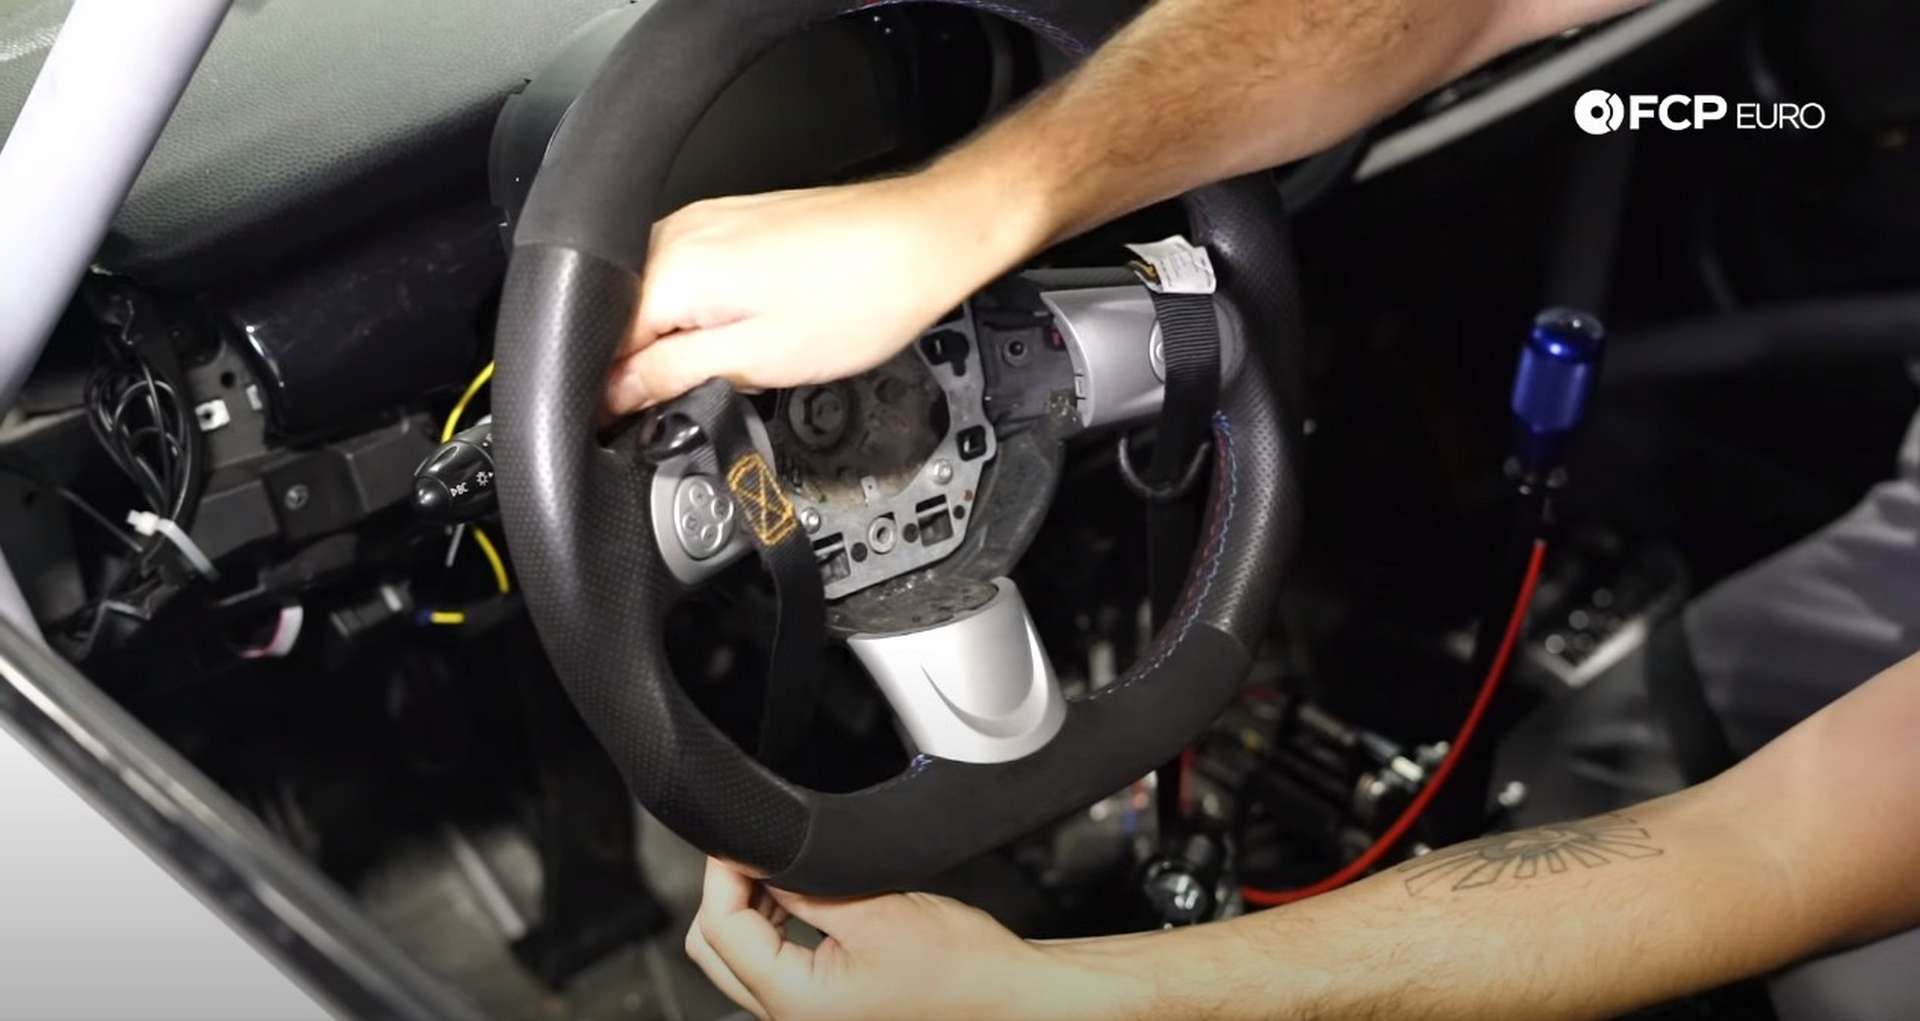
Tension the straps evenly to prevent the wheel from being able to be turned.
Step 3: Aligning the string setup
Take this time to tie a weight to each end of your string or fishing line. Use enough line to have the weights hold it taut along the length of the car.
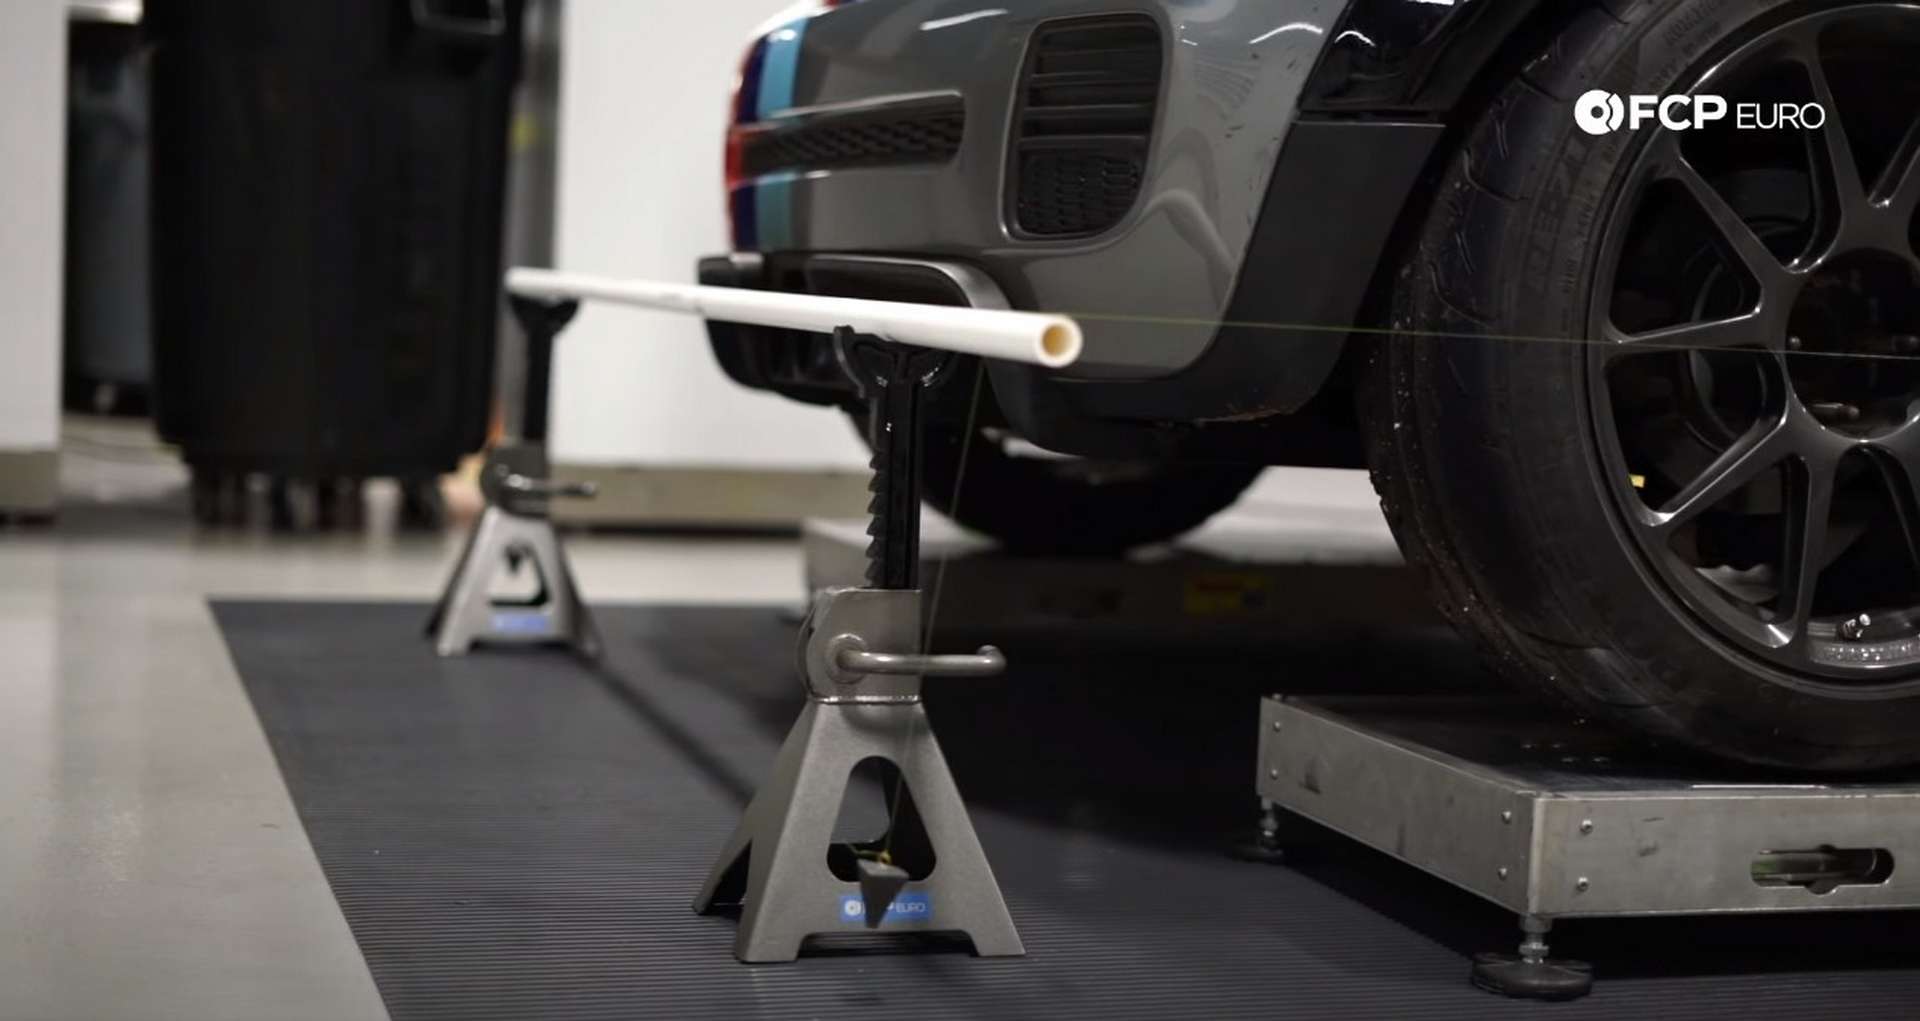
Once the lines are running parallel to the vehicle, they need to be spaced evenly from the wheels. Use a ruler to measure the distance from the wheel center to the string. Move the pipes along teh jack stands until the string is the same distance away from each wheel on all four corners.
The distance from string to wheel should only be the same between the front wheels and the rear wheels. The front and rear suspension have different track widths, so the distance away from the string won't match front to rear.
Step 4: Setting the toe
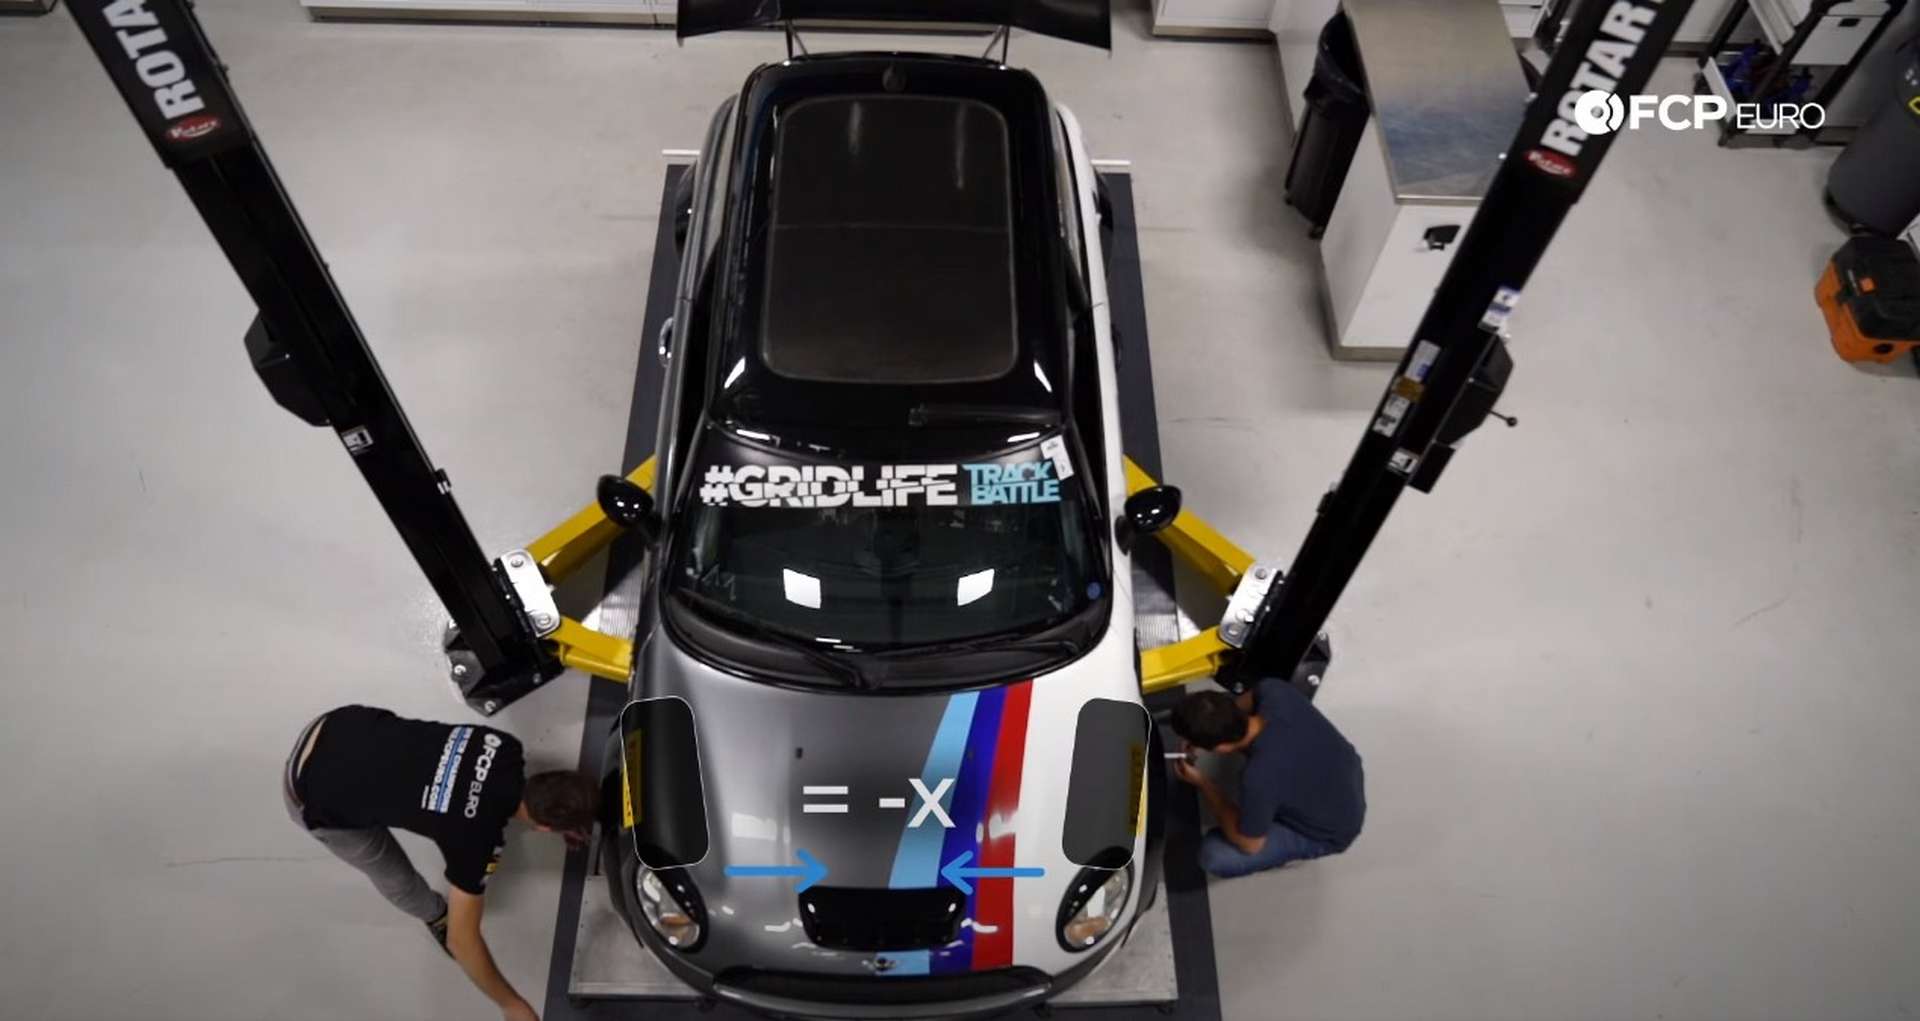
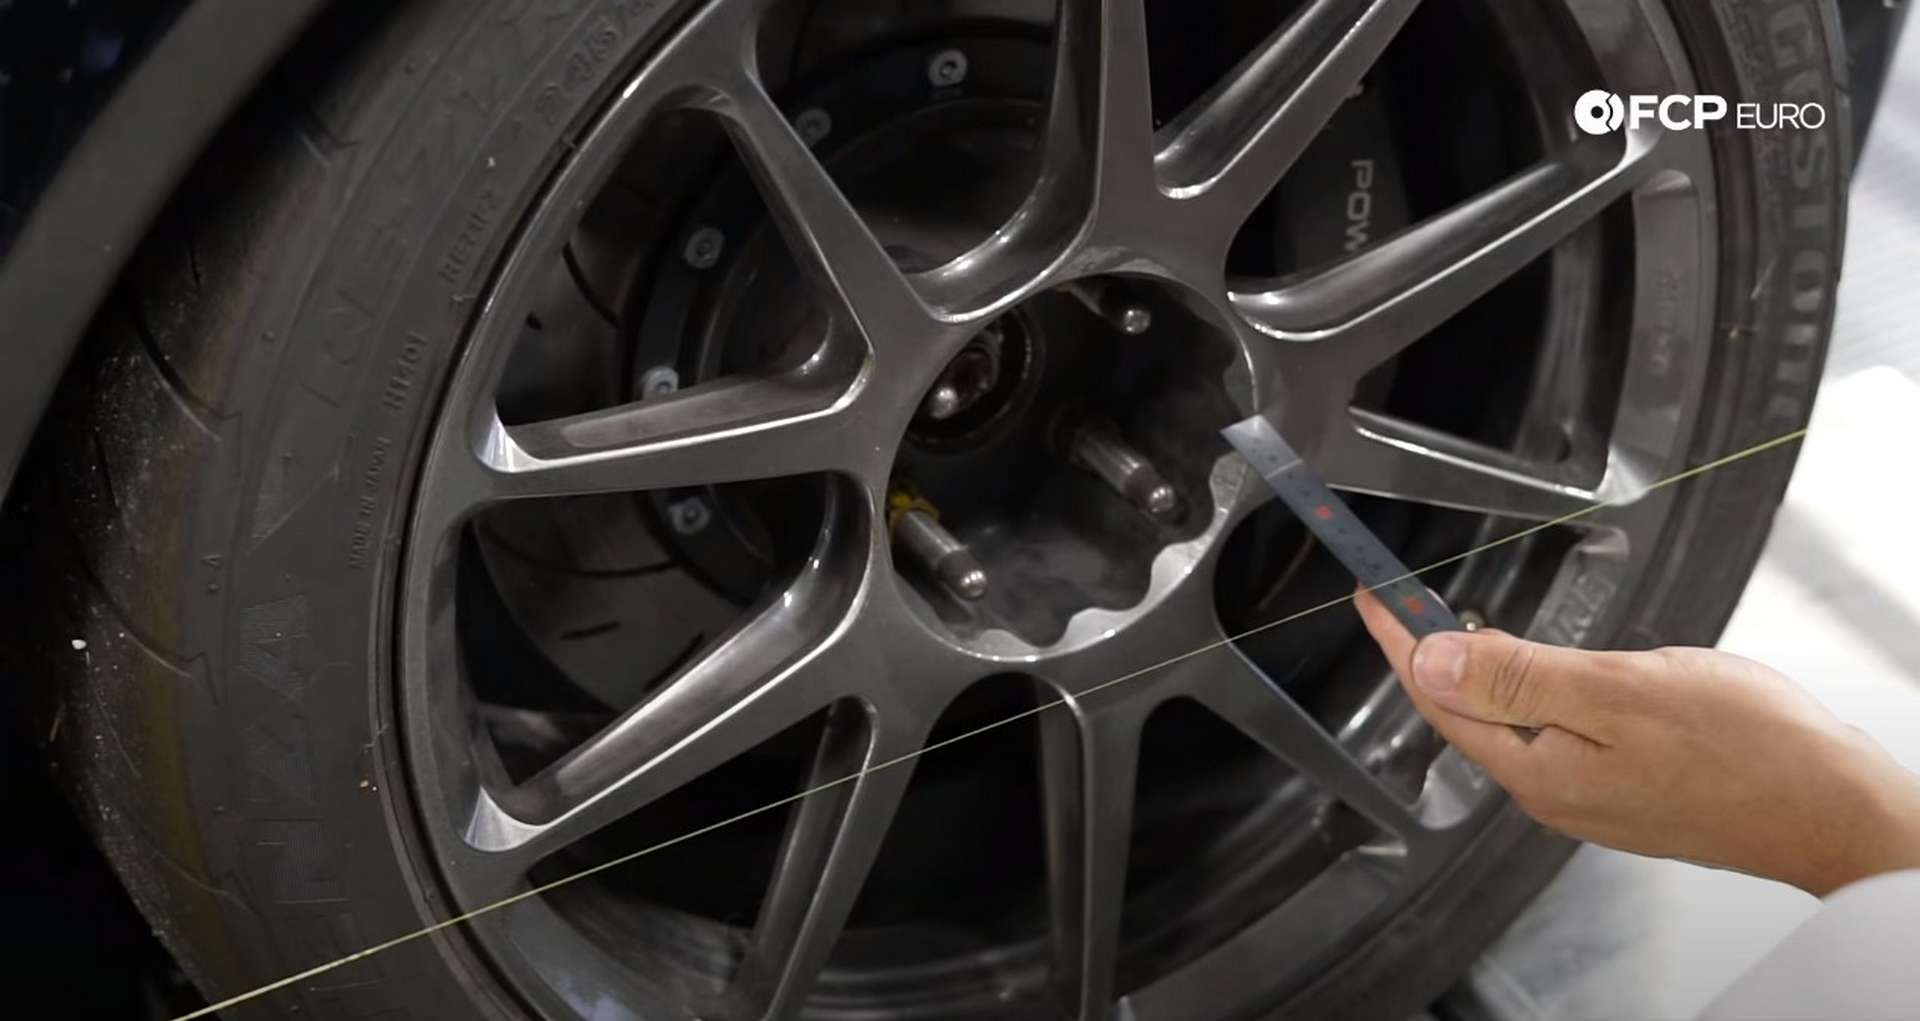
This step is where you indeed to start keeping track of the tire measurements. Set up a diagram and get measurements from the wheel's front edge, the wheel's center, and the wheel's rear edge.
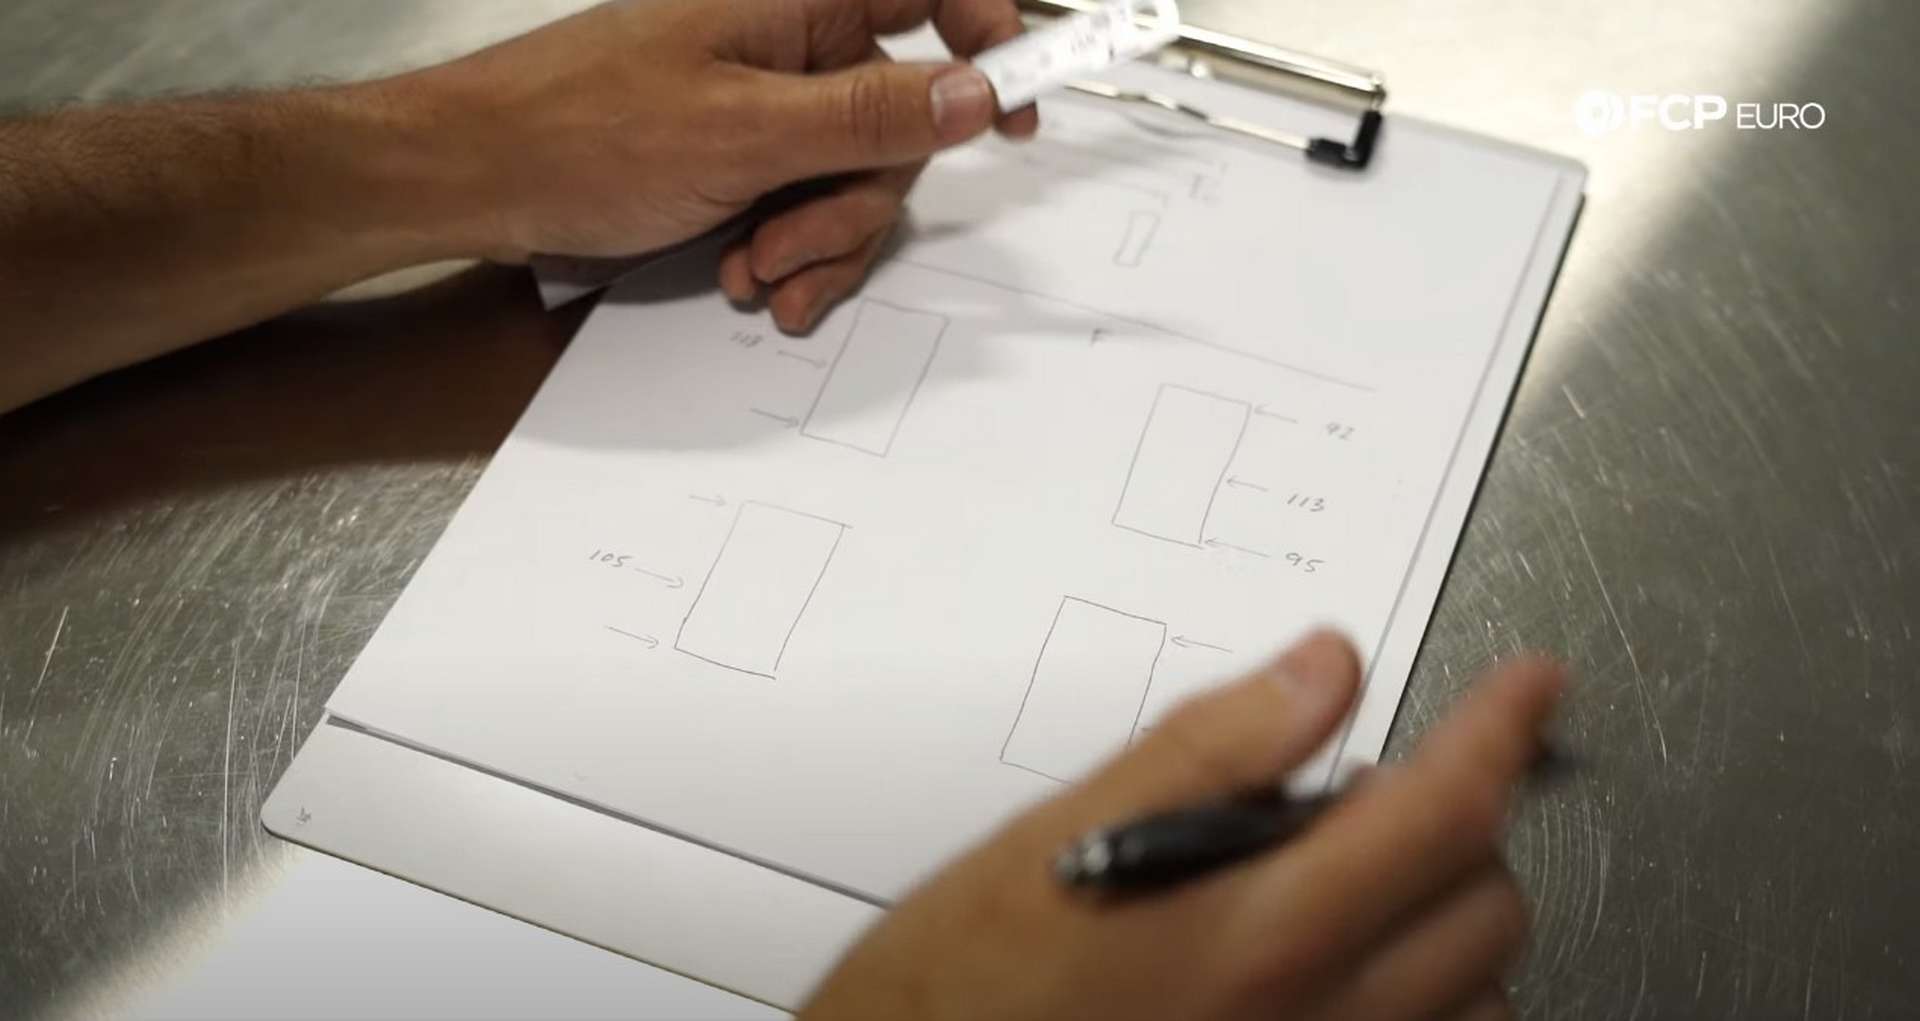
For us, the wheel's front edge had 92mm to the string, and the rear edge had 95mm to the string. Those measurements indicate that the car has 3mm of toe-out. Make the measurements for each wheel and then mark down the total toe for the front and rear wheels.
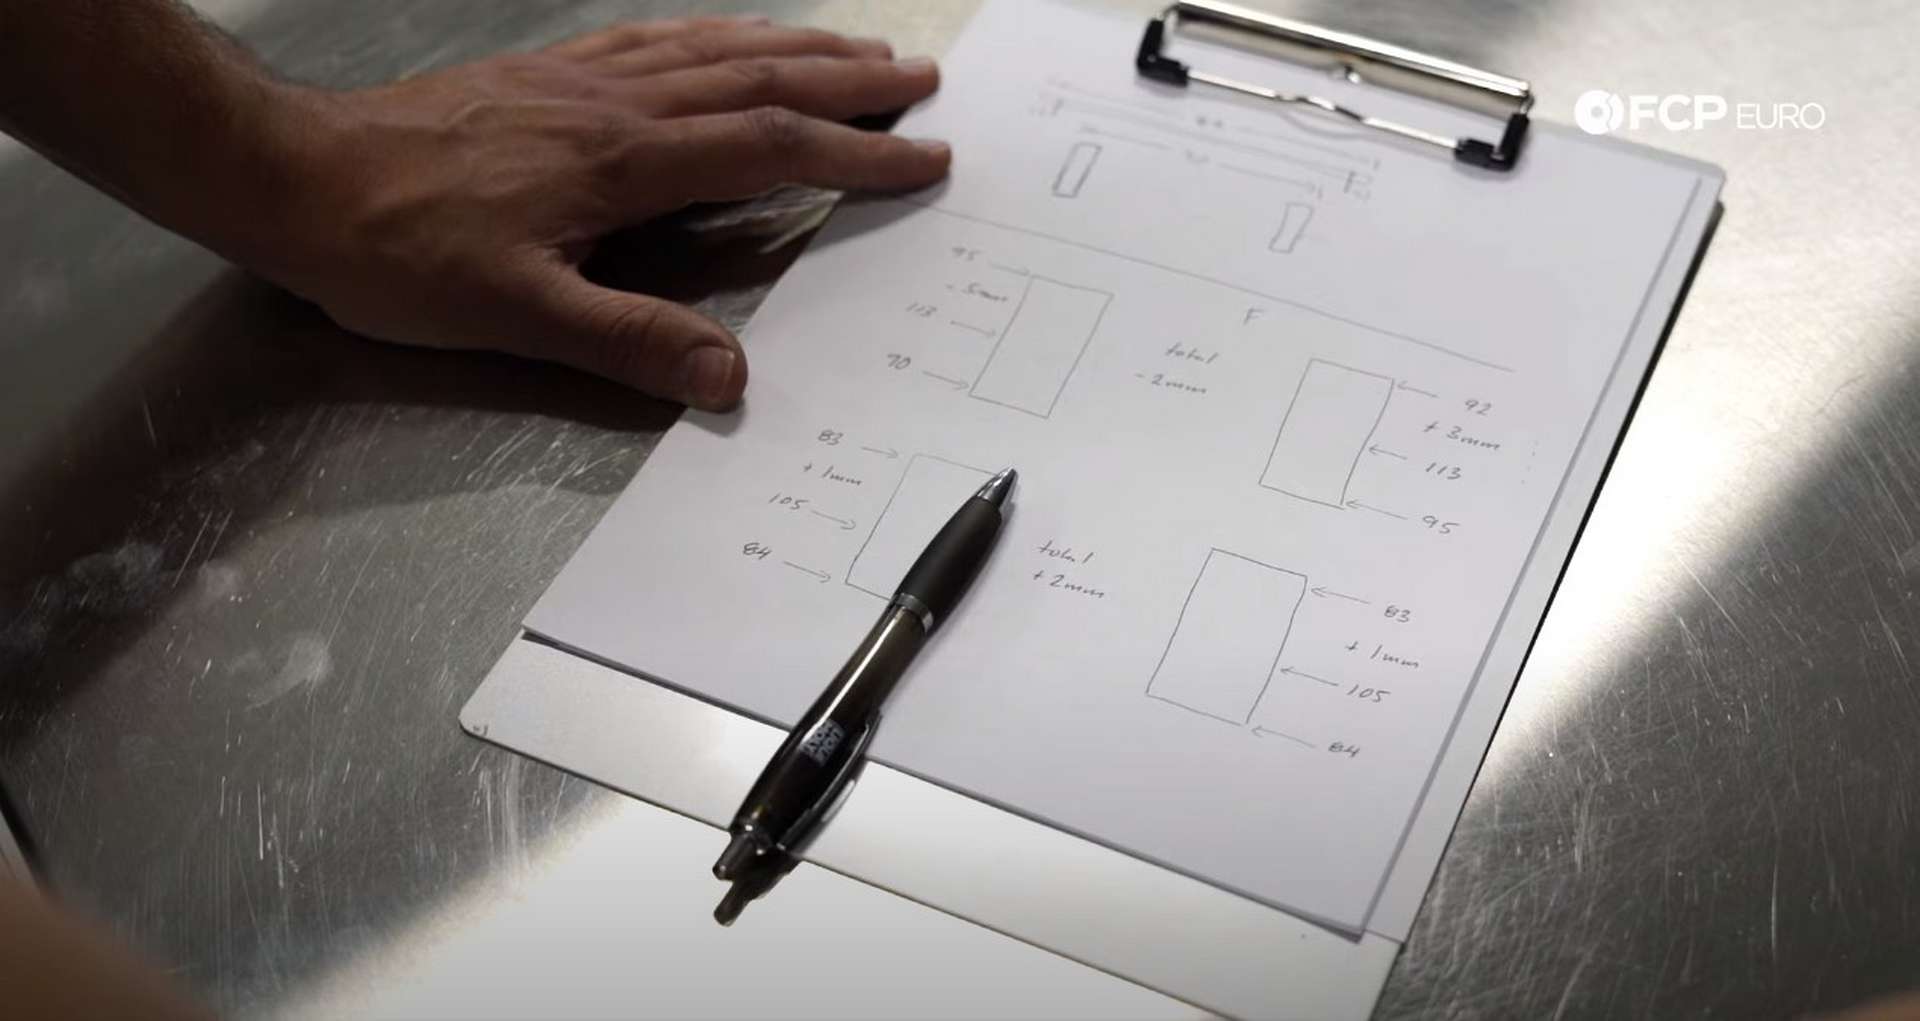
Compare your measurements to the factory alignment settings. The alignment sheet will give you the total amount of toe-in that your manufacturer requires for the front wheels. Split that in half, and you get the necessary amount of toe per wheel.
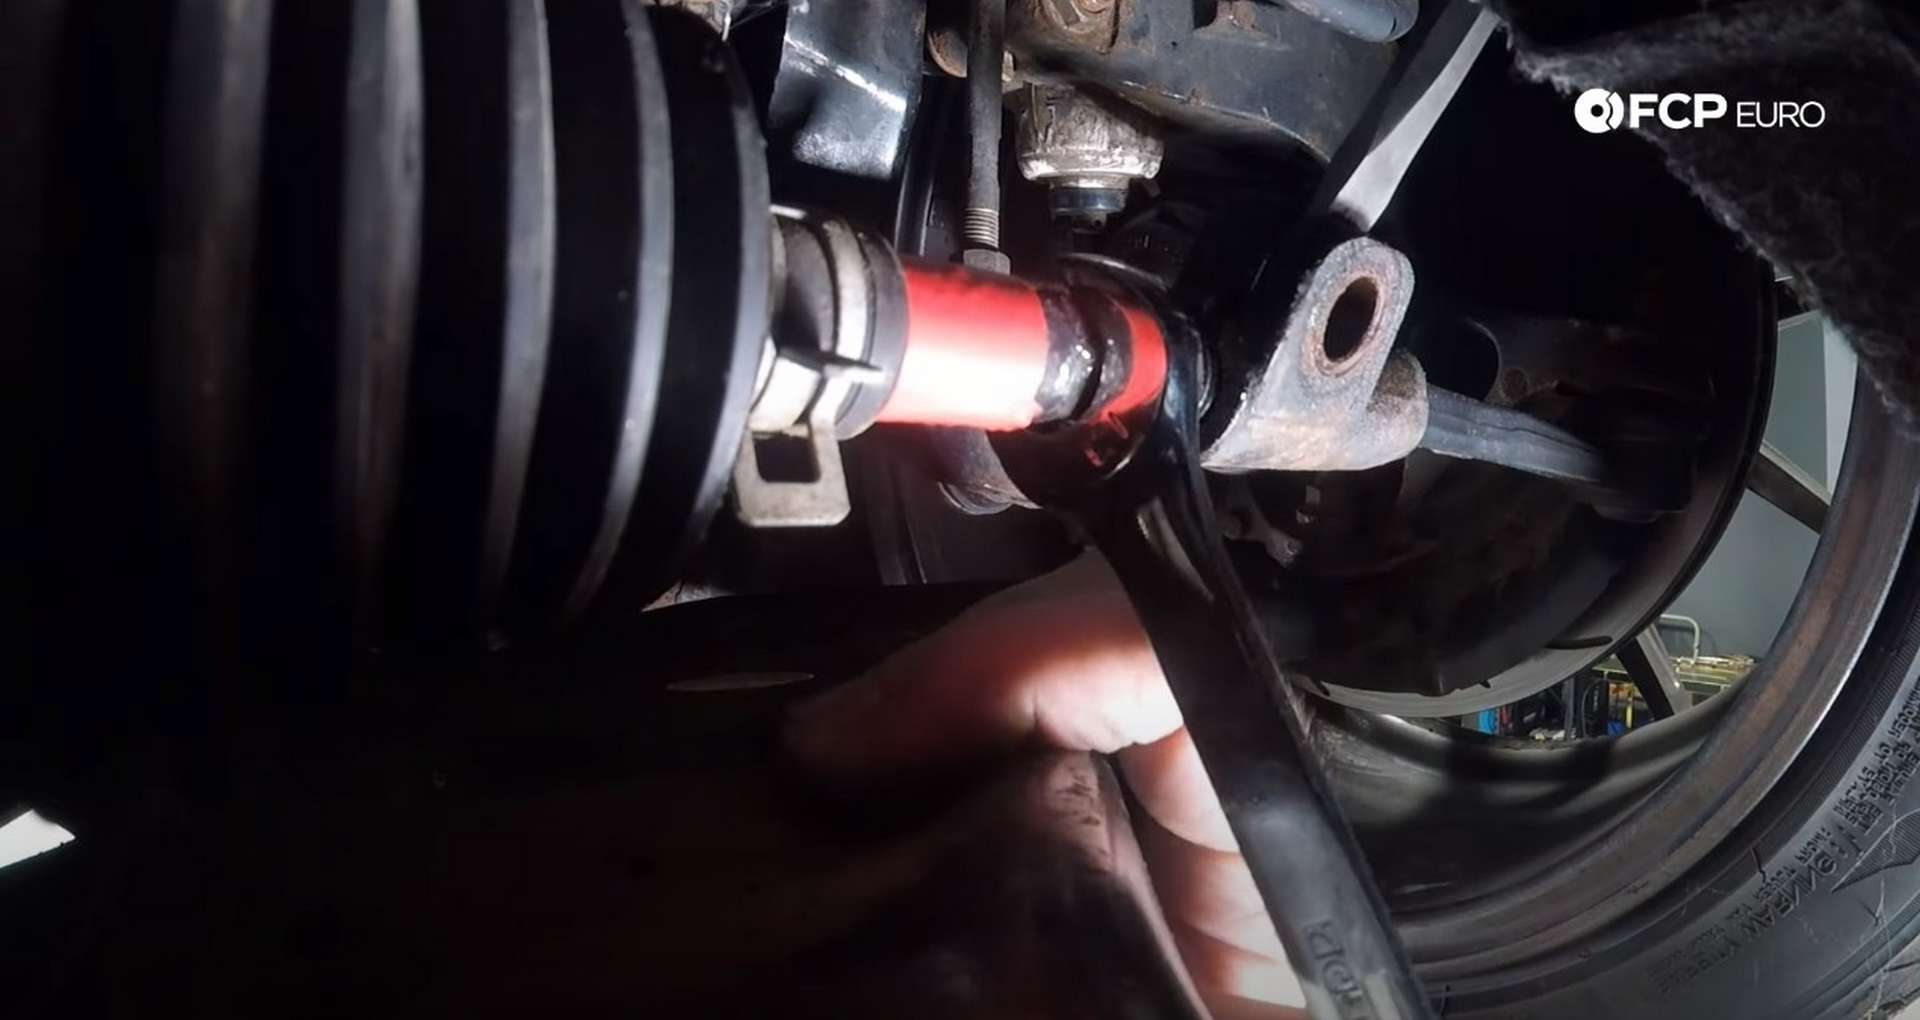
Next, jack up the front of the vehicle to adjust the toe. To do so, locate the tierod end on the knuckle. Then, loosen the locking fastener on the tierod end, whether it's a jam nut or a pinch bolt.
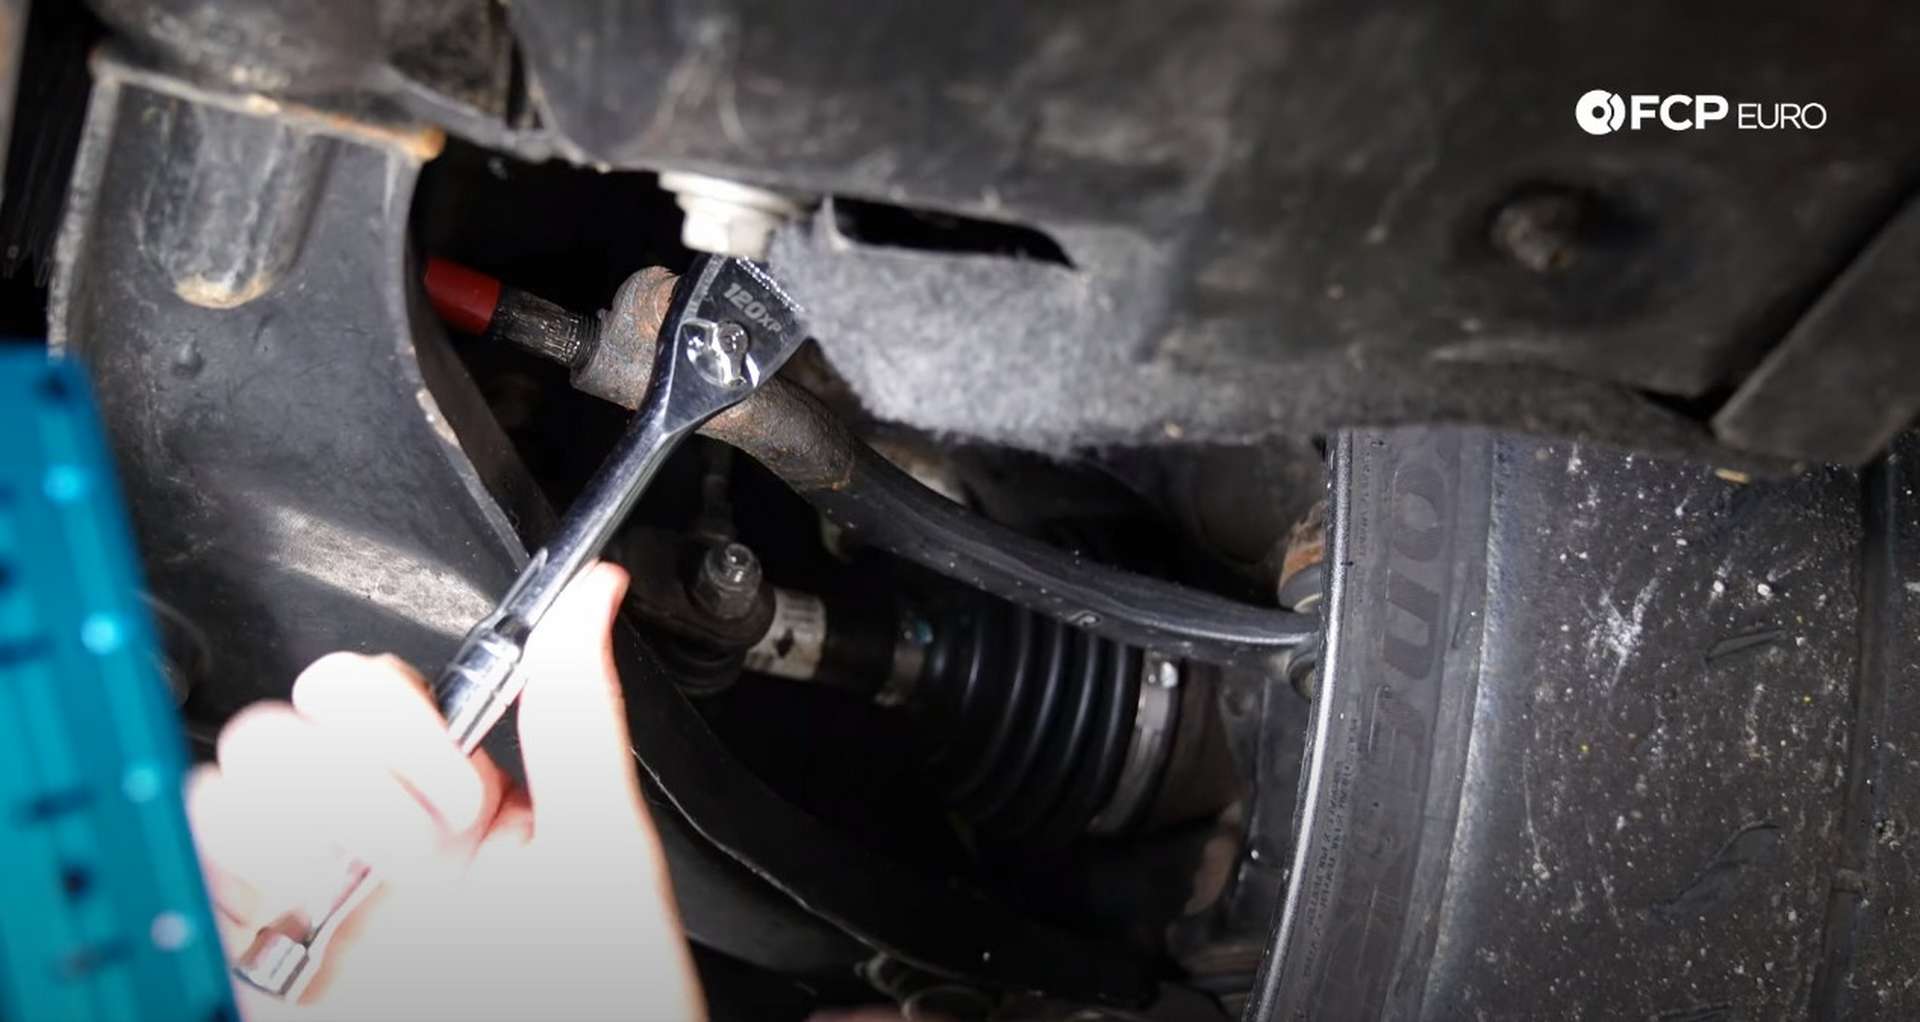
Next, make a mark on the tierod within an inch or two of the tierod end. Measure the distance between the tierod end and the mark, and use that to determine how much the wheel has moved in or out.

Find the correct wrench size for the tierod and rotate it to push or pull the wheel in or out. Lock the tierod once you have adjusted the toe to the amount that you need.
Place the car back onto the ground and roll it back and forth a few times to settle the suspension. Then, reposition the strings and recheck the alignment of the toe. If it is where it needs to be, move onto camber adjustment. If it needs more adjusting, jack it up and adjust it more.
Step 5: Adjust the camber
First, use a level and the angle finder to ensure the ground you're working on is completely flat. Uneven ground will give you inaccurate readings. To read the camber on your wheels, use a level or a straight edge to sit vertically across the face of the tire or wheel. Then place the angle finder against that straight edge to read the camber.
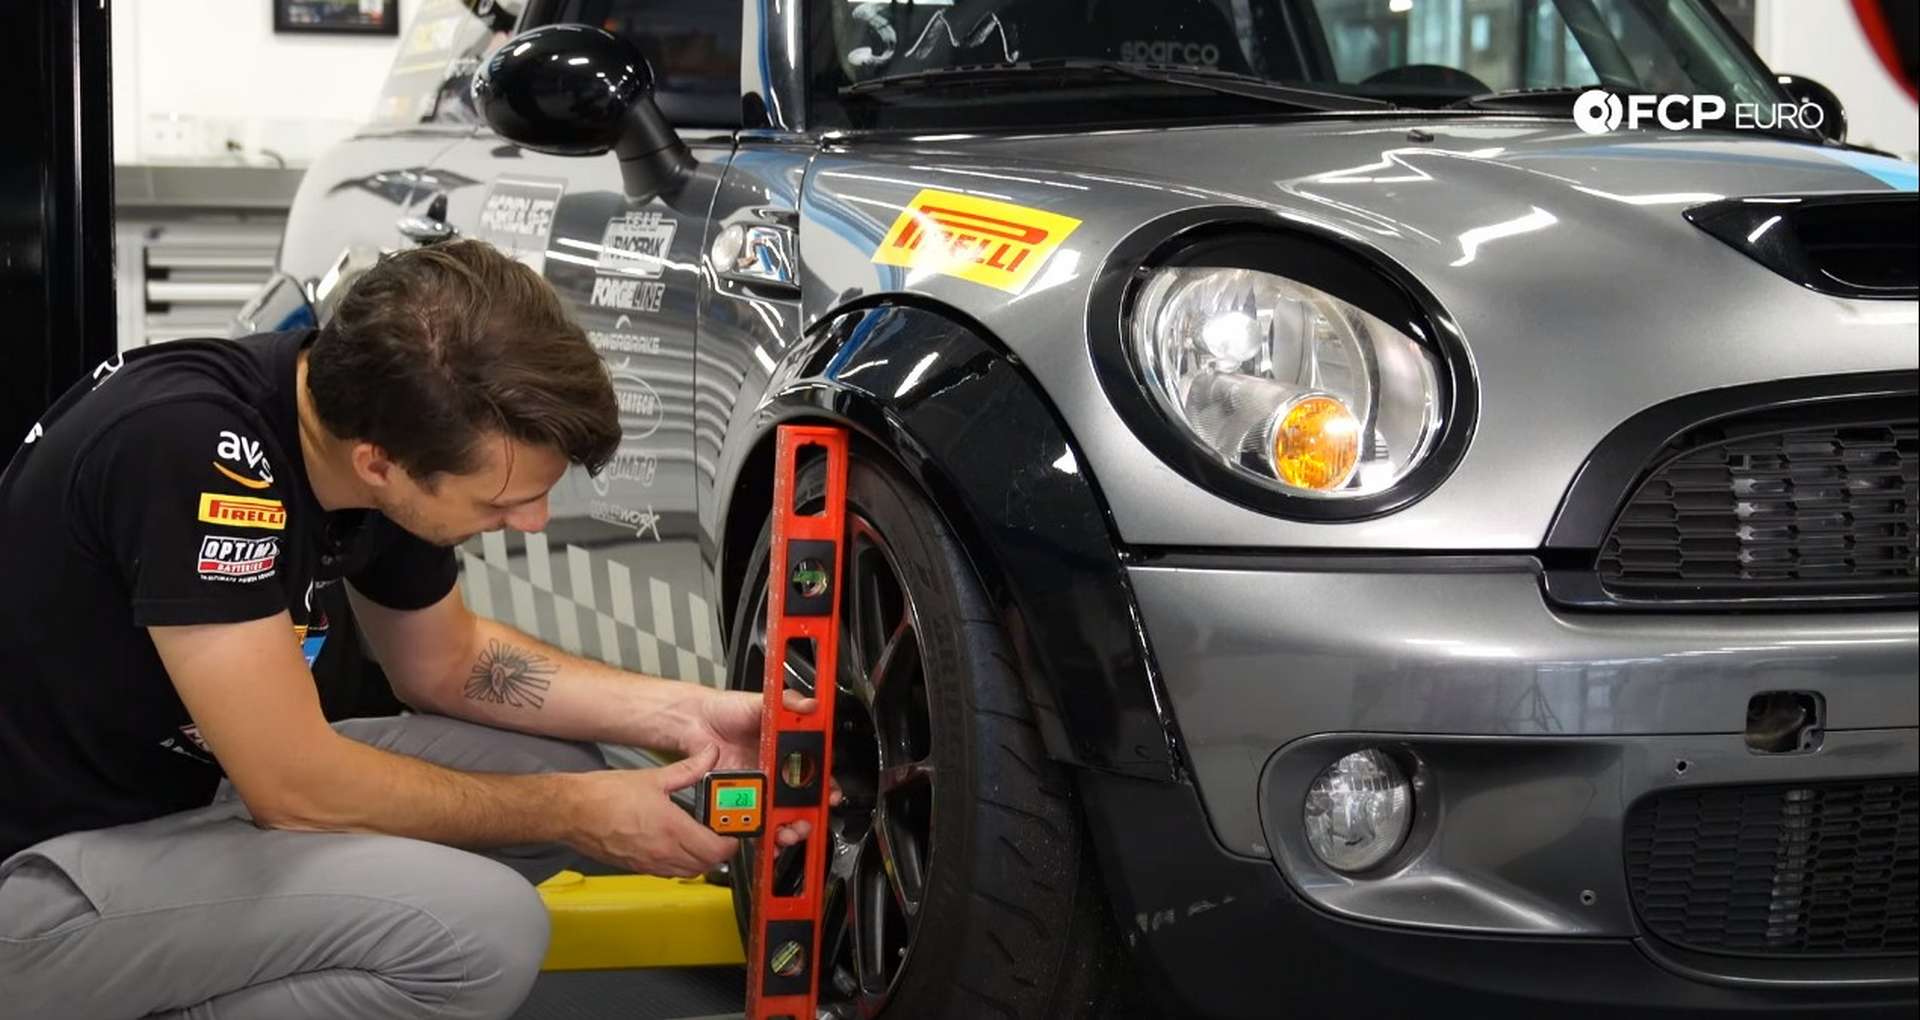
Record your measurements and compare them to the factory specs to determine how much each wheel has to be adjusted. Then jack up the front or rear of the car to adjust the camber. Cars with MacPherson struts will use an eccentric bolt to hold the strut to the knuckle. Loosen the nut, rotate the bolt to move the top of the knuckle in or out, and then tighten the nut to lock down the camber adjustment. If your vehicle features wishbone or multi-link suspension, you'll be able to move the upper or lower control arm to move the top or bottom of the wheel in or out. Once your adjustments have been made, set the car down to check your work.
With the camber and toe set to your specs or the factory specs, the alignment is complete. If you're interested in more DIYs for your European vehicle, you can visit fcpeuro.com or subscribe to our YouTube channel.